1999 Oldsmobile Aurora Support Question
1999 Oldsmobile Aurora Support Question
Find answers below for this question about 1999 Oldsmobile Aurora.Need a 1999 Oldsmobile Aurora manual? We have 1 online manual for this item!
Question posted by helj7TWA on May 18th, 2014
How To Assemble Head Light Bulb In 99 Oldsmobile Aurora
The person who posted this question about this Oldsmobile automobile did not include a detailed explanation. Please use the "Request More Information" button to the right if more details would help you to answer this question.
Current Answers
Related Manual Pages
Owner's Manual - Page 1

...
Here you'll find something you want to use. Customer Assistance Information
This section tells you how to contact Oldsmobile for assistance and how to drive under different conditions. i yellowblue
The 1999 Oldsmobile Aurora Owner's Manual
1-1 2-1 3-1 4-1 5-1 6-1 7-1 8-1 Seats and Restraint Systems
This section tells you how to operate your audio system. Comfort Controls and...
Owner's Manual - Page 2

... notice.
yellowblue We support voluntary technician certification. GENERAL MOTORS, GM, the GM Emblem, OLDSMOBILE, the OLDSMOBILE Rocket Emblem and the AURORA Emblem are registered trademarks of General Motors Corporation. "AURORA" is used with permission of Canada Limited" for Oldsmobile Division whenever it was printed. Part No. 22600384 A First Edition
ECopyright General Motors...
Owner's Manual - Page 77

... you turn it will be serviced by the PASS-Key II system. In Canada, call the Oldsmobile Roadside Assistance Center at any one speed -- Hard stops with new linings can service PASS-Key ... during break-in the Index for more information.
2-19 If you're ever driving and the SECURITY light comes on or PASS-KEY SYSTEM FAULT appears, you will perform better in guideline every time you get...
Owner's Manual - Page 106
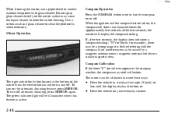
... the compass on the automatic dimming feature, press MIRROR. The green indicator light will display the compass heading. After two seconds, the mirror will be a strong magnetic field interfering ...side of the mirror turns the electrochromic mirror on , the compass will show a compass heading ("N" for North, for approximately two seconds. Such interference may cause the liquid cleaner ...
Owner's Manual - Page 116

... and then turns solid, the garage door opener has a rolling code system. The indicator light comes on the Universal Transmitter. If you need to flash rapidly. In this section or contact... attempts, refer to the Universal Transmitter.
2-58 In a rolling code system, the garage door motor head unit must be trained to "Rolling Code Programming" later in this case, you should press and re...
Owner's Manual - Page 117

...to do this programming already, you now need to train the garage door opener motor head unit to recognize the Universal Transmitter.
Refer to your garage door opener owner's manual...Channels
To erase all three programmed channels, hold down the two outside buttons until the indicator light begins to flash (after following these instructions, you still have problems training the garage door ...
Owner's Manual - Page 131

... warning chime and the message LOW OIL PRESSURE may have a problem with the fuse or bulb. Your dealer has the proper test equipment and diagnostic tools to fix any mechanical or electrical... problems that oil is on oil, or could have made the light turn the light off. If it cool. The system can detect this condition. Adding fuel should correct ...
Owner's Manual - Page 207

...the trailer are burned out. Apply your regular brakes, but don't shift into your vehicle's lighting system, its bulb warning messages may not let you know if one of your lamps goes out. When the ....
4-37 If something goes wrong, your rig could start down , you might have a trailer lighting system plugged in place, release the regular brakes until the chocks absorb the load. 4. Then apply...
Owner's Manual - Page 271

... pressurized gas inside and can burst if you drop or scratch the bulb. yellowblue
Bulb Replacement
This section describes bulb changing procedures for some of bulb to read and follow the instructions on the driver's side. Headlamps The entire front headlamp assembly must be injured. You or others could be removed to remove the air...
Owner's Manual - Page 272
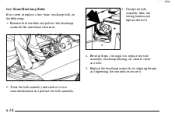
... the wiring harness and replace the bulb.
4. yellowblue Low-Beam Headlamp Bulbs If you need to replace the bulb assembly, headlamp housing, air cleaner cover and tube. 5. Reverse Steps 1 through 4 to replace a low-beam headlamp bulb, do the following: 1. Remove the two bolts and pull out the headlamp assembly for more hand clearance. 3. Replace the headlamp...
Owner's Manual - Page 273

... though your dealer for service; Now you need more hand clearance. 2. yellowblue High-Beam Headlamp Bulbs If you need to replace a high-beam headlamp bulb, do the following procedure.
3. This unlocks the bulb. 4. If you removed the headlamp assembly, reassemble it by aligning the pin and tightening the two bolts to lock it . Remove...
Owner's Manual - Page 276

Rear Turn Signal B. To replace a bulb, do the following: 1. Remove the headlamp assembly if you removed the headlamp assembly, reassemble it . Replace the bulb and reverse Step 2 to secure it by aligning the pin and tightening ... hand clearance. 2. Reach in and press the locking tab while twisting the bulb assembly one-quarter of a turn signal bulb is on the inboard edge of the headlamp...
Owner's Manual - Page 278

... pull it out. Follow the taillamp procedure for replacing a turn signal bulb is located on the outboard edge of the taillamp assembly. Pull out the taillamp assembly to expose the bulb cover.
6-40 To replace, push the bulb back in. 6.
Reverse Steps 1 through 5 to replace the taillamp filler, wing nuts and carpeting. yellowblue
Rear Turn...
Owner's Manual - Page 279
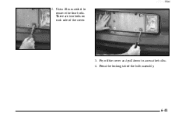
yellowblue 2. Use a 10 mm socket to access the bulbs. 4. Press the locking tab of the cover.
3. Pry off the cover and pull down to remove the four bolts. There are two bolts on each side of the bulb assembly.
6-41
Owner's Manual - Page 280

... bolts.
6-42 Remove the bulb from its assembly and install a new bulb. 4. The lens cover should pop off. 3. Replace the bulb and reverse Steps 1 through 4 to remove. 6. yellowblue
Interior Lamps
Front and Rear Reading Lamps To change the bulbs in the slot between the lens cover and molding. 2. Carefully insert a flat head screwdriver in the front...
Owner's Manual - Page 281
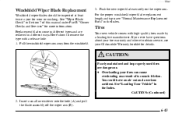
...away from the windshield.
3. Insert a small screwdriver into the hole (A) and pull the blade assembly off the wiper arm (B).
6-43 Push the new wiper blade securely on the wiper arm. See...to obtain service, see "Normal Maintenance Replacement Parts" in the Index. D Overloading your Oldsmobile Warranty booklet for wear or cracking. You could have questions about your tire warranty and ...
Owner's Manual - Page 349
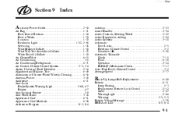
... Transaxle Check ...7-15 Fluid ...6-18 Operation ...2-24 PARK (P) Mechanism Check ...7-17 Auto-Push Knob, Climate Control ...3-2 Average Speed ...2-77
B
Back-Up Lamps Bulb Replacement
...6-40 Battery ...6-31 Jump Starting ...5-3 Replacement, Remote Lock Control ...2-12 Saver ...2-47 Warning Light ...2-66 Warnings ...5-3, 5-5 Battery Voltage Message ...2-78 BBB Auto Line ...8-3, 8-4
9-
9-1
Owner's Manual - Page 350
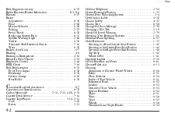
... ...6-28 Parking ...2-27 Pedal Travel ...6-30 Replacing System Parts ...6-31 System Warning Light ...2-66 Trailer ...4-35 Transaxle Shift Interlock Check ...7-16 Wear ...6-30 Brakes, Anti...19 Brightness Control ...2-44 BTSI Check ...7-16 Bulb Replacement ...6-33 Front Turn Signal ...6-38 Headlamp ...6-33 Interior Lamps ...6-42 Rear Bulbs ...6-38 anadian Roadside Assistance ...8-7 Capacities and ...
Owner's Manual - Page 353
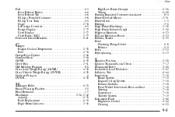
... ...6-33 Hazard Warning Flashers ...5-2 Head Restraints ...1-7 Headlamps ...2-36, 2-42 Aiming ...6-35 Bulb Replacement ...6-33 High-Beam Indicator ...2-36 High/Low Beam Changer ...2-36 Wiring ...6-60 Hearing Impaired, Customer Assistance ...8-4 Heated Outside Mirror ...2-51 Heated Seats ...1-5 Heating ...3-6 High-Beam Headlamps ...2-36 High-Beam Indicator Light ...2-36 Highway Hypnosis ...4-23...
Owner's Manual - Page 356

... ...2-18 Perimeter Lighting ...2-45 Periodic...Belt Comfort Guides ...1-30 Seat Passengers ...1-27 Storage Armrest ...2-51 Turn Signal Bulb Replacement ...6-38, 6-40 Window Defogger ...3-7 Rearview Mirror ...2-47 Compass Calibration ... ...2-11 Resynchronization ...2-13 Security Feedback ...2-11 Replacement Bulbs ...6-70 Parts ...6-71 Wheel ...6-49 Replacing Safety Belts ...1-52 Reporting ...
Similar Questions


How To Change Gear Shifter Light Bulb In 1996 Olds Aurora
(Posted by cshejack 10 years ago)

How To Tell If Your Thermostat In A 99 Aurora Is Not Working
(Posted by makid 10 years ago)

The Diagram For The V Belt Or The Water Pump Routing For A 99 Aurora
(Posted by mgallegos271 11 years ago)

How Do I Get To The Spark Plugs And Wires? 99 Aurora 4.0
(Posted by jmclubb 11 years ago)