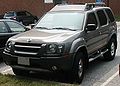
2004 Nissan Xterra Support Question
2004 Nissan Xterra Support Question
Find answers below for this question about 2004 Nissan Xterra.Need a 2004 Nissan Xterra manual? We have 1 online manual for this item!
Question posted by wkessel on May 18th, 2014
How To Remove Xterra Sun Shade
The person who posted this question about this Nissan automobile did not include a detailed explanation. Please use the "Request More Information" button to the right if more details would help you to answer this question.
Current Answers
Related Manual Pages
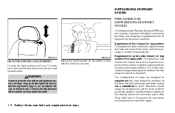
Owner's Manual - Page 11
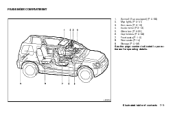
LII0034
Illustrated table of contents 0-5
Sunroof (if so equipped) (P. 2-39) Map lights (P. 2-41) Sun visors (P. 3-13) Inside mirror (P.3-13) Glove box (P. 2-30) Cup holders (P. 2-29) Front seats (P. 1-2) Rear seats (P.1-4) Storage (P. 2-26)
See the page number indicated in parentheses for operating details. PASSENGER COMPARTMENT
1. 2. 3. 4. 5. 6. 7. 8. 9.
Owner's Manual - Page 22
..., seat belts and supplemental air bags
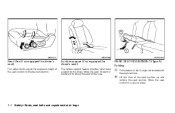
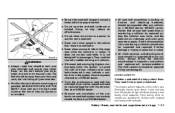
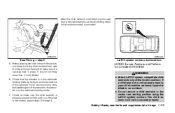
REAR SEAT ADJUSTMENT (Type A) Folding
1 2
Pull outward on the 2 straps at the bottom of the seat cushion up and remove the seat cushion. WRS0131
WRS0389
WRS0180
Seat lifter (if so equipped for driver's seat)
The lumbar support feature provides lower back support to the driver...
Owner's Manual - Page 24
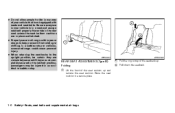
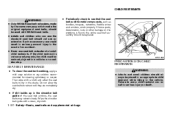
In a sudden stop . WRS0184 WRS0185 2 3
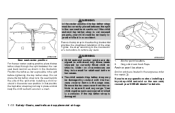
REAR SEAT ADJUSTMENT (Type B) Folding
1
Pull the ring on top of the seatback up and remove the seat cushion. Fold down the seatback.
Be sure everyone in your vehicle that is in a seat and using a seat belt properly. Lift the front ...
Owner's Manual - Page 26
... inflate on seat belt usage.)
WARNING
Head restraints should be adjusted properly as they may provide significant protection against injury in an accident.
Do not remove them . SUPPLEMENTAL RESTRAINT SYSTEM PRECAUTIONS ON SUPPLEMENTAL RESTRAINT SYSTEM
This Supplemental Restraint System (SRS) section contains important information concerning the driver and passenger supplemental front...
Owner's Manual - Page 41
... assemblies not in rear facing child restraints. The belt should be away from your face and neck, but not falling off your NISSAN dealer. ● Removal and installation of internal injuries in use during a collision be properly restrained. A lap belt worn too high could be inspected after any collision by a NISSAN...
Owner's Manual - Page 48
...; Adults and children who can result in serious injury or death.
1-30 Safety-Seats, seat belts and supplemental air bags Failure to dry in the shade. WARNING
● Only NISSAN seat belt extenders, made by the same company which made the original equipment seat belts, should be seriously injured in a collision...
Owner's Manual - Page 51
... manufacturer's instructions for a very tight fit by pulling forcefully on the lap belt adjustment.
Before placing the child in the lap belt for belt routing. Remove all slack in the child restraint, use . It should not move more than 1 inch (25mm). 5. Be sure to tighten the belt again, or put the...
Owner's Manual - Page 52
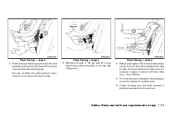
... air bags WRS0266
WRS0267
WRS0268
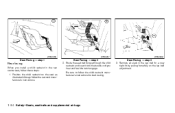
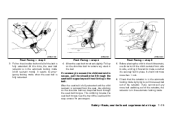
Rear Facing - step 1
Rear facing
When you hear and feel the latch engage.
Rear Facing - step 3 3. Always follow these steps: 1. Remove all slack in the rear center seat, follow the restraint manufacturer's instructions.
Owner's Manual - Page 54
... retracted. Pull up on the shoulder belt until you hear and feel the latch engage. WRS0250
WRS0251
WRS0146
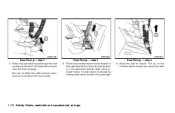
Front Facing - step 2 2. Allow the belt to remove any slack in the automatic locking mode (child restraint mode). Pull on the shoulder belt to retract. Route the seat belt tongue through the child...
Owner's Manual - Page 55
... bags 1-37 WRS0252
WRS0273
Front Facing - step 5 5. Before placing the child in a rear outboard seat, follow the restraint manufacturer's instructions. After the child restraint is removed and the seat belt is fully retracted, the automatic locking mode (child restraint mode) is not locked, repeat steps 3 through 6. If you install a child restraint...
Owner's Manual - Page 56
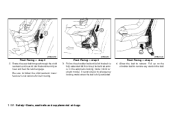
... belt until you hear and feel it into the buckle until all of the belt is fully extended. Rear Facing - step 4 4. It reverts back to remove any slack in the automatic locking mode (child restraint mode). WRS0309
WRS0260
WRS0253
Rear Facing - step 2 2. Be sure to retract.
Owner's Manual - Page 57
... LATCH system anchors. It should not move more than 1 inch (25mm). 6. Safety-Seats, seat belts and supplemental air bags 1-39 After the child restraint is removed and the seat belt is fully retracted, the automatic locking mode (child restraint mode) is in the automatic locking mode by trying to pull more...
Owner's Manual - Page 59
... Tongue and buckle fastened
TOP TETHER STRAP CHILD RESTRAINT
This vehicle is placed between the seat back and child restraint.
Tighten the strap according to remove any slack. For the rear outboard seating positions, place the top tether strap over the seat back as shown in the rear cargo area for...
Owner's Manual - Page 60
Remove the tonneau cover from the vehicle or secure it and any slack. WRS0232
Rear seat center position For...the child restraint secure in the split before tightening the top tether strap.
Tighten the strap according to the manufacturer's instructions to remove any cargo. Under no circumstances are designed to the side of the strap. If you have any questions when installing a ...
Owner's Manual - Page 63
...the retractor is fully extended.
It reverts to emergency locking mode when the seat belt is removed from side to side, and tug it forward to make sure that the retractor is securely ...held in the automatic locking mode by trying to remove any more than 1 inch. 6. WRS0160
WRS0161
WRS0380
Front Facing - step 3 3. Pull on the...
Owner's Manual - Page 64
After the child restraint is removed and the seat belt is fully retracted, the automatic locking mode (child restraint mode) is properly secured prior to each use. 7. Check to make sure the child restraint is canceled.
1-46 Safety-Seats, seat belts and supplemental air bags If the seat belt is not locked, repeat steps 3 through 6.
Owner's Manual - Page 67
Manual windows ...2-38 Sunroof (if so equipped)...2-39 Manual sunroof...2-39
Removing/installing ...2-40 Interior lights ...2-40 Map lights (if so equipped) ...2-41
Owner's Manual - Page 106
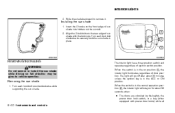
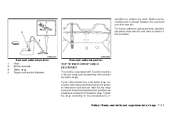
... the sun shade
WIC0348
LIC0630
REMOVING/INSTALLING
WARNING
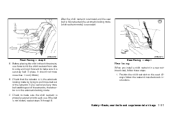
Do not remove or install the sun shade while driving so full attention may be given to remove it. 1. Turn each lock bolt counterclockwise while supporting the sun shade.
2-40 Instruments and controls The light will stay on the rear edge of sun shade with power door locks) while all
Removing the sun shade
1. Slide the shade...
Owner's Manual - Page 182
... ungrounded connection.
Keep snow clear of snowdrifts. ● Extra window washer fluid to assist in shaded areas. WARNING
Do not use the cruise control on slippery roads. ● Snow can be ...refill the reservoir tank.
● Allow more traction. Braking should be slick and very hard to remove ice and snow from around your heater with care. Try not to brake while on the ice...
Owner's Manual - Page 201
... fabric protectors contain chemicals that may damage the lens cover. GLASS
Use glass cleaner to remove smoke and dust film from the interior trim, plastic parts and seats using any similar material... Small dirt particles can be abrasive and damaging to clean the underbody regularly in the hot sun. They could discolor the wheels. CAUTION
When cleaning the inside of corrosion on meter or ...
Similar Questions


Car Manual How To Remove The Bumper Of A 2000 Nissan Xterra
(Posted by razBettyD 10 years ago)

How To Remove Washer Fluid Tank From 2004 Nissan Xterra
(Posted by bricryan 10 years ago)
