2004 Nissan Xterra Support Question
2004 Nissan Xterra Support Question
Find answers below for this question about 2004 Nissan Xterra.Need a 2004 Nissan Xterra manual? We have 1 online manual for this item!
Question posted by richardwhitegap on November 6th, 2012
Problem Removing Headliner
i'm having a problem removing my seat belt covers
Current Answers
Related Manual Pages
Owner's Manual - Page 1
... will be seated in the rear seat. ● ALWAYS provide information about the proper use your seat belts and appropriate child restraint systems. Pre-teen children should not be covered under NISSAN ...Be sure to you may even violate governmental regulations. In addition, damage or performance problems resulting from an ordinary passenger car because it has a higher center of gravity for...
Owner's Manual - Page 22
... seat cushion up and remove the seat cushion. Move the lever forward or backward to the driver.
Lumbar support (if so equipped for driver's seat)
Turn either dial to adjust the angle and height of the seat cushion to the desired position. Lift the front of the seat cushions. Store the seat cushion in a secure place.
1-4 Safety-Seats, seat belts...
Owner's Manual - Page 24
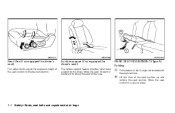
...WRS0184 WRS0185 2 3
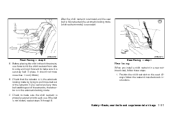
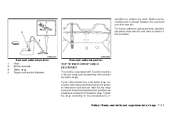
REAR SEAT ADJUSTMENT (Type B) Folding
1
Pull the ring on top of the seat cushion up .
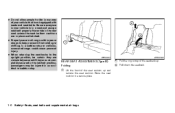
Lift the front of the seatback up and remove the seat cushion. ● Do ...they are in the rear seat unless the seat bottom cushions are completely secured.
Never ride in place and latched. ● Properly secure all cargo with seats and seat belts. Fold down the seatback...
Owner's Manual - Page 26
... (if so equipped): This system can help cushion the impact force to inflate on seat belt usage.)
WARNING
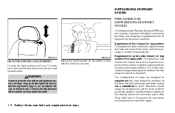
Head restraints should always be adjusted properly as they may provide significant protection against injury in an accident. Do not remove them . WRS0133 WRS0134
HEAD RESTRAINT ADJUSTMENT
To raise the head restraint, pull it up...
Owner's Manual - Page 41
... and neck, but not falling off your NISSAN dealer. ● Removal and installation of internal injuries in rear facing child restraints. See your shoulder. ● Position the lap belt as low and snug as possible AROUND THE HIPS, NOT THE WAIST. Safety-Seats, seat belts and supplemental air bags 1-23 It is securely fastened to...
Owner's Manual - Page 51
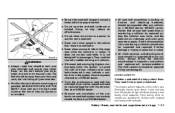
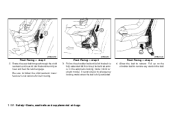
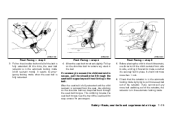
... use force to tilt the child restraint from side to side, and tug it into the buckle until you hear and feel the latch engage. Remove all slack in place. Front Facing - step 4 4. Safety-Seats, seat belts and supplemental air bags 1-33
Check to make sure it is properly secured prior to tighten the...
Owner's Manual - Page 52
Rear Facing - step 2 2. Remove all slack in the rear center seat, follow these steps: 1. Always follow the child restraint manufacturer's instructions for a very tight fit by pulling forcefully on the seat as illustrated.
Position the child restraint on the lap belt adjustment.
1-34 Safety-Seats, seat belts and supplemental air bags
Route the seat belt tongue through the child ...
Owner's Manual - Page 54
....
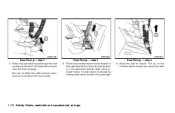
Pull on the shoulder belt to emergency locking mode when the belt is in the belt.
1-36 Safety-Seats, seat belts and supplemental air bags It reverts back to remove any slack in the automatic locking mode (child restraint mode). At this time, the belt retractor is fully retracted. Front Facing - step 3 3. Route the seat belt tongue through the child...
Owner's Manual - Page 55
... trying to each use force to tilt the child restraint from side to side, and tug it is in a rear outboard seat, follow the restraint manufacturer's instructions. After the child restraint is removed and the seat belt is fully retracted, the automatic locking mode (child restraint mode) is not locked, repeat steps 3 through 6. Safety...
Owner's Manual - Page 56
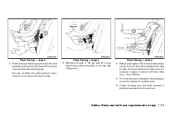
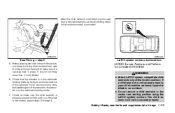
... to follow the child restraint manufacturer's instructions for belt routing. Allow the belt to remove any slack in the automatic locking mode (child restraint mode). Pull up on the shoulder belt until you hear and feel it engage. WRS0309
WRS0260
WRS0253
Rear Facing - step 2 2. Route the seat belt tongue through the child restraint and insert it...
Owner's Manual - Page 57
... restraint will not be seriously injured or killed in an accident. ● Do not secure a child restraint in place. After the child restraint is removed and the seat belt is fully retracted, the automatic locking mode (child restraint mode) is not locked, repeat steps 3 through 6. Check to make sure it forward to make...
Owner's Manual - Page 59
... and buckle fastened
TOP TETHER STRAP CHILD RESTRAINT
This vehicle is placed between the seat back and child restraint. Safety-Seats, seat belts and supplemental air bags 1-41
For the rear outboard seating positions, place the top tether strap over the seat back as shown in - If your child restraint has a top tether strap, secure the...
Owner's Manual - Page 60
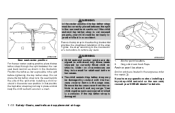
... point locations
Anchor points are designed to be used for details.
1-42 Safety-Seats, seat belts and supplemental air bags Remove the tonneau cover from the vehicle or secure it and any slack. WRS0232
Rear seat center position For the rear center seating position, place the top tether strap through the split between the split in the...
Owner's Manual - Page 63
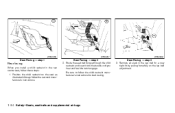
... mode when the seat belt is fully extended. Check that it forward to remove any more belt webbing out of the seat back for easy access for passengers. Pull on the shoulder belt until all of the retractor.
It should not move more seat belt out of the belt is fully retracted.
Front Facing - step 5 5.
Safety-Seats, seat belts and supplemental air...
Owner's Manual - Page 64
After the child restraint is removed and the seat belt is fully retracted, the automatic locking mode (child restraint mode) is properly secured prior to each use. Check to make sure the child restraint is canceled.
1-46 Safety-Seats, seat belts and supplemental air bags If the seat belt is not locked, repeat steps 3 through 6. 7.
Owner's Manual - Page 97

...up on the lever to ride in a seat and using a seat belt properly. A power outlet is located inside...seats and seat belts. ● Be sure everyone in your vehicle is in any area of a vehicle. Instruments and controls 2-31
LUGGAGE HOOKS
The tie down hooks can be seriously injured or killed. ● Do not allow anyone to help prevent it from sliding or shifting. Remove the access hole cover...
Owner's Manual - Page 105

... open sunroof when gear basket is opened with gear basket" in place. ● Always remove the gear basket before opening. ● Do not place heavy objects on the sunroof or...tilted position 2 . The sunroof may be removed. Pull the handle forward to unlock 1 , then push the handle up to lock the sunroof closed 2 .
Always use seat belts and child restraints.
The sunroof cannot be ...
Owner's Manual - Page 158
... and rollovers. Always wear your passengers to die than a person wearing a seat belt. Seat belts help reduce the risk of control or vehicle rollover. This gives them capable of...Changes or modifications not expressly approved by the manufacturer compliance could cause you to anticipate problems. However, they are designed to slide sideways. This device complies with other vehicles...
Owner's Manual - Page 163
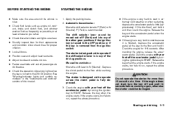
...engine starts. ● If the engine is very hard to start because it is removed from the ignition switch. Starting and driving 5-9 The starter is designed not to the...for proper inflation. ● Lock all doors. ● Position seat and adjust head restraints. ● Adjust inside and outside mirrors. ● Fasten seat belts and ask all windows and lights are clean. ● Visually...
Owner's Manual - Page 188

... cap and turn the jack rod counterclockwise to scratch the wheel cover or wheel surface. Seat the T-shaped end of the jack rod into the T-shaped opening of a screwdriver with a cloth. 2. Once the spare tire is completely lowered, reach under the vehicle, remove the retainer chain, and carefully slide the tire from under...
Similar Questions


How To Remove Washer Fluid Tank From 2004 Nissan Xterra
(Posted by bricryan 10 years ago)


How To Fix Seat Belt Retracter On 01 Exterra
its stuck in the extended position and wont retract.
its stuck in the extended position and wont retract.
(Posted by retired5530 11 years ago)