
2010 Mercury Milan Support Question
2010 Mercury Milan Support Question
Find answers below for this question about 2010 Mercury Milan.Need a 2010 Mercury Milan manual? We have 8 online manuals for this item!
Question posted by saaugi on March 16th, 2014
How To Remove A Headliner From A 2006 Mercury Milan
The person who posted this question about this Mercury automobile did not include a detailed explanation. Please use the "Request More Information" button to the right if more details would help you to answer this question.
Current Answers
Related Manual Pages
Owner's Manual - Page 4
... vehicle, the greater the safety and pleasure you will automatically cut off switch in separate publications. For more you know and understand about your new Mercury. Introduction
CONGRATULATIONS Congratulations on Ford Motor Company and its products visit the following website: • In the United States: www.ford.com • In Canada...
Owner's Manual - Page 18
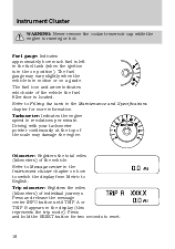
... message center INFO button until TRIP A or TRIP B appears in the Maintenance and Specifications chapter for two seconds to reset.
18 Instrument Cluster
WARNING: Never remove the coolant reservoir cap while the engine is located.
Refer to English.
Press and hold the RESET button for more information. The fuel icon and...
Owner's Manual - Page 27

... perimeter alarm system is armed and the vehicle is operating and senses a vehicle. Instrument Cluster
TRUNK AJAR - Displayed when the trunk is 10% or less. REMOVE OBJECTS NEAR PASS SEAT - Displayed when objects are blocked. ENGINE OIL CHANGE SOON - Displayed when the engine oil life remaining is not completely closed. VEHICLE...
Owner's Manual - Page 31

... side up . When the display reads LOAD CD#, load the desired disc, label side up to remove them. 31 The system will begin where it ended last. When the system has ejected the CD,... system will begin to play will prompt you want to play . For a CD6 system- Press LOAD. Remove the CD. To auto eject all stations playing that selection or press SCAN for a brief sampling of music...
Owner's Manual - Page 47

... fog potential. 11. Operating tips • To reduce fog build-up inside the vehicle, do not drive with recirculated air to the back seats. • Remove any airflow mode except (defrost). Recirculation may turn off . automatically in MAX A/C, Outside temperature (if equipped): The outside temperature will appear in all airflow modes...
Owner's Manual - Page 54

... blower fan speed from the highest setting and put objects under the front seats that will interfere with the airflow to the back seats. • Remove any snow, ice or leaves from your A/C system. Set the temperature to maintain comfort. 54 For maximum cooling performance: • Automatic operation: 1. Set highest fan...
Owner's Manual - Page 55
... automatically after a predetermined amount of fog and thin ice. To manually turn the rear window defroster on the Press R button will not be running to remove decals from the inside or the rear window. Direct the outer instrument panel vents towards the side windows. to clear the rear window of time...
Owner's Manual - Page 63
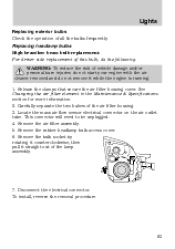
... the air filter housing cover. Locate the mass air flow sensor electrical connector on the air outlet tube. To install, reverse the removal procedure.
63 Disconnect the electrical connector. Remove the air filter assembly. 5. See Changing the air filter element in the Maintenance & Specifications section for more information. 2. This connector will need...
Owner's Manual - Page 64
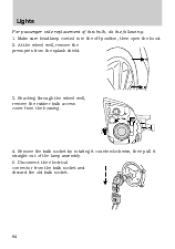
... press pins from the bulb socket and discard the old bulb socket.
64 Remove the bulb socket by rotating it counterclockwise, then pull it straight out of this .... 2. Disconnect the electrical connector from the splash shield.
3. Reaching through the wheel well, remove the rubber bulb access cover from the housing.
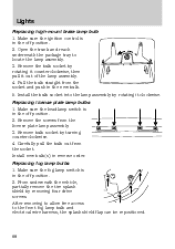
4. Lights
For passenger side replacement of the lamp assembly. 5.
Owner's Manual - Page 65
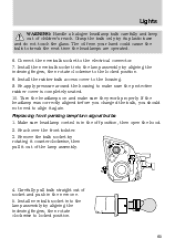
... the off position, then open the hood. 2. The oil from your hand could cause the bulb to the electrical connector. 7. Reach over the front bolster. 3. Remove the bulb socket by its plastic base and do not touch the glass. Grasp the bulb only by rotating it counterclockwise, then pull it again...
Owner's Manual - Page 66
...assembly. Make sure the headlamp control is equipped with a new bulb, and reverse the removal steps to complete the process. Rotate the lamp clockwise while holding the electrical connector in ...trunk side panel (dark grey, soft wheelhouse side trim panel) at the lamp area. 3. After removing to allow free access to the front side marker lamp bulb and electrical wire harness, the splash shield...
Owner's Manual - Page 67
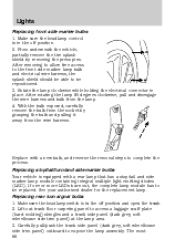
.... 6. Install the bulb socket into the lamp assembly by rotating it clockwise. 7. Remove the bulb socket by removing 3 to 4 pin-type retainers to expose the lamp assembly. 3. Carefully reposition the...4. Install trunk floor carpeting panel. Doing so may result in the new bulb. 5. Remove the bulb socket by rotating it counterclockwise, then pulling it out of the trunk floor...
Owner's Manual - Page 68
...it clockwise. Install the bulb socket into the lamp assembly by turning counterclockwise. 4. After removing to allow free access to locate the lamp assembly. 3. Open the trunk and reach underneath...and push in reverse order. Make sure the fog lamp switch is in the off position. 2. Remove bulb socket by rotating it out of the lamp assembly. 4. Make sure the ignition control is ...
Owner's Manual - Page 69
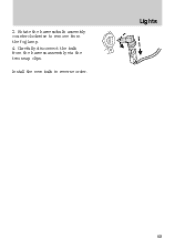
Lights
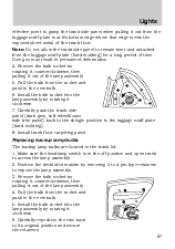
3. Install the new bulb in reverse order.
69 Carefully disconnect the bulb from the fog lamp. 4. Rotate the harness/bulb assembly counterclockwise to remove from the harness assembly via the two snap clips.
Owner's Manual - Page 71

... it rearward for additional sunlight coverage. Driver Controls
TILT/TELESCOPE STEERING WHEEL To adjust the steering wheel: 1. Note: To stow the visor back into the headliner, visor must be retracted before moving . Slide-on the visor mirror lamps.
Owner's Manual - Page 79
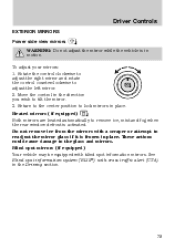
Move the control in place. Do not remove ice from the mirrors with a scraper or attempt to readjust the mirror glass if it is ...control clockwise to adjust the right mirror and rotate the control counterclockwise to the glass and mirrors. Return to the center position to remove ice, mist and fog when the rear window defrost is in motion. See Blind spot information system (BLIS ) with blind ...
Owner's Manual - Page 235
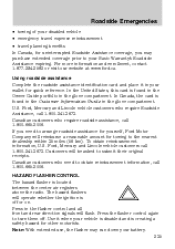
... the ignition is located between the center air registers above the radio. Ford, Mercury and Lincoln vehicle customers who need to arrange roadside assistance for yourself, Ford Motor Company... will be asked to submit their original receipts. Ford, Mercury and Lincoln vehicle customers call 1-800-665-2006. HAZARD FLASHER CONTROL The hazard flasher is off . Press the flasher ...
Owner's Manual - Page 271

... CARE PRODUCTS Your Ford or Lincoln Mercury authorized dealer has many quality products available to complement the style and appearance of equivalent quality: Motorcraft Bug and Tar Remover (ZC-42) Motorcraft Custom Bright Metal Cleaner (ZC-15) Motorcraft Custom Clear Coat Polish (ZC-8-A) Motorcraft Detail Wash (ZC-3-A) Motorcraft Dusting Cloth (ZC-24...
Roadside Assistance Card 1st Printing - Page 2
... 5 p.m.
We have any questions.
Please keep a card handy - it includes the Mercury Commitment hotline number for customer service or Roadside Assistance. Towing and emergency services are provided by... of California, Inc., Thousand Oaks, CA.
If traveling in Canada, call 800 665-2006.
in U.S.A.
covered by and/or through Cross Country Motor Club of California, Inc., ...
Quick Reference Guide 1st Printing - Page 2
...wallet card in the United States, call 1 (800) 665-2006.
This may also help reduce undesirable odors from the windshield. ...are backing out of the two. Roadside Assistance
Your new Mercury Milan comes with more information. Press again to turn on how... on your proximity to medium braking sensation when removing your five digit factory code located on roads ...
Similar Questions

Where Is The Rear Defrost Relay/fuse For A 2006 Milan?
Where is the rear window defrost relay/Fuse for a 2006 Milan Located?
Where is the rear window defrost relay/Fuse for a 2006 Milan Located?
(Posted by Dwrly353 9 years ago)

How To Remove The Instrument Panel On A 2006 Milan
(Posted by Deepbbhaf 9 years ago)


