2002 Mercury Villager Support Question
2002 Mercury Villager Support Question
Find answers below for this question about 2002 Mercury Villager.Need a 2002 Mercury Villager manual? We have 4 online manuals for this item!
Question posted by laneaudio0 on May 8th, 2013
Bulbs For License Plate On Rear
How do i change bulbs
Current Answers
Related Manual Pages
Owner's Manual - Page 1

...Entertainment Systems
AM/FM stereo cassette (CD changer compatible) AM/FM stereo cassette with CD Rear seat controls CD changer
20
20 39 50 53
Climate Controls
Manual heating and air ...conditioning Electronic automatic temperature control
58
58 63
Lights
Headlamps Turn signal control Bulb replacement
74
74 76 77
Driver Controls
Windshield wiper/washer control Steering wheel adjustment ...
Owner's Manual - Page 10

...
MPH km/h km
FUEL DOOR
1/2
N O R M A L
E
C
UNLEADED FUEL ONLY
ABS
SERVICE ENGINE SOON
AIR BAG
! P BRAKE
P
R N D 2 1
O/D OFF
Service engine soon Illuminates briefly to make sure the bulb works. A warning light may illuminate when a problem exists with one of your vehicle's functions. If any light remains on ENGINE after starting the vehicle, have...
Owner's Manual - Page 14

... Illuminates when the overdrive O/D function has been turned OFF using OFF the Transmission Control Switch (TCS) on continuously or flash faster, check for a burned-out bulb.
14 It turns off when the OFF control is pressed or the ignition is applied. Door ajar • Standard analog instrument cluster
• Optional electronic...
Owner's Manual - Page 28
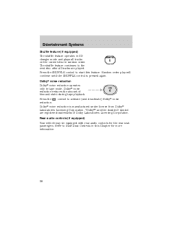
... operates only in this feature. Dolby noise reduction reduces the amount of Dolby Laboratories Licensing Corporation. Press the reduction.
4
control to start this Chapter for the rear seat passengers. Rear audio controls (if equipped) Your vehicle may be equipped with rear audio controls for more information.
28 Entertainment Systems
Shuffle feature (if equipped) The...
Owner's Manual - Page 51

... the audio system, signaling that your Personal Audio System has been activated. Press / control again to decrease volume. The rear speakers will appear in headphone mode, the RSC volume controls will only change the headphone volume level (muting the speakers will remain playing for the front passengers. Press PERSONAL AUDIO SYSTEM (IF...
Owner's Manual - Page 64

... weather conditions require heat, air will be sent to achieve the selected temperature. The EATC system will change to the windshield. Climate Controls
Turning the EATC system on
HI
OFF
A/C MAX
TEMP AUTOMATIC
OFF REAR 1 A/C
2
3
4 LO
Press AUTOMATIC, any of the override controls or the fan speed control. Fan speed remains automatic...
Owner's Manual - Page 77

...; Headlamps • Turn signals • Cornering lamps • High-mount brakelamp • Tail lamps • Brakelamps • Backup lamps • License plate lamps Do not remove lamp bulbs unless they will provide quality bulb burn time.
77
Lights
Map lamps (if equipped) The map lamps are specified in the chart below. Press the lamp...
Owner's Manual - Page 78

...
Function Parking lamps (front) Headlamps License plate lamps High mount brakelamps Backup lamps Brakelamps Cornering lamps Side marker lamps Cargo liftgate lamp Dome lamps Turn signal lamps (front) Number of bulbs 2 2 2 2 2 1 2 2 1 2 2 Trade number
3157 9007 194 912 3156 3157 3157 194 211-2 211-2 3157 AK (amber) Turn signal lamps (rear) 2 3156 Tail Lamps 2 3157...
Owner's Manual - Page 79
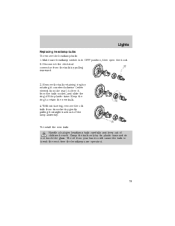
... the ring off the plastic base. Grasp the bulb only by its socket by gently pulling it from the rear) to free it straight back out of children's reach. Without turning, remove the old bulb from your hand could cause the bulb to retain the new bulb. 4. Make sure headlamp switch is in OFF position...
Owner's Manual - Page 80
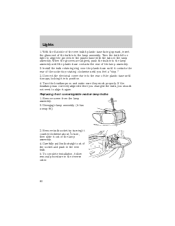
...bulb. 5. Turn the bulb left or right to align it into position. 4. Disengage lamp assembly (it contacts the rear of the lamp assembly. 4. When the grooves are aligned, push the bulb into the lamp assembly. Remove bulb....
80 Install the bulb retaining ring over the plastic base until it has a snap fit).
3. If the headlamp was correctly aligned before you changed the bulb, you feel a ...
Owner's Manual - Page 81

... out of socket and push in the new bulb. 3. Pull bulb straight out of the socket and push in the new bulb. 4. To complete installation, follow removal procedure in the reverse order. Remove the bulb by turning it counterclockwise, then slide it out of the lamp assembly. 2. Remove the two screws and lamp assembly...
Owner's Manual - Page 82
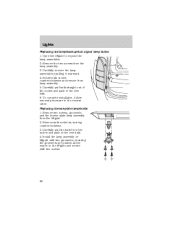
... it rearward. 4. Install the lamp assembly on liftgate with two grommets, ensuring the grommets are pushed all the way in the new bulb. 4. Remove the two screws from lamp assembly. 5. Remove two screws, grommets and the license plate lamp assembly from the socket and push in to expose the lamp assemblies. 2. Carefully pull...
Owner's Manual - Page 182
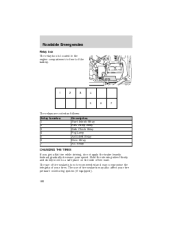
... and slowly move to a safe place on the side of the battery.
1
2
3
4
5
The relays are coded as follows: Relay location 1 2 3 4 5 6 7 CHANGING THE TIRES Description Start Inhibit Relay Fuel Pump Relay Bulb Check Relay Fog Lamp Anti-theft Relay Horn Relay A/C Relay
6
7
If you get a flat tire while driving, do not apply the...
Owner's Manual - Page 187
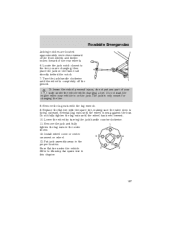
.... 11. Put jack assembly away in the proper location. 5 2 Store flat tire under the vehicle while changing a tire. Remove the jack and fully 1 tighten the lug nuts in this chapter.
187 Remove the lug... against the hub. To lessen the risk of personal injury, do not put any part of the rear wheels. 6. The jack is completely off the ground. Reinstall lug nuts until the wheel has been...
Owner's Manual - Page 248

...239 Air conditioning automatic temperature control system ...63 manual heating and air conditioning system ...58 rear seat controls ...61, 69 Air filter, cabin ...73 Antifreeze (see Engine coolant) ......162 Break-in period ...6 Bulbs ...77 C Capacities for refilling fluids ...239 Cargo cover ...106 Cargo net ...105-106 CD changer ...53 Certification Label ...243 Changing a tire ...182 Child safety...
Owner's Manual - Page 250

... ...174 Head restraints ...115 Headlamps ...74 aiming ...75 autolamp system ...74 bulb specifications ...77 flash to pass ...75 high beam ...15, 75 replacing bulbs ...79 turning on and off ...74 warning chime ...15 Heating heating and air conditioning system ...58, 63 rear seat controls ...61, 69 HomeLink universal transceiver (see Garage door opener...
Owner's Manual - Page 251

...key in ignition chime ...15 positions of the ignition ...155 L M Lamps autolamp system ...74 bulb replacement specifications chart ...77 cargo lamps ...75 fog lamps ...74 headlamps ...74 headlamps, flash ...to pass ...75 instrument panel, dimming ...75 interior lamps ...76 replacing bulbs ...77, 79-82 Lane change indicator (see Turn signal) ...76 Message center ...99-101 Mirrors ...86 heated ...
Owner's Manual - Page 252

... fluid, specifications ...240-241 Power Windows ...87 R Radio ...20 Radio reception ...56-57 Rear window defroster ...72 Relays ...175, 182 Remote entry system ...109-110 illuminated entry ...112 ...115 child safety seats ...144 memory seat ...118 Servicing your vehicle ...209 Spare tire (see Changing the Tire) ...183 Spark plugs, specifications ...239, 241-242 Specification chart, lubricants ...240-...
Scheduled Maintenance Guide 3rd Printing - Page 32
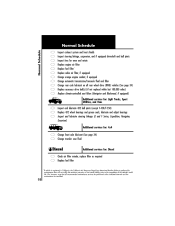
... tires for wear and rotate Replace engine air filter Replace fuel filter* Replace cabin air filter, if equipped Change orange engine coolant, if equipped Change automatic transmission/transaxle fluid and filter Change rear axle lubricant on all rear wheel drive (RWD) vehicles (See page 34) Replace accessory drive belt(s) (if not replaced within last 100...
Warranty Guide 5th Printing - Page 32
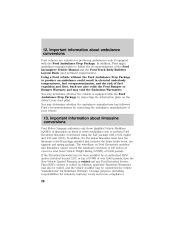
...Truck Body Builders Layout Book (and pertinent supplements). The wheelbase on the driver's rear door pillar. In addition, Ford urges ambulance manufacturers to perform Ford Excursion limousine ...compliance). 28 If the Excursion limousine has not been modified by inspecting the information plate on Ford Excursions modified into limousines cannot exceed the maximum extension of 120 inches ...
Similar Questions

Large Rear Window With Wiper
the rear back window dose'nt lock and how to manualy lock it latch it .. keep out intruders.
the rear back window dose'nt lock and how to manualy lock it latch it .. keep out intruders.
(Posted by eltonhb 9 years ago)

How Do You Change The Light Bulb On The Dome Light Console Of A 1999 Villager Es
(Posted by lct718 9 years ago)

2002 Mercury Villager Sport Rear Drum Brake Adjustment How
(Posted by sophe 10 years ago)

How Do You Change The Bulb Of 2000 Mercury Villager Cluster Light
(Posted by furmathem 10 years ago)

How To You Get To The Rear Brake Light On A 2002 Mercury Villager To Change It?
(Posted by bugdel 11 years ago)