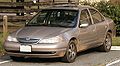
2000 Mercury Mystique Support Question
2000 Mercury Mystique Support Question
Find answers below for this question about 2000 Mercury Mystique.Need a 2000 Mercury Mystique manual? We have 3 online manuals for this item!
Question posted by jimyfmbrz2 on February 9th, 2014
2000 Mercury Mystique. Positive Battery Cable Connection.
positive battery cable spits in 2 where does these 2 ends connect to on engine.
Current Answers
Answer #1: Posted by TommyKervz on February 9th, 2014 2:06 AM
TommyKervz

Member since:
January 10th, 2013 Points: 17,776,813

Member since:
January 10th, 2013 Points: 17,776,813
Hi. Do see page 155 & 156 of the Owner's Manual.
Related Manual Pages
Owner's Manual - Page 11
...than three (3) seconds after the ignition is turned to the ON position or stays on continuously while you are driving, have your transaxle ...only) Illuminates and remains illuminated when the transaxle control switch (TCS) on and the engine is turned off . For details, refer to check the engine coolant level.
Indicates the status of the gearshift lever is pressed and overdrive is off...
Owner's Manual - Page 54
...
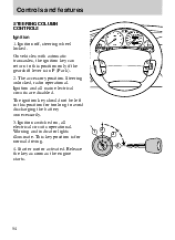
TRACTION CONTROL
Ignition 1. Warning and indicator lights illuminate. The accessory position. The ignition key should not be left in this position only if the gearshift lever is for too long to this position for normal driving. 4. Release the key as soon as the engine starts.
2 1
C H
8
55 60 70 80 50 100 120 90 140...
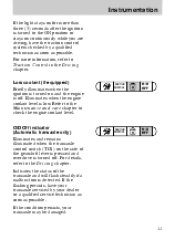
Owner's Manual - Page 69
...
NIC PA
UN K C LO
K UN TR
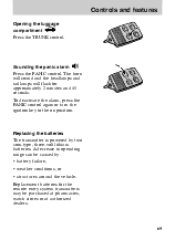
Replacing the batteries The transmitter is powered by : • battery failure, • weather conditions, or • structures around the vehicle. To deactivate the alarm, press the PANIC control again or turn the ignition key to the on position.
Controls and features
Opening the luggage
NIC PA CK...
Owner's Manual - Page 70
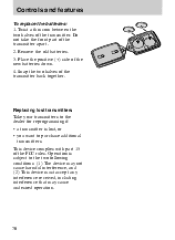
...together.
Snap the two halves of the transmitter apart. 2. Place the positive (+) side of the FCC rules. Remove the old batteries. 3. Replacing lost , or • you want to the two ... that may cause undesired operation.
70 This device complies with part 15 of the new batteries down. 4. Operation is lost transmitters Take your transmitters to the dealer for reprogramming if:...
Owner's Manual - Page 100

... the top and bottom of belt by pressing the red button. 5. Place the child in the child seat and position the shoulder belts over each shoulder.
100 Seating and safety restraints
3. If connected, squeeze the tabs on the child seat cushion and shoulder safety belt. Then release the lower half of the...
Owner's Manual - Page 121

... gearshift to the position you have to swerve around an object or another vehicle, your transaxle to optimize shift smoothness. Optimal shifting will have full power assist. When the battery is disconnected or a new battery is depressed. Putting your vehicle in gear You must relearn its adaptive strategy. Start the engine. 2. Vehicles equipped with...
Owner's Manual - Page 123
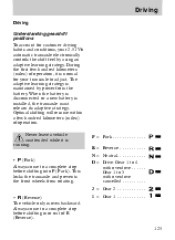
... stop before shifting in or out of R (Reverse). 1 = Gear 1 ...
123 Driving
Driving Understanding gearshift positions To account for your 2.5 l V6 automatic transaxle electronically controls the shift feel by power from rotating. This locks... the transaxle and prevents the front wheels from the battery. The adaptive learning strategy is normal for customer driving habits and ...
Owner's Manual - Page 155
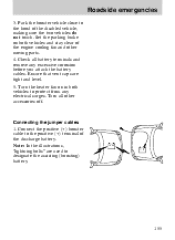
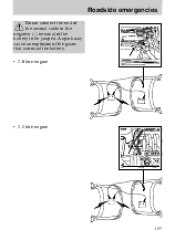
... the hood of the discharge battery. Turn all battery terminals and remove any electrical surges. Park the booster vehicle close to protect from any excessive corrosion before you attach the battery cables. Connecting the jumper cables 1. Roadside emergencies
3. Set the parking brake on in both vehicles and stay clear of the engine cooling fan and other accessories...
Owner's Manual - Page 156
..."eye". Do not use fuel lines, engine rocker covers, or the intake manifold as "grounding" points.
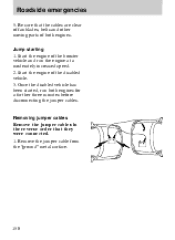
156 Make the final connection of the stalled vehicle's engine, away from the battery and the carburetor. Connect the other end of the positive (+) cable to the negative (-) terminal of the assisting battery.
3. Connect the negative (-) cable to the positive (+) terminal of the assisting...
Owner's Manual - Page 157
A spark may cause an explosion of the battery to be jumped. Roadside emergencies
Do not connect the end of the second cable to the negative (-) terminal of the gases that surround the battery. • 2.0 litre engine
• 2.5 litre engine
157
Owner's Manual - Page 158
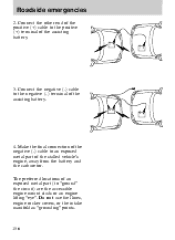
... 1. Be sure that they were connected. 1. Start the engine of both engines for a further three minutes before disconnecting the jumper cables. Once the disabled vehicle has been started, run the engine at a moderately increased speed. 2.
Start the engine of the booster vehicle and run both engines. Removing jumper cables Remove the jumper cables in the reverse order that the...
Owner's Manual - Page 159
..., allow it to idle for several minutes so the engine computer can "relearn" its idle conditions.
159 Roadside emergencies
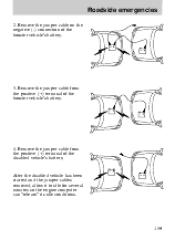
2. Remove the jumper cable from the positive (+) terminal of the disabled vehicle's battery.
Remove the jumper cable from the positive (+) terminal of the booster vehicle's battery.
3. Remove the jumper cable on the negative (-) connection of the booster vehicle...
Owner's Manual - Page 182
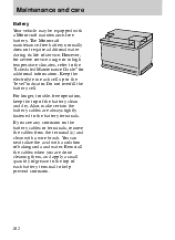
... done cleaning them, and apply a small quantity of grease to the top of the battery clean and dry. Reinstall the cables when you see any corrosion on the battery cables or terminals, remove the cables from the terminal(s) and clean with a wire brush. For longer, trouble-free operation, keep the top of each cell up...
Owner's Manual - Page 238
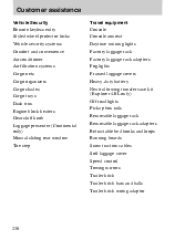
...Air conditioner Air filtration systems Cargo nets Cargo organizers Cargo shades Cargo trays Dash trim Engine block heaters Gear shift knob Luggage presenter (Continental only) Manual sliding rear window ...lights Factory luggage rack Factory luggage rack adapters Fog lights Framed luggage covers Heavy-duty battery Neutral towing transfer case kit (Explorer 4.0L only) Off road lights Pickup box rails...
Owner's Manual - Page 242
Index
A Page Accessory position on the ignition ...54 Additives, engine oil ...169 Air bag supplemental restraint system and child ......179 fluid, refill capacities ...224 fluid, specification ...225 B Backing up ...123, 129 Battery charging system warning light . .9 jumping a disabled battery ...154 proper disposal, recycling ...184 replacement, specifications . .223 servicing ...182 Brake fluid ...
Owner's Manual - Page 244
...switch ...141 Fuse panels engine compartment ...144 instrument panel ...146 Fuses charts ...145, 148 checking and replacing ...143 G Gas mileage (see Fuel) Gauges engine coolant temperature ...20 fuel... ...2 J Jack positioning ...152 storage ...151 Jump starting your vehicle attaching cables ...155 disconnecting cables ...158 K Keys key in ignition warning chime .19 positions of the ignition ...54
Owner's Manual - Page 246
......68 opening the trunk ...69 panic alarm ...69 replacing the batteries ...69 replacement/additional transmitters ...70 Repairing paint chips ...218 Reporting...74 Servicing your vehicle ...162 Shift-lock system ...121 Shift positions (see Gearshift) Snow tires and chains ...194 Spare tire changing... .111 starting the engine ...114 Steering column controls ...55 Steering wheel horn ...56 speed...
Scheduled Maintenance Guide 3rd Printing - Page 8
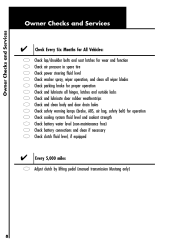
... clean body and door drain holes safety warning lamps (brake, ABS, air bag, safety belt) for operation cooling system fluid level and coolant strength battery water level (non-maintenance free) battery connections and clean if necessary clutch fluid level, if equipped
Every 5,000 miles Adjust clutch by lifting pedal (manual transmission Mustang only)
8
Warranty Guide 1st Printing - Page 8
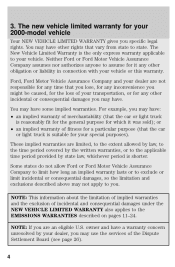
... and exclusions described above may not apply to the applicable time period provided by your 2000-model vehicle
Your NEW VEHICLE LIMITED WARRANTY gives you are an eligible U.S. You may ...LIMITED WARRANTY also applies to assume for which it any other obligation or liability in connection with your vehicle. Neither Ford or Ford Motor Vehicle Assurance Company assumes nor authorizes anyone...
Warranty Guide 1st Printing - Page 23
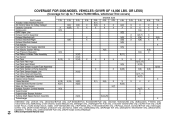
...Multiple Function Control Module Supercharger Supercharger Bypass Actuator Turbine Shaft Speed Sensor Assembly Turbocharger 2.0L 2.5L X(2) X(28) 3.0L X(2) X 3.3L X X 3.8L X(1) X(2) X ENGINE SIZE 4.0L 4.2L X X X X 4.6L X(2) X X(5) X X X(8) X(8) X(8) X(5) X(9) X(3) X(10) X(12) X(14) X(11) X X X X ...Contour/Mystique CNG=Compressed Natural Gas
19 COVERAGE FOR 2000-MODEL VEHICLES (GVWR OF 14,000 LBS.
Similar Questions

Need To Review Pages 155 & 156 N Owner Manual For 2000 Mystique.
the answer for positive battery cable connection are on these pages.
the answer for positive battery cable connection are on these pages.
(Posted by jimyfmbrz2 10 years ago)
What & Where Are The Wire Links For Positive Battery Cable
I was trying to replace positive battery cable on my 2000 mystique I had to leave job for a couple d...
I was trying to replace positive battery cable on my 2000 mystique I had to leave job for a couple d...
(Posted by jimyfmbrz2 10 years ago)

How Do You Replace A 1999 Mercury Mystique Positive Battery Cords
(Posted by schwaDLPar 10 years ago)
Location & Size Fuse For Tail Lights For 2000 Mystique?
(Posted by jimyfmbrz2 11 years ago)

Positive Battery Cable
How Do You Replace It
(Posted by sharonmcfarland76 11 years ago)