1996 Mercury Villager Support Question
1996 Mercury Villager Support Question
Find answers below for this question about 1996 Mercury Villager.Need a 1996 Mercury Villager manual? We have 1 online manual for this item!
Question posted by myrashelpowl on June 28th, 2013
Where Is The Fuse For The Temperature Gauge Located On The 1996 Mercury Villager
The person who posted this question about this Mercury automobile did not include a detailed explanation. Please use the "Request More Information" button to the right if more details would help you to answer this question.
Current Answers
Related Manual Pages
Owner's Manual - Page 14
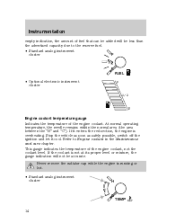
... red section, the engine is overheating. Refer to the reserve fuel. • Standard analog instrument F cluster
E FUEL
• Optional electronic instrument cluster
F
1/2
E
Engine coolant temperature gauge Indicates the temperature of the engine coolant, not the coolant level. Never remove the radiator cap while the engine is not at its proper level or mixture...
Owner's Manual - Page 15
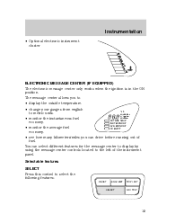
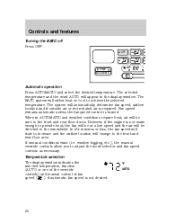
...many kilometers/miles you to: • display the outside temperature. • change your gauges from english ˚F ˚C to metric units. ...You can drive before running out of the instrument panel. The message center allows you can select different features for the message center to display by using the message center controls located...
Owner's Manual - Page 16
...
16 SELECT OD / TRIP ENG/MET Press this control to reset the trip 1 and 2 odometer (which ever is driven at speeds of your instrument cluster gauges from english to Temperature conversion in the Controls and Features chapter. Message center functions OUTSIDE TEMP Press SELECT until the menu displays OUTSIDE TEMP.
Owner's Manual - Page 24
... passenger compartment air conditioning system (if equipped) should be set to OFF, if rear heating is provided through the floor ducts located under the front seat that will reduce fogging on your windshield. After a few minutes, select any desired position. • To... tips • In humid weather, select before driving.
Airflow and temperature to the second row seat floor ducts.
24
Owner's Manual - Page 30
... heat, the fan will be at a low speed and the air will be directed to achieve the selected temperature. window fogging, etc.), the manual override controls allow you to increase and the airflow location will appear in AUTOMATIC and weather conditions require heat, air will be sent to the front and rear...
Owner's Manual - Page 35
... the second row seat floor ducts.
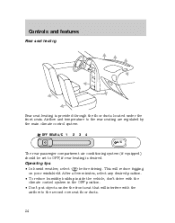
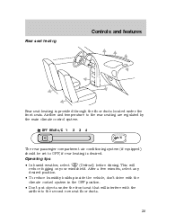
35 Controls and features
Rear seat heating
Rear seat heating is desired. Airflow and temperature to OFF, if rear heating is provided through the floor ducts located under the front seat that will reduce fogging on your windshield. OFF REAR A/C 1 2 3 4
A/C
The rear passenger compartment air conditioning...
Owner's Manual - Page 132

... to be propelled by the air bag into your seat to service, repair, or modify the Air Bag Supplemental Restraint System or its fuses. Do not attempt to the rear as far as a deploying air bag can while still reaching the pedals comfortably. • Recline the...the upright position. Do not put anything on or over the air bag module. Never place your Ford or Lincoln-Mercury dealer.
132
Owner's Manual - Page 146

... in Canada include a tether anchor hardware kit. All vehicles built for sale in the anchor location. Tether anchorage hardware kits (part number 613D20) including instructions, may be obtained at no charge from any Ford or Lincoln-Mercury dealer. Tighten the anchor according to follow the child safety seat manufacturer's instructions. Seating and...
Owner's Manual - Page 172
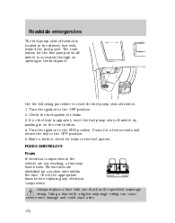
...is accessible through an opening in on the reset button. 4. FUSES AND RELAYS Fuses If electrical components in the fuel system. Using a fuse with one that has the specified amperage rating. The reset button... the kick panel. If no fuel leak is located in the driver's foot well, behind the kick panel. Blown fuses are not working, a fuse may have blown. Turn the ignition to the ...
Owner's Manual - Page 173
... Red Blue Yellow Natural Green Standard Fuses Grey Violet Pink Tan Brown Red Blue Yellow Natural Green Maxi Fuses Yellow - Green Orange Red Blue Tan Natural Cartridge Fuse Link Maxi Cartridge Fuses Blue Blue - - Pink Pink Green Green Red Red - Yellow - Brown - Black
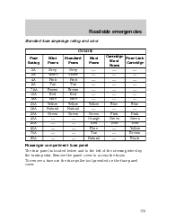
Passenger compartment fuse panel The fuse panel is located below and to access the...
Owner's Manual - Page 174
Fuse/Relay Location Corner Lamps - I /P ILLUM CORNER LAMPS REAR BLOWER O2 SENSOR
HAZARD
USE SPECIFIED FUSES ONLY
The fuses are coded as follows. Roadside...TAIL LAMP I /P Illum Electron Fuse Amp Rating 10A - 7.5A 10A Description Front Exterior Lamps Not Used Interior Panel Illumination Lamps Transaxle Control Module (TCM), Electronic Automatic Temperature Control (EATC) Module, Instrument ...
Owner's Manual - Page 175
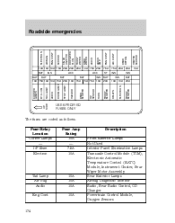
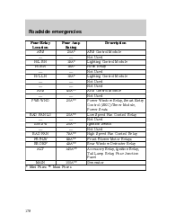
Roadside emergencies
Fuse/Relay Location Room Lamp Mirror Stop Lamp Cigar Lighter Hazard RR Pwr Plug Rear Blower Wiper Rear Blower Rear Wiper O2 Sensor Audio Turn Audio Amp Front Blower Eng Cont Relays Fuse Amp Rating 15A 7.5A ..., Rear Blower Motor, Data Link Connector #2, Cooling Fans Electronic Automatic Temperature Control (EATC) Module, A/C Relay, Front Climate Control Panel
A/C Cont
7.5A
175
Owner's Manual - Page 176
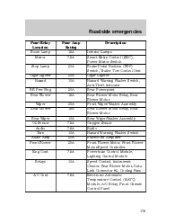
Roadside emergencies
Fuse/Relay Location Electron Fuse Amp Rating 10A Description Transmission Control, Lighting Control Module, ABS Control Module, Smart Entry... Defog - Heated Mirror
20A 20A 20A - 10A
Power distribution box The power distribution box is located in the engine compartment. If the battery has been disconnected and reconnected, refer to the Power Distribution Box before ...
Owner's Manual - Page 177

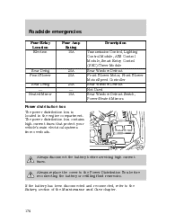
RAD FAN H1 RAD FAN H2 RAD FAN LO Roadside emergencies
USE SPECIFIED FUSES OR FUSIBLE LINKS ONLY
15A 65A FR BLW 30A PWR WND 40A ABS 20A 7.5A ... 15A FUEL RAD PUMP
15A H/L LH
15A H/L RH
10A
10A
10A INJ
ALT ECCS
The high-current fuses are coded as follows. Fuse/Relay Location - FUEL PUMP INJ SEC RAD ECCS - - ALT Fuse Amp Rating - 15A* 10A* 7.5A* 7.5A* 10A* - - 10A* Description Not Used Fuel ...
Owner's Manual - Page 178
Roadside emergencies
Fuse/Relay Location ABS - H/L RH HORN - H/L LH - - ABS - PWR WND Fuse Amp Rating 20A* - 15A* 15A* - 15A* - - 40A** - 30A** Description ABS Control... High Speed Fan Control Relay Front Blower Motor Relays Rear Window Defroster Relay Accessory Relay, Ignition Relay, Tail Lamp Relay, Fuse Junction Panel Generator
RAD FAN LO - IGN SW - RAD FAN FR BLW RR DEF ALT
20A** - 30A** - ...
Owner's Manual - Page 202
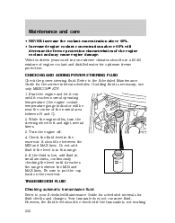
... the level until it reaches the range between the MIN and MAX lines. Start the engine and let it run until it reaches normal operating temperature (the engine coolant temperature gauge indicator will decrease the freeze protection characteristics of the normal area between H and C). 2. Vehicles driven year-round in the reservoir.
Owner's Manual - Page 213

...your vehicle's tires perform different jobs, they often wear differently. Maintenance and care
Temperature A B C The temperature grades are cold, after the vehicle has been parked for a tire that the... test wheel. SERVICING YOUR TIRES Checking the tire pressure • Use an accurate tire pressure gauge. • Check the tire pressure when tires are A (the highest), B, and C, representing...
Owner's Manual - Page 224
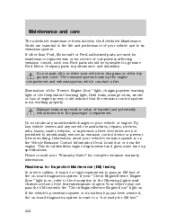
... system. Illumination of the "Service Engine Soon" light, charging system warning light or the temperature warning light, fluid leaks, strange odors, smoke or loss of engine power, could indicate ...that the emission control system is on the Vehicle Emission Control Information Decal located on . If the vehicle's powertrain system or its emissions system. If other dry ground...
Owner's Manual - Page 225

.... Quickly depress the accelerator pedal for I/M testing, follow the procedure described below: 1. Accelerate the vehicle to C). 2. Allow the engine to cool to ambient temperature (the engine coolant temperature gauge indicator will be near the center of the following lights frequently: • Headlamps • Turn signals • Cornering lamps • High-mount brakelamp •...
Owner's Manual - Page 256
... fuels ...215 Fuses ...172,173 Garage door opener ...93,94,98 Gas cap (see Fuel cap) ...217 Gas mileage (see Fuel economy) ...220 Gauges ...11 engine coolant temperature gauge ...14 fuel gauge ...13 odometer ...13 speedometer ...12 trip odometer ...13 GAWR (Gross Axle Weight Rating) ...165 definition ...165 driving with a heavy load ...165 location ...165 and...
Similar Questions


Where Is The Fuse Box On A 1996 Murcury Villager
(Posted by DDDnatas 9 years ago)

Mercury/1996-villager 3.0 Timing Belt
We replaced the timing belt. An it will not crank.
We replaced the timing belt. An it will not crank.
(Posted by Anonymous-139105 9 years ago)
Where Is The Lamp Circuit Fuse In A 1999 Mercury Villager
(Posted by mkalmmas 10 years ago)

1.the Temperature Gauge Reads Low, 2.the Heat Does Blow Hot But We Want It Hotte
(Posted by charlesgraf 11 years ago)