Maytag MHWZ400TQ Support Question
Maytag MHWZ400TQ Support Question
Find answers below for this question about Maytag MHWZ400TQ - 3.7 cu. Ft. Epic Z Front Load Washer.Need a Maytag MHWZ400TQ manual? We have 1 online manual for this item!
Question posted by clan1952 on May 29th, 2014
Door Latch Broke
door latch/strike broke off when opening. strike now stuck in the machine latch assembly on front of machine. can this be removed and replaced dyi? How?
Current Answers


Answer #2: Posted by clan1952 on May 31st, 2014 6:37 AM
clan1952

Member since:
May 29th, 2014 Points: 50
Member since:
May 29th, 2014 Points: 50
I fixed the problem shortly after posting here. How: I was able to get the machine turned on by holding the door shut and running the spin cycle for a moment. When I cancelled/stopped the cycle the latch "unlocked" and released the "strike" from the door assembly. I did need to replace the "strike", easy. SO relieved I didn't need to disassemble the whole thing! Thank you richsappliance for your response.
Related Maytag MHWZ400TQ Manual Pages
Use and Care Guide - Page 4
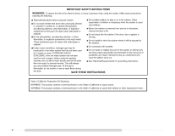
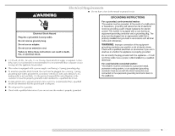
...machine, turn on or in the washer. This will release
[] Do not reach into the washer if the drum, tub or agitator is flammable, do not smoke or use an open...not install or store the washer where it will be ...replace any part of the washer or attempt any accumulated hydrogen gas. Close supervision of children is necessary when the washer is removed...washer, follow basic precautions, including the...
Use and Care Guide - Page 5

...
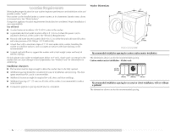
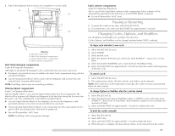
You Will Need to Buy
4 ft (1.2 m) drain hose extension kit, Part Number 285863
2 longer water fill hoses: 6 ft (1.8 m) Part Number 76314 10 ft (3.0 m) Part Number 350008
Pedestal
... purchased your washer and dryer? call the toll-free number on the cover or in the "Assistance or Service" section. You may require additional parts. Drain hose form B. Ask for installation
Open end wrenches...
Use and Care Guide - Page 6
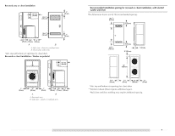
...load) of 4OO Ibs (180 kg).
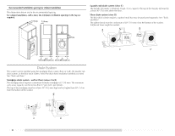
Recommended installation spacing for custom undercounter installation
The dimensions shown are for the recommended spacing.
Some water can remain in the washer...Electrical Requirements." The door
opens more than 90 ° , and it is attached to the washer.
501'/'4 (I 276ram)
27" (686 ram)
A grounded electrical outlet located within 4 ft (1.2 m) of ...
Use and Care Guide - Page 7
... for the recommended spacing.
48 in . 2.-
(155cm2)
----_11"_ 301/2÷,1, 4"I'_-"-
(25ram) (775mm) (102ram)
A
B
A. Recessed area B. Closet door with stacked washer and dryer
The dimensions shown are for closet door. top and bottom air openings for closet door. ** External exhaust elbow requires additional space. Recessed area or closet installation
24 in .2 * (310 crn 2)
±...
Use and Care Guide - Page 8
...installation, with a door, the minimum ventilation required. openings in the top are for cabinet installation
The dimensions shown are
7" (178ram)
Bn
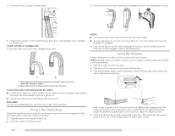
Laundry tub drain system (view C)
The laundry tub needs a minimum...siphon break must be a minimum of 28" (710 mm) from the bottom of the washer.
30" rnin. (762mm)
A
B Select the drain hose installation method you need.
f
{710ram)
D...
Use and Care Guide - Page 9
... qualified electrician or serviceman if you are in doubt as to a gas pipe. Do not remove ground prong. that a separate circuit serving only this appliance be plugged into an appropriate outlet ... Do not modify the plug provided with a qualified electrician if you are not sure the washer is properly grounded. Failure to the equipment=grounding terminal or lead on the appliance. If ...
Use and Care Guide - Page 10
... into a laundry tub, drainpipe, or bucket, to do so can result. I0
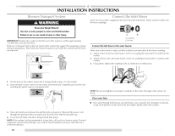
Firmly seat the washer into hose ...ft (900 mm) of the rear pane[ and dose the hole with the attached cap.
4. Coupling B. Clear water lines
• Run water through the opening of its final location. Once all 4 bolts are 4 transport
during transportation. To avoid suspension and structural damage, your washer...
Use and Care Guide - Page 11
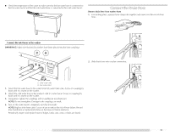
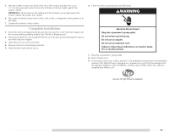
... coupling by hand until it is seated on the washer. 3. NOTE: Replace inlet hoses after 5 years of drain hose. Periodically inspect and replace hoses if bulges, kinks, cuts, wear, or leaks are found. S
C. Hot water inlet 1. Turn on the hoses for leaks. Remove drain hose from washer drum
1. Use locking pliers, squeeze hose clamp tabs...
Use and Care Guide - Page 12
... hose into place. Drape the power cord over drain hose form and snap into drainpipe or standpipe.
4. out. Laundry tub drain or standpipe drain
Connect the drain hose form to back. A
B
A.
Slide the washer to stop the hose from going back into standpipe. Once drain hose is perfectly [eve[ (use a [eve[).
B. Drain...
Use and Care Guide - Page 13
... not use a
_)/i_" (14 mm) open-end wrench to clean your tools.
4. Allow the washer to follow these instructions can result in firm contact with the floo_; IMPORTANT: All four feet must be tightened. Do not remove ground prong. Plug into a grounded 3 prong outlet.
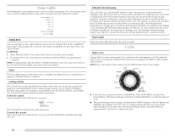
Check for a medium-size load.
Pour the detergent into the...
Use and Care Guide - Page 15
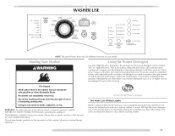
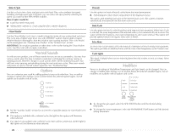
WASHER USE
POWER
ADD A GARMENTpHREWAS WASH RINSE SPIN CLEAN
CONTROLS LOCKED _ DOOR LOCKED
RAPID NORMAL
DELICATE
EST MEMATAEND NTGME
START CANCEL/... specific sections of this manual for more detailed information.
Doing so can completely remove oil.
Do not store laundry products on the load size. Use only HE High Efficiency detergenL Use _/_the manufacturer's recommended amount for...
Use and Care Guide - Page 16
... that more than one garment bag be removed from the washer as soon as it off . Your new washer has a dispenser drawer with three separate compartments for your laundry products--one is for detergent, one is complete, the CI_EAN status light illuminates, the door unlocks, and the wash load can be used and that should close...
Use and Care Guide - Page 17
... garment damage.
To continue the cycle, select and hold START (for your load. Select the desired OPTIONS Rinse. Select the desired MOI)IFIERS such as Prewash... can be changed anytime before the door unlocks. 3. Dispenser release lever B. Use a measuring cup with all Options and Modifiers are not available, the machine will be removed from the washer. Select and hold START (for...
Use and Care Guide - Page 18
.... and POWER. To lock the controls SeLect and hold CYCI.E SIGNAl. If a large load of clothing is complete, then resume with all Options and Modifiers are shown in the Preset...removes extra suds and assures proper rinsing of the cycle the washer is opened or PAUSE/CANCEl_is selected. Door Locked
When the status light illuminates, the door is over, the wash cycle needs to the washer ...
Use and Care Guide - Page 20
...soiled loads that need pretreatment. • Add detergent to aid in the washer during the Clean Washer cycle.
Stain Cycle
Use this option for that option will provide optimal removal of ..."Cleaning Your Washer" in the "Washer Care" section. You may hear various sounds when the door is helpful when you want from prewash into the main wash cycle.
The washer continues automatically...
Use and Care Guide - Page 24
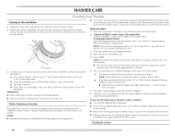
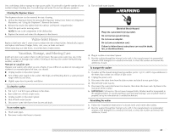
... seal/bellow, using a damp cloth. a) Mix a dilute solution, using 3/4 cup (1 77 ml.) of liquid chlorine bleach, and 1 gal. (3.8 I .et stand 5 minutes.
d) Wipe clown area thoroughly door open. Open the washer door and remove any clothing or items from the washer.
2. Seal/Beflovv
3. If stained areas are found, wipe down these areas of warm tap water...
Use and Care Guide - Page 25
... Normal cycle with _/_the manufacturer's recommended
amount of time, you are away.
• Slightly open door to locate, level and connect the washer. 2. Put 1 qt (1 I . Washer must be removed for an extended period of HE detergent for a medium-size load, to wipe up for a medium-size load, to the washer. Shut off both water faucets. Flush water pipes. 2.
Use and Care Guide - Page 26
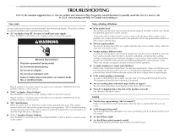
.... It is drained from the rear of the machine removed? after the start of normal washer operation. The non-High Efficiency detergents the washer. in washer or reconnect power. Check the list below for service. Unplug washer or disconnect power.
"F--E--" Variables (Washer Problem)
Press POWER to .
Check under the door sea[ or basket. can cause oversudsing
which can...
Use and Care Guide - Page 27
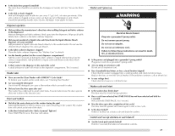
...door must be secured to the washer basket.
Control won't accept selections or won 't unlock
Did all spills. Hold for 3 seconds the button to avoid odors, see "Cleaning Your Washer."
or laundry...the door open after use an extension cord. This washer has a tight seal to the dispensers?
Do not remove ground prong.
If the problem continues, ca[[ an electrician. The door must...
Use and Care Guide - Page 30
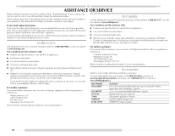
... the same precision used to build every new MAYTAG +I .fyoustillneedhelpf,ollowtheinstructiobneslow. isinformatiownillhelpustobetterrespontodyourequest. Whencallingp,leaskenowthepurchasdeateandthecompletmeodea[ndserianl umbeorf yourappliancTeh. If you need replacement
parts
If you need to local dealers, repair parts distributors and service companies. or visit our website
• Use and...
Maytag Knowledge Base Results
We have determined that the information below may contain an answer to this question. If you find an answer, please remember to return to this page and add it here using the "I KNOW THE ANSWER!" button above. It's that easy to earn points!-
How do I clean my front-load washer dispensers?
... the softener and bleach dispenser. Front-load Neptune® washer with rear-mounted console Leaking water - Remove the inserts from the drawer. The inserts are not working correctly - Front-load Epic washer How do I clean my front-load washer door seal? Wash the dispenser drawer parts under running water. Replace the inserts and return the dispenser drawer to... -
Dispensers not working correctly - Front-load Epic washer
... remaining in the correct position. Is liquid chlorine bleach dispensed on my Epic front-load washer are a few things that can block the flow of the wash ...remove the dispenser, and clean any leftover detergent or other laundry products that the detergent separator is not how it in the Delicate, Silk, Wool or Handwash cycles. See How do I clean my front-load washer... -
Display shows F22 or FdL - Front-load washer
... enough space in the washer to allow the clothes to operate. The door must be latched. Display shows F25 or F06 - Before you washing a large load? Front-load washer Open the door and firmly close the washer door, check for the washer to freely tumble. My front-load washer display shows F22 or FdL. Front-load washer The door will not open - To remove the error display, press...
Similar Questions

Cu Ft For My Maytag Washer,model# Mhwe450ww02 Front Load Washer
Hi, I want to know cu ft for my Maytag washer,Model# mhwe450ww02 front load washer
Hi, I want to know cu ft for my Maytag washer,Model# mhwe450ww02 front load washer
(Posted by rashmi3462 8 years ago)

How To Reset Maytag Epic Z Front Loading Washer Door Locked
(Posted by atanit 9 years ago)

My Maytag Front Load Washer Won't Drain Can I Open The Door
(Posted by PVSalexes 10 years ago)

What Does The Code F--24 Mean On My Maytag (epic Z) Front Load Washer?
I Just L
(Posted by Tersteven 13 years ago)

What Does The Code F--24 Mean On My Maytag (epic Z) Front Load Washer?
I just loaded my maytag front load washer, and when i tried to start it, the error code f-24 came up...
I just loaded my maytag front load washer, and when i tried to start it, the error code f-24 came up...
(Posted by Christd333 13 years ago)