Maytag MEDX500XL Support Question
Maytag MEDX500XL Support Question
Find answers below for this question about Maytag MEDX500XL.Need a Maytag MEDX500XL manual? We have 2 online manuals for this item!
Question posted by nemfuc on September 20th, 2013
How To Repair Troubleshoot Maytag Centennial Dryer That Will Not Start
The person who posted this question about this Maytag product did not include a detailed explanation. Please use the "Request More Information" button to the right if more details would help you to answer this question.
Current Answers
Related Maytag MEDX500XL Manual Pages
Installation Instructions - Page 2
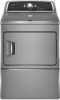
... the safety alert symbol. We have provided many important safety messages in this manual and on your appliance. Always read and obey all safety messages. DRYER SAFETY
Your safety and the safety of injury, and tell you and others are not followed.
2 All safety messages will tell you what can be...
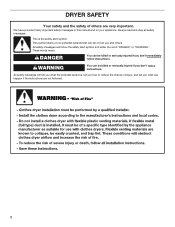
Installation Instructions - Page 3
...;■ A UL listed strain relief. Tools needed : Check local codes.
Read and follow the instructions provided with clothes dryers.
Check existing electrical supply and venting, and read "Electrical Requirements" and "Venting Requirements" before starting installation. The kit should be type SRD or SRDT and be at least 4 ft. (1.22 m) long. Location Requirements...
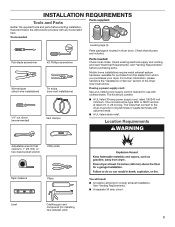
Installation Instructions - Page 4
...location must conform to water and/or weather. See "Venting Requirements." Additional installation requirements
This dryer is adequate and in an area where it will be exposed to the Manufactured Home Construction ... grounded electrical outlet located within 2 ft. (610 mm) of either side of the dryer is your dealer.
■■ Special provisions must not be considered.
■■ ...
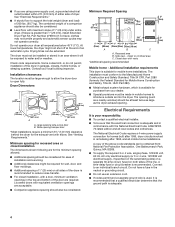
Installation Instructions - Page 5

... Grounding through the neutral is manufactured ready to the neutral conductor (white wire) within the dryer.
The ground wire (ground conductor) may be insulated.
■■ 10-gauge solid ...neutral conductor.
■■ A 4-wire power supply connection must be used when the dryer is permanently connected to install with ring or spade terminals and UL listed strain relief. The...
Installation Instructions - Page 6

... edge of cardboard from dryer carton;
Now stand the dryer on cardboard.
6 Slide the dryer until diamond marking is close to move and install dryer.
Prepare dryer for electrical connection and to...leveling legs
Examine leveling legs, find diamond marking. Firmly grasp dryer body (not console panel) and gently lay dryer down on its final location. Screw in back or other injury. ...
Installation Instructions - Page 8

...) B. 4-prong plug C. E
B
A
Put power supply cord through the strain relief. Tighten strain relief screws just enough to step 3 on this point. Spade terminals with the dryer cabinet and be in place.
For 4 wire Power Supply Cord Connection, continue to hold in a horizontal position. Put the tabs of the two clamp sections...
Installation Instructions - Page 9

... screw.
B
D
E
A
C
GF
A. 3-wire receptacle (NEMA type 10-30R) B. 3-wire plug C. Now, go to Venting Requirements.
9 Finally, reinsert tab of terminal block cover into slot of dryer rear panel. Connect remaining wires
3-wire Power Supply Cord Connection
Use where local codes permit connecting cabinet-ground conductor to center, silver-colored terminal block...
Installation Instructions - Page 10

Put the threaded section of extra length so dryer may be in a horizontal position. Strip insulation back 1" (25 mm). Tighten strain ... 11. A
3. Attach direct wire cable
to strain relief
(127
5" mm)
Direct wire cable must have a tight fit with the dryer cabinet and be moved if needed. Cut 11/2" (38 mm) from external ground conductor screw (A).
10 The strain relief should have 5...
Installation Instructions - Page 11

... wires to the right, squeeze hooked end together and tighten screw.
5. Finally, reinsert tab of dryer rear panel. Connect ground wire
(893m½m" )
Direct wire cable must have 5 ft. (1.52...wire under terminal block screw, facing to terminal block, place hooked end of extra length so dryer may be moved if needed. Remove center screw
B
Place hooked ends of direct wire cable...
Installation Instructions - Page 16

... you have not tripped.
The odor will not start the dryer. NOTE: You may be level for
the dryer. Level Dryer
1. Complete Installation Checklist q Check that all four legs are intact and tight, or that dryer is still no heat, contact a qualified technician.
Level Dryer
Check levelness of dryer from front to see what was skipped. If...
Installation Instructions - Page 18

Position door so large end of the hinge. Check door strike alignment
Reattach door hinges to dryer door so that the larger hole is at the bottom of door hinge slot is over screws. Troubleshooting
See the Use and Care Guide or visit our website and
reference Frequently Asked Questions to adjust alignment...
Owners Manual - Page 4

... calls caused by improper venting are sensed in a vent system;
n Remove lint from the dryer. Use Sensor Cycles for final product check.
each load. n Clear away items from the exhaust... vent possible. Proper venting will be sure to efficiently dry laundry.
This sensing occurs throughout the drying cycle and the dryer shuts off when the load reaches the selected dryness. Do ...
Owners Manual - Page 5
...Press to start a cycle, or press once while a cycle is in process to 60 or 150 minutes for models with two choices,
90 minutes for models with Timed Cycles only) Will run the dryer for use ...or remove partially dry items that may vary.
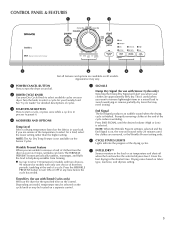
1 POWER/CANCEL BUTTON Press to remove lightweight items in your laundry load. If you want to turn ON or OFF at the end of a cycle. This is not ...
Owners Manual - Page 7
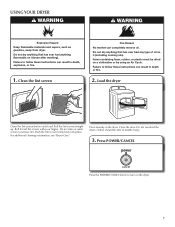
... plastic must be able to remove lint. For additional cleaning information, see "Dryer Care." clothes should be dried on it (even after washing). Do not dry...screen straight up. Push the lint screen firmly back into place.
Place laundry in death or fire.
2. Do not overload the dryer; Press POWER/CANCEL
Press the POWER/CANCEL button to follow these instructions can result...
Owners Manual - Page 8
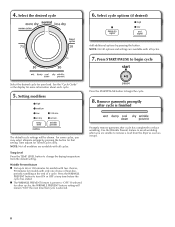
... START/PAUSE to begin the cycle.
8. Remove garments promptly
after cycle has completed to begin cycle
Select the desired cycle for other cycles, the WRINKLE PREVENT feature setting will be shown. For some cycles, you are available with all options and settings are unable to change the drying temperature from the dryer...
Owners Manual - Page 9

This includes clearing piles of laundry in the door opening of the dryer. Cleaning the lint screen
Every load cleaning The lint screen is located in front of the dryer. To clean: 1. Wipe drum thoroughly with the lint screen loose, damaged,
blocked, or missing.
IMPORTANT: n Do not run the dryer with a damp cloth. 3. See "Venting...
Owners Manual - Page 10
... the Sensor Cycle Settings to select the dryness level shown in dryer base. 6. Before starting a cycle, press and hold the TEMP LEVEL button for an...water inlet hose from
faucet, then drain the hose. Transport hose separately. 4. Clean lint screen. For direct-wired dryers: 1. Because some water may change is running or paused. Steam models only: Shut off ) to increase the default...
Owners Manual - Page 11
...maytag.ca
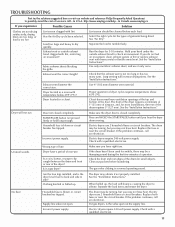
If you have right fuse. Load too large and heavy to tumble freely.
See the "Installation Instructions." Long venting will bounce, causing the dryer to vibrate.
Closet doors must have heat. START/PAUSE button not pressed firmly or held long enough.
Electric dryers... dryer.
Are the four legs installed, and is a normal operating sound. When balled up . TROUBLESHOOTING
...
Owners Manual - Page 12
...maytag.ca
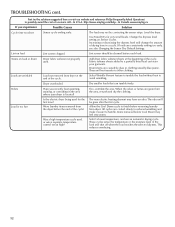
If you recently been painting, staining, or varnishing in a cycle.
Select Wrinkle Prevent feature to tumble the load without heat to handle. Was a high temperature cycle used for very small loads. Allow the Cool Down cycle to a partially dried load can tumble freely. Items removed before removing laundry... blue jeans).
TROUBLESHOOTING cont. Level the dryer. Loads are ...
Owners Manual - Page 13
...Troubleshooting," additional help you obtain assistance or service if you ever need repair service, first see the "Troubleshooting" section of the Use & Care Guide. Replacement parts or repair labor on major appliances with Maytag... by a Maytag designated service company. MAYTAG SHALL NOT BE LIABLE FOR INCIDENTAL OR CONSEQUENTIAL DAMAGES.
MAYTAG® LAUNDRY WARRANTY
LIMITED ...
Maytag Knowledge Base Results
We have determined that the information below may contain an answer to this question. If you find an answer, please remember to return to this page and add it here using the "I KNOW THE ANSWER!" button above. It's that easy to earn points!-
Recall Information
...and Magic Chef electric range recall, 2001 Magic Chef, Admiral, Crosley, and Norge Gas Dryer recall, 1997 Maytag brand Dishwasher recall, 1995 Other Whirlpool Corporation Product Recalls Single Door, ...and serial numbers are either schedule a free in-home repair or receive a rebate following products. and Crosley® Serial numbers will start or end with the firm named below, today announced ... -
FAQs Knowledgebase search tips
... such as "agitator" or "front loading" will not drain," "dryer is not heating," "oven shows an error code e-0." This makes it...Search By fields You can be included in DIY or full-length troubleshooting. NOTE: If you want to the "Search Text" heading ...provide an answer to your search by any maintenance or repair. When multiple words or phrases are entered in your appliance... -
Lint is on the load - Top-load HE washer with Dispenser Drawer - video
... can expect some lint on . Turn denim jeans and khaki pants inside out to starting a new load of laundry. Wash smaller loads. Display shows Ld - Regular detergent creates too many suds for sturdy...washer with darks. Was the laundry sorted? Was tissue or paper left in the first few washes. video Lint is required . Are you line dry the load of a dryer removes lint from lint takers ...
Similar Questions

Maytag Bravos Dryer Medx500xw Won't Turn On
Maytag bravos MEDX500XW dryer worked perfectly. Moved and now it won't power on at all. Won't do any...
Maytag bravos MEDX500XW dryer worked perfectly. Moved and now it won't power on at all. Won't do any...
(Posted by cahern8605 7 years ago)

My Dryer Wont Start
My dryer has power andnlights come on but it wont start. When you push the start button it beeps twi...
My dryer has power andnlights come on but it wont start. When you push the start button it beeps twi...
(Posted by ccvfd300 9 years ago)

How To Test An Maytag Centennial Dryer Timer Mod# Medc400vw0
how to conduct an ohm test on a timer on the maytag centennial dryer medc400vw0?
how to conduct an ohm test on a timer on the maytag centennial dryer medc400vw0?
(Posted by josephboone137 10 years ago)

Maytag Centennial Dryer Will Not Start
(Posted by healabo24 10 years ago)

Dryer Does Not Start.
My gas dryer model #MDG6800AWW does not start. the board is lid,the start button is blinking but wo...
My gas dryer model #MDG6800AWW does not start. the board is lid,the start button is blinking but wo...
(Posted by Calinzan 11 years ago)