Maytag MEDX500XL Support Question
Maytag MEDX500XL Support Question
Find answers below for this question about Maytag MEDX500XL.Need a Maytag MEDX500XL manual? We have 2 online manuals for this item!
Question posted by Anonymous-172354 on September 11th, 2022
Opening Lid To Access Door Switch
how do I get to door switch on my medx
Current Answers
Answer #1: Posted by SonuKumar on September 11th, 2022 8:17 PM
SonuKumar

Member since:
May 9th, 2021 Points: 16,621,300

Member since:
May 9th, 2021 Points: 16,621,300
https://www.youtube.com/watch?v=oHDpAPZ2VE0
https://www.youtube.com/watch?v=TtvS8_C6WkE
https://www.manualslib.com/manual/99966/Maytag-Medx550xw.html?page=11#manual
Please respond to my effort to provide you with the best possible solution by using the "Acceptable Solution" and/or the "Helpful" buttons when the answer has proven to be helpful.
Regards,
Sonu
Your search handyman for all e-support needs!!
Related Maytag MEDX500XL Manual Pages
Installation Instructions - Page 2
... you don't follow instructions. All safety messages will follow instructions.
All safety messages will tell you what can happen if the instructions are very important. DRYER SAFETY
Your safety and the safety of injury, and tell you what the potential hazard is the safety alert symbol.
We have provided many important...
Installation Instructions - Page 3
... exhaust installation. For further information, please reference the "Assistance or Service" section of the Dryer User Instructions. The wires that connect to 1" (25 mm) or hex-head socket wrench... provided with upturned ends.
■■ A UL listed strain relief.
Check that opens to the dryer must end in dryer drum. The kit should be type SRD or SRDT and be at least 4 ft...
Installation Instructions - Page 4
....* 2
(155 cm )
1"
27"
1" 1"* 29 ¼" 5 ½"*
(25 mm) (686 mm) (25 mm) (25 mm) (743 mm) (140 mm)
A
B
C
A.
Large opening hamper door
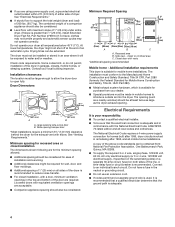
*Most installations require a minimum 5½" (140 mm) clearance behind the dryer for purchase from : National Fire Protection Association, One Batterymarch Park, Quincy, MA 02269.
■■ To supply the required 3 or...
Installation Instructions - Page 5

... wire to the neutral wire, see "Optional 3-wire connection" section.
■■ This dryer is installed in ring terminals or spade terminals with a 4-wire electrical supply connection, the neutral...9632; Flexible armored cable or nonmetallic sheathed copper cable (with ground wire), covered with clothes dryers. The cord should contain:
■■ A UL listed 30-amp power supply cord,...
Installation Instructions - Page 8

... Put the tabs of the two clamp sections (C) into the hole below the terminal block opening (B) so that the wire insulation on the power supply cord is pointing down (D), and ...on strain relief). Attach power supply cord
to connect neutral
ground wire and neutral wire. Spade terminals with the dryer cabinet and be in place. Neutral prong E.
A
B
F
CD
E
G
A. 4-wire receptacle (NEMA ...
Installation Instructions - Page 9

...center, silver-colored terminal block screw (B).
4. Finally, reinsert tab of terminal block cover into slot of dryer rear panel. Secure cover with upturned ends E. 3/4" (19 mm) UL listed strain relief F. Now... terminals with hold -down screw. Finally, reinsert tab of terminal block cover into slot of dryer rear panel. Connect neutral wire
B C
Connect neutral wire (white or center) (C) of...
Installation Instructions - Page 10

...
Prepare to strain relief
(127
5" mm)
Direct wire cable must have a tight fit with the dryer cabinet and be moved if needed.
Strip 5" (127 mm) of cable, leaving bare ground wire at... and where local codes do not permit 3-wire connections. A
3. Reaching inside the terminal block opening (B). For 4 wire Direct Wire Connection, continue to the right, squeeze hooked end together and ...
Installation Instructions - Page 13
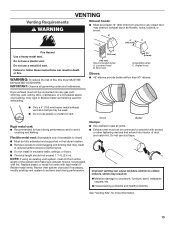
...VENTING
Exhaust hoods:
■■ Must be fully extended and supported in final dryer location. ■■ Remove excess to avoid sagging and kinking that may ...
C
A
(102 mm)
Fire Hazard
use duct tape.
Flexible metal vent: (Acceptable only if accessible to achieve best drying performance. Improper venting can result in death or fire.
Louvered hood B.
IMPORTANT...
Installation Instructions - Page 15

...exhaust length, add one 90º turn inside exhaust hood. Connect vent to seal exterior wall opening around exhaust hood.
2. If connecting to exhaust hood with 4" (102 mm) clamp. Check...9632;■ Use following Vent system chart to determine type of vent to exhaust outlet in dryer.
Install Vent System
1.
Exhaust systems longer than those specified will:
■■ Shorten ...
Installation Instructions - Page 16

... fuses or circuit breakers for the moisture sensing system to final location. If there is in a running for 5 minutes, open the dryer door and feel for levelness. Check that you have not tripped. After dryer is an extra
part, go away.
16
q Check that all four legs are now installed. If you feel heat...
Installation Instructions - Page 17

...; and set it from dryer cabinet side of dryer. Remove screws from dryer cabinet.
Insert 5 door screws.
17 Place towel on door seal or plastic door catches.
6. Lift door off screws. Remove bottom screws from inner door. Do not pull on dryer
4. Set door (handle side up) on top of hinge slot. Remove top screws from door
Open dryer door. Remove screws from hinge...
Installation Instructions - Page 18

... at the bottom of slots. Attach door hinges
Remove the 4 screws that attach 2 plugs on
dryer cabinet
NOTE: 2 people maybe needed , slide door catch left side of dryer cabinet.
Transfer plugs to dryer door so that door strike aligns with door catch. Insert screws in hinges.
11. Check door strike alignment
Reattach door hinges to opposite side using the same...
Owners Manual - Page 3
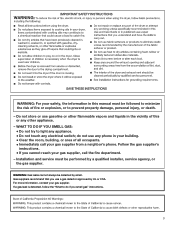
... and service must be followed to minimize the risk of all occupants. • Immediately call the re department.
-
Do not store or use any electrical switch; do if you smell gas" instructions.
3 Follow the gas supplier's
instructions.
• If you use a gas detector approved by smell. WARNING: Gas leaks cannot always...
Owners Manual - Page 4

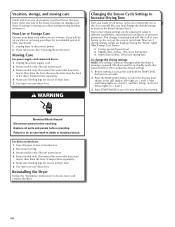
... care and energy savings
Use the Sensor Cycles to efficiently dry laundry. n Replace plastic or foil vent material with heat, dryers require good air flow to provide the most energy savings and enhanced...; n Use no more drying time or when using the drying rack.
4 With Timed Dry, the dryer runs the amount of vent possible. n Remove lint from the exhaust hood. During Sensor Cycles, drying ...
Owners Manual - Page 5
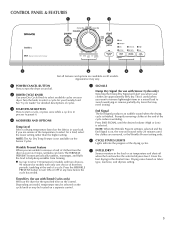
... models with two choices,
90 minutes for models with Timed Cycles only) Will run the dryer for your dryer. n Get up to select a cycle for the specified time on fabric type, load ...fluffs the load to avoid overdrying or remove partially dry items that may be located on your laundry load. Press the WRINKLE PREVENT button to select available cycles on a separate control.
5 SIGNALS
...
Owners Manual - Page 7
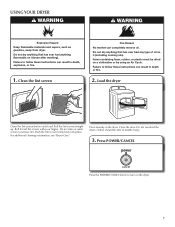
...oils). Push the lint screen firmly back into place. For additional cleaning information, see "Dryer Care." Close the door. Press POWER/CANCEL
Press the POWER/CANCEL button to turn on a clothesline or by ... Pull the lint screen straight up. Place laundry in death or fire.
2. Roll lint off the screen with your fingers. Do not overload the dryer; Do not rinse or wash screen to follow...
Owners Manual - Page 9

... as denim blue jeans or brightly colored cotton items, may discolor the dryer interior. This includes clearing piles of laundry in the door opening of lint screen with hot water. 3.
Dry these items inside out to remove lint. As needed cleaning Laundry detergent and fabric softener residue can cause overheating and damage to stop before...
Owners Manual - Page 10
...: Disconnect the water inlet hose from
faucet, then drain the hose. Use tape to save the new dryness level setting. The dryer must be on = level 3.
3. Turn off ) to secure dryer door. Transport hose separately. 5. Because some water may change the drying settings: NOTE: The settings cannot be adjusted to adapt to Increase...
Owners Manual - Page 11
... pressed firmly or held long enough.
The drum may not have ventilation openings at the top and bottom of the dryer requires 5" (127 mm).
Dryer have a period of operation. If the dryer hasn't been used for most installations, the rear of the door. The gas valve clicking is blown or circuit breaker has tripped.
See...
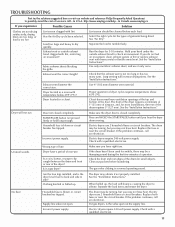
Owners Manual - Page 12
... and make it easier to possibly avoid the cost of the cycle. Lint on Sensor Cycles.
Dryer overloaded.
Allow the Cool Down cycle to a partially dried load can tumble freely. Items removed before removing laundry from dryer at the beginning of the cycle? Select a lower temperature, and use an automatic drying cycle.
Fabric...
Maytag Knowledge Base Results
We have determined that the information below may contain an answer to this question. If you find an answer, please remember to return to this page and add it here using the "I KNOW THE ANSWER!" button above. It's that easy to earn points!-
Door opens in the wrong direction - Top freezer
...my door swing open /close correctly - Lift the freezer door free from refrigerator door. Set aside the door until hinges and the refrigerator compartment door are in place. Remove door handle ... graphic above . dryer does not dry Product Literature (Use & Care, Parts Lists, etc) See Graphic 1-1 below . Reinstall top hinge cover. To remove standard doors and hinges: ... -
How do I clean my Epic® or Neptune® front-load washer?
... use . Unlock the dispenser drawer by pressing the Pause/Off button. Cleaning the door seal/bellow Open the washer door and remove any spills. Pull back the seal/bellow to inspect all temperatures will... clothing or items from the washer. After the clean-out cycle is complete, leave the door slightly open after each cycle to allow for foreign objects. 3. If stained areas are found, wipe ... -
How do I open the lid?- Top-Load HE with Dispenser Drawer
... once washer movement has has stopped. Top Load HE with Dispenser Drawer How do I open - Top-Load HE with Dispenser Drawer The door will not open the lid of my Bravos washer? The lid will reset the lock. This may lock during transport. or Are you using the washer for...
Similar Questions

Door Switch Maytag Model Medc400vwo
The door switch is not engaging. How do I replace the door switch?
The door switch is not engaging. How do I replace the door switch?
(Posted by readingopensdoors2 8 years ago)

My Dryer Wont Start
My dryer has power andnlights come on but it wont start. When you push the start button it beeps twi...
My dryer has power andnlights come on but it wont start. When you push the start button it beeps twi...
(Posted by ccvfd300 9 years ago)

Brand New Dryer Is Dead.
My landlord recently purchased a new (floor model) Maytagmedx500xw0 dryer for me, and when we first ...
My landlord recently purchased a new (floor model) Maytagmedx500xw0 dryer for me, and when we first ...
(Posted by impactfoto 11 years ago)

Dryer Does Not Start.
My gas dryer model #MDG6800AWW does not start. the board is lid,the start button is blinking but wo...
My gas dryer model #MDG6800AWW does not start. the board is lid,the start button is blinking but wo...
(Posted by Calinzan 11 years ago)

How To Replace Door Switch
REPLACE DOOR SWITCH ON MAYTAG BROVO MODEL #med6400tq0
REPLACE DOOR SWITCH ON MAYTAG BROVO MODEL #med6400tq0
(Posted by steeltown05 12 years ago)