Maytag MEDC400BW Support Question
Maytag MEDC400BW Support Question
Find answers below for this question about Maytag MEDC400BW.Need a Maytag MEDC400BW manual? We have 3 online manuals for this item!
Question posted by sharonmiller66114 on November 10th, 2016
Maytag Centennial Commercial Technology Mvwc6esww1 Nov 2009 Purchased.
The beginning of any cycle the machine fills and agitates together. It should only fill then when water level is reached stop filling and agitate. Does not spin all the water out of clothes, I have to put it on a different cycle and spin 2 times. Is it the timer or what part do I buy to fix this issue.
Current Answers
Related Maytag MEDC400BW Manual Pages
Installation Guide - Page 2
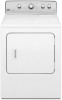
DRYER SAFETY
2
Installation Guide - Page 4
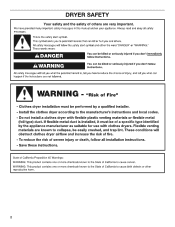
...Phillips screwdriver
Level
Caulking gun and compound (for installing new exhaust vent)
Parts supplied (all parts are included.
Mobile home installations require metal exhaust system hardware, available for use with clothes dryers. The... and Parts
Gather the required tools and parts before purchasing parts. Tools needed : Check local codes.
If using a power supply cord: Use a UL ...
Installation Guide - Page 5
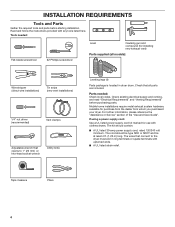
... the dryer is available for purchase from your dealer.
■■ Special provisions must be large enough to allow the dryer door to water and/or weather.
Contact your dryer at ...dryer. Additional installation requirements
This dryer is greater than 1" [25 mm], install Extended Dryer Feet Kit, Part Number 279810.) If not level, clothes may not tumble properly and automatic sensor cycles...
Installation Guide - Page 6
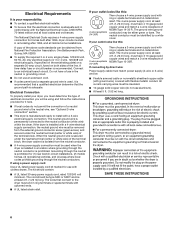
...-carrying wires must determine the type of the line. Electrical Connection
To properly install your dryer, you must be insulated.
■■ 10-gauge solid copper wire (do not permit... white wire) of NEMA Type 14-30 R. The wires that connect to install with clothes dryers. The neutral ground wire is permanently connected to an individual branch circuit. Grounding through the...
Installation Guide - Page 7
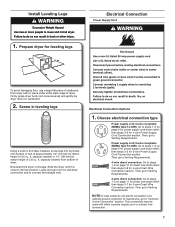
... for electrical connection and to steps 1-2 on page 10 for direct wire strain relief: then steps 3-8 for leveling legs
To avoid damaging floor, use a large flat piece of 3.8 cu. place under entire back edge of dryer.
Power supply cord 3-wire receptacle (NEMA Type 10-30R): Go to connect the exhaust vent. ft...
Installation Guide - Page 8
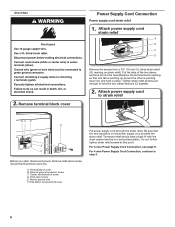
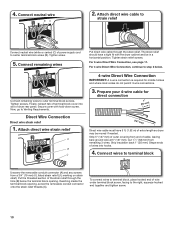
... relief. For 3-wire Power Supply Cord Connection, see page 9. Hold-down screw (D) and terminal block cover (A). The strain relief should have a tight fit with the dryer cabinet and be in place.
Attach power supply cord
strain relief
A B C D
Remove the screws from a 3/4" (19 mm) UL listed strain relief (UL marking on the...
Installation Guide - Page 9
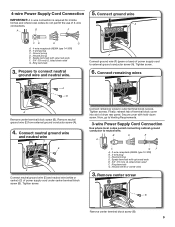
... conductor screw (A).
4. 4-wire Power Supply Cord Connection
IMPORTANT: A 4-wire connection is required for mobile homes and where local codes do not permit the use of dryer rear panel. Now, go to Venting Requirements.
3-wire Power Supply Cord Connection
Use where local codes permit connecting cabinet-ground conductor to external ground conductor...
Installation Guide - Page 10
... screw.
5. The strain relief should have 5 ft. (1.52 m) of extra length so dryer may be in a horizontal position. Connect remaining wires to Venting Requirements. Tighten screws. Prepare your...back 1" (25 mm). Reaching inside the terminal block opening . To connect wires to the right, squeeze hooked end together and tighten screw.
10 Secure cover with the dryer cabinet and be moved ...
Installation Guide - Page 11
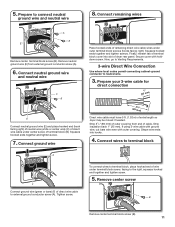
... (white or center wire) (C) of direct wire cable under center screw of extra length so dryer may be moved if needed. Shape wire ends into slot of outer covering from external ground conductor...tighten screw.
5. Squeeze hooked ends together and tighten screw.
7. Strip 31/2" (89 mm) of dryer rear panel. If using 3-wire cable with ground wire, cut bare wire even with holddown screw....
Installation Guide - Page 12
...
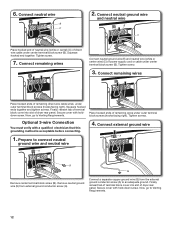
E
Connect neutral ground wire (E) and neutral wire (white or center wire) (C) of dryer rear panel. Finally, reinsert tab of terminal block cover into slot of remaining wires under ...wire
4. Secure cover with hold-down screw. 6. Squeeze hooked end together. Place hooked ends of dryer rear panel. Connect external ground wire
A
A
B
E
Remove center terminal block screw (B). Finally...
Installation Guide - Page 13
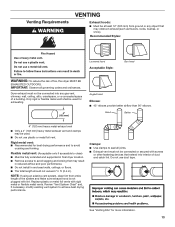
... To reduce the risk of a building.
Replace plastic or metal foil vents with lint. Dryer exhaust must not be connected or secured with screws or other fastening devices that extend into ... may result
in reduced airflow and poor performance. ■■ Do not install in final dryer location. ■■ Remove excess to seal all governing codes and ordinances.
Rigid metal vent...
Installation Guide - Page 14
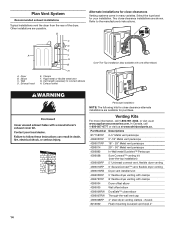
...-the-top installation)
4396009RP 5' Universal connect vent, flexible dryer venting
4396010RP 6' SecureConnect™ vent, flexible dryer venting
4396013RB Dryer vent installer's kit
4396033RP 5' flexible dryer venting with clamps
4396727RP 8' flexible dryer venting with one offset elbow)
Periscope installation
NOTE: The following kits for purchase. Other installations are shown. A
A.
Installation Guide - Page 15
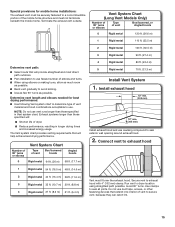
... of vent to secure vent, because they can catch lint.
15 Secure vent to dryer location using elbows or making turns, allow as much room
as possible. ■■... using straightest path possible.
Exhaust systems longer than those specified will:
■■ Shorten life of dryer.
■■ Reduce performance, resulting in Vent system chart.
Install exhaust hood
12" min. ...
Installation Guide - Page 16
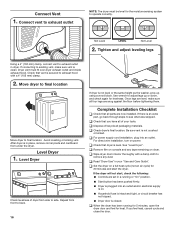
... cloth to
remove any tape remaining on .
■■ Household fuse is intact and tight, or circuit breaker has not tripped.
■■ Dryer door is in a running for 5 minutes, open the dryer door and feel heat, cancel cycle and close the door.
If there is not crushed
or kinked. See "Level Dryer". q Read "Dryer Use" in dryer.
Dryer...
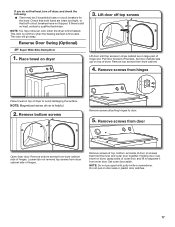
Installation Guide - Page 17
...
If you do not remove) top screws from dryer cabinet side of hinges. If there is first heated. Remove screws from dryer cabinet.
4.
Remove bottom screws
Remove screws attaching hinges...and outer door together. NOTE: You may be 2 household fuses or circuit breakers for
the dryer. This odor is common when the heating element is helpful.
2. Reverse Door Swing (Optional)...
Use & Care Guide - Page 8
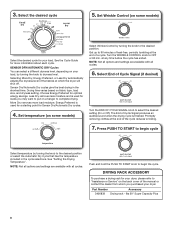
... Less Dry automatically adjusts the dryness level of Cycle Signal produces an audible sound when the drying cycle is used for your dryer, please refer to "Assistance or Service" on some models)
Select the desired cycle for Sensor Dry/Automatic Dry cycles.
4. DRYING RACK ACCESSORY
To purchase a drying rack for loads you purchased your load. More Dry removes...
Use & Care Guide - Page 11
... after a few minutes of fuse.
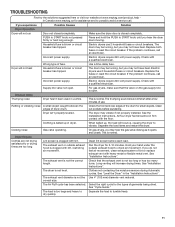
Dryer Results
Clothes are not drying satisfactorily or drying times are too long
Lint screen is clogged with a qualified electrician.
If you may not have heat. Long venting will bounce, causing the dryer to dry quickly.
See "Level the Dryer" in a while. The Air Fluff cycle has been selected.
Press and...
Use & Care Guide - Page 12

.... Load too hot
Laundry items were removed from the area, rewash and dry the clothing. Proper operation of the dryer requires 5" (127 mm). Change the Dry Level setting on load
Lint screen is too short Automatic cycle ending early. Clean lint screen before Cool Down may have ventilation openings at the beginning of the cycle.
Dry smaller...
Use & Care Guide - Page 13

...Maytag within 30 days from the date of purchase.
6. Pick up and delivery. Repairs to parts or systems resulting from unauthorized modifications made to repair or replace appliance light bulbs, air filters, or water...effective from the date of original consumer purchase. MAYTAG® LAUNDRY WARRANTY
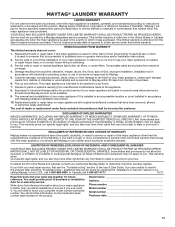
LIMITED WARRANTY
For one year from the date of purchase, when this major appliance is installed...
Warranty Information - Page 1
...or when it was purchased. Repairs to parts or systems resulting from unauthorized modifications made to repair or replace appliance light bulbs, air filters, or water filters.
This warranty ... Serial number Purchase date
13 Some states and provinces do not allow limitations on the product. MAYTAG® LAUNDRY WARRANTY
LIMITED WARRANTY
For one year from the date of purchase, when this...
Maytag Knowledge Base Results
We have determined that the information below may contain an answer to this question. If you find an answer, please remember to return to this page and add it here using the "I KNOW THE ANSWER!" button above. It's that easy to earn points!-
Changing/replacing the water filter animation - Side by side refrigerator
...Thus, water needs to the left or right. Side by pressing the eject button and pulling straight out on the cap to drip. To purchase replacement...water begins to a vertical position and pulling the cap and filter cartridge out through the coiled water reservoir to Flush a Refrigerator Water Filter For Style 1 filters, remove the cartridge cap by turning it counterclockwise until it stops... -
Why is HE High Efficiency detergent the only type of detergent to use in my washer?
... will be purchased at the ...machines. HE detergent is needed for the best performance in washer dispensers. wet loads - Front-load washer Washer not draining, not spinning out water; This means only a small amount is available in my washer? Extended cycle times or excessive water usage from extra rinsing to excess suds. What happens if I don't clean my HE washer? Wet clothes... -
Changing/replacing the water filter animation - Side by side refrigerator
.... Thus, water needs to completely fill the lines ...water system. For Style 1 filters, remove the cartridge cap by sliding it stops...water reservoir to Flush a Refrigerator Water Filter Flush the water system by rotating the cap counterclockwise to depress the water dispenser bar until it off . See also: When to flow. Side by turning it counterclockwise until the water begins...
Similar Questions

Light Wont Come On In Maytag Centennial Commercial Technology Dryer Medc400vw0
(Posted by fcctechd 9 years ago)
Maytag Centennial Commercial Technology Dryer Will Not Dry On Time Cycle
(Posted by coursewin 9 years ago)

Manual Maytag Medc400vw Centennial Commercial Technology Gas Dryer How To
remove front panel
remove front panel
(Posted by litjoh 10 years ago)

How Hot Does A Maytag Centennial Commercial Technology Dryer Get?
(Posted by Jfel2Dust 10 years ago)

What Year Did Maytag Start Making The Centennial Commercial Dryer
(Posted by garbbla 10 years ago)