
Maytag MEDC300XW Support Question
Maytag MEDC300XW Support Question
Find answers below for this question about Maytag MEDC300XW.Need a Maytag MEDC300XW manual? We have 3 online manuals for this item!
Question posted by RUBYILFREEMAN on November 18th, 2011
Dryer Is New Get Very Hot On Top
The person who posted this question about this Maytag product did not include a detailed explanation. Please use the "Request More Information" button to the right if more details would help you to answer this question.
Current Answers
Related Maytag MEDC300XW Manual Pages
Owners Manual - Page 2
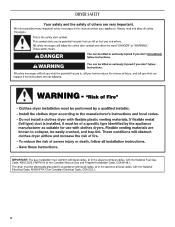
DRYER SAFETY
2
Owners Manual - Page 4
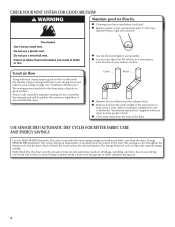
...rigid vent material.
When cleaning is complete, be paid by the customer, regardless of the dryer. Use Timed Dry for final product check. Proper venting will provide optimal energy savings.
CHECK... calls caused by the warranty and will be sure to efficiently dry laundry.
During SENSOR DRY/Automatic Dry cycles, drying air temperature or moisture level are not...
Owners Manual - Page 5
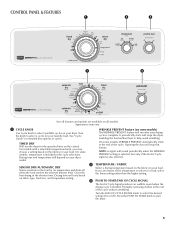
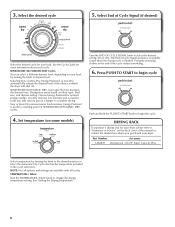
... produces an audible sound when the drying cycle is finished. See "Cycle Guide" for your dryer model. On models with a selectable temperature knob, you are available on the control. Gives .... Drying time will stop this feature. Opening the door will vary based on your laundry load. Appearance may choose a setting based on some models, WRINKLE PREVENT automatically starts at the...
Owners Manual - Page 6

CYCLE GUIDE - Senses moisture in the dryer too long.
CYCLE GUIDE - Will run the dryer for drying medium-weight items such as towels and work clothes, towels.... Line dry bonded or laminated fabrics. If you dry a similar load. Settings and options shown in your dryer has multiple heat settings:
A High Heavy temperature setting may be used for the specified time on all cycles...
Owners Manual - Page 7
... remove dust from storing and shipping.
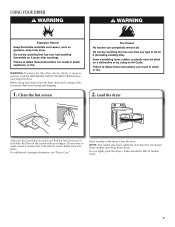
1.
Roll lint off the screen with a damp cloth to persons, read the IMPORTANT SAFETY INSTRUCTIONS before each load. Place laundry in the dryer. Before using your dryer, wipe the dryer drum with your fingers. Do not tightly pack the...
Owners Manual - Page 8
...cycle
5. SENSOR DRY/AUTOMATIC DRY Cycles You can select a different dryness level, depending on your dryer. Set temperature (on a hanger to dryness level. TEMPERATURE / Fabric
Turn the TEMPERATURE / Fabric ...Select temperature by turning the knob to complete drying. See the Cycle Guide for your dryer, please refer to begin the cycle.
Drying time varies based on the back cover...
Owners Manual - Page 9
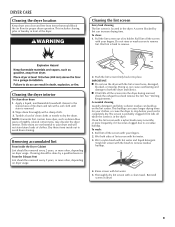
... is probably clogged if lint falls off the screen with your dryer and will not stain future loads of the drum and rub with hot water. 3. Reinstall
screen in the dryer. This includes clearing piles of laundry in the dryer. Cleaning the dryer interior
To clean dryer drum 1. This buildup can cause overheating and damage to avoid...
Owners Manual - Page 10
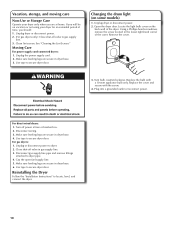
... are at fuse or breaker box. 2. Reinstalling the Dryer
Follow the "Installation Instructions" to gas supply
line. 3. Unplug dryer or disconnect power. 2. (For gas dryers only): Close shut-off power at home. Turn off valve to locate, level, and connect the dryer.
10 Use tape to dryer pipe. 4. If you will be on vacation or...
Owners Manual - Page 11
... Instructions". Use 4" (102 mm) diameter vent material.
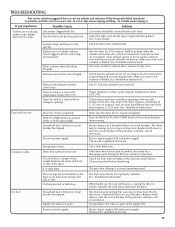
See "Installation Instructions". Make sure the dryer door is not crushed or kinked. The drum may be a thumping sound during the first few...START knob until you do not feel air movement, clean exhaust system of the dryer. Run the dryer for most installations, the rear of garments being dried. See "Installation Instructions". ...
Owners Manual - Page 12

... new electric heating element may have recently been painting, staining, or varnishing in the load and shut off when the load reaches the selected dryness. Use Timed Dry for the first time.
Loads are cooled slowly to reduce wrinkling and make it easier to high.
Laundry items were removed from the dryer before...
Installation Instructions - Page 2

... you what can happen if the instructions are very important.
Tools needed:
Flat-blade screwdriver 2
#2 Phillips screwdriver
Wire stripper (direct wire installations)
Tin snips (new vent installations) DRYER SAFETY
Your safety and the safety of injury, and tell you don't follow instructions. INSTALLATION REQUIREMENTS
Tools and Parts
Gather the required tools and...
Installation Instructions - Page 3
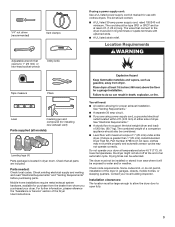
... dealer from whom you are included. Mobile home installations require metal exhaust system hardware, available for installing new exhaust vent)
Parts supplied (all parts are using a power supply cord: Use a UL listed power...area where it will need:
■■ A location allowing for use with clothes dryers. Contact your dryer. The cord should be type SRD or SRDT and be at the end of ...
Installation Instructions - Page 4
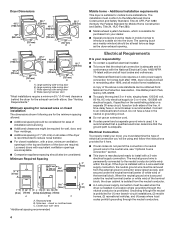
... ready to install with equivalent ventilation openings are required. The installation must conform to introduce outside air into the dryer. The National Electrical Code requires a 4-wire power supply connection for (1) new branch-circuit installations, (2) mobile homes, (3) recreational vehicles, and (4) areas where local codes prohibit grounding through the neutral conductor is...
Installation Instructions - Page 5
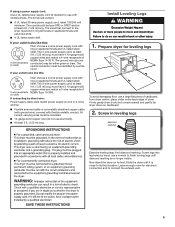
...; A UL listed strain relief. The ground wire (ground
4-wire receptacle conductor) may be identified by a white
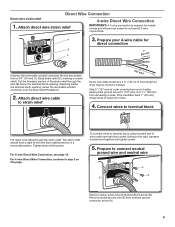
cover. If connecting by hand, use with clothes dryers. Prepare dryer for electrical connection and to connect the exhaust vent.
5 Screw legs into leg holes by direct wire:
Power supply cable must match power supply (4-wire...
Installation Instructions - Page 7
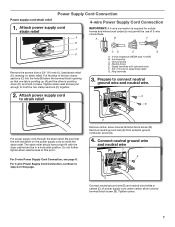
... relief.
E Remove center, silver-colored terminal block screw (B). Tighten screw.
7 Tighten strain relief screws just enough to step 3 on strain relief).
Spade terminals with the dryer cabinet and be in place.
For 4 wire Power Supply Cord Connection, continue to hold in a horizontal position. Put the tabs of the two clamp sections...
Installation Instructions - Page 8

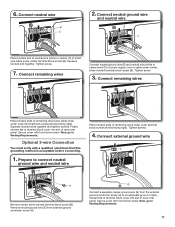
... ground wire
A
F Connect ground wire (F) (green or bare) of power supply cord to neutral wire.
Finally, reinsert tab of terminal block cover into slot of dryer rear panel. Now, go to outer terminal block screws. 5. Tighten screws. Secure cover with hold -down screw. Connect remaining wires
Connect remaining wires to outer...
Installation Instructions - Page 9
..., squeeze hooked end together and tighten screw.
5.
Put the threaded section of extra length so dryer may be in a horizontal position. Remove neutral ground wire (E) from a 3/4" (19 mm)... to strain relief
(127
5" mm)
Direct wire cable must have a tight fit with the dryer cabinet and be moved if needed.
Attach direct wire strain relief
IMPORTANT: A 4-wire connection is...
Installation Instructions - Page 10
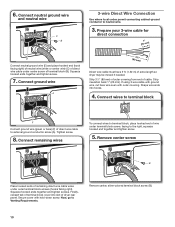
... Now, go to neutral wire.
3. Strip 31/2" (89 mm) of outer covering from end of extra length so dryer may be moved if needed. Connect wires to terminal block
F
Connect ground wire (green or bare) (F) of wire ... of remaining direct wire cable wires under center screw of dryer rear panel. Squeeze hooked ends together and tighten screws. Remove center, silver-colored terminal block screw (B)....
Installation Instructions - Page 11
...
B C
2. Tighten screw.
3. Connect remaining wires
Place hooked ends of dryer rear panel. Secure cover with hold -down screw. Connect external ground wire...Connect neutral ground wire
and neutral wire
B C
Place hooked end of neutral wire (white or center) (C) of dryer rear panel. Tighten screws.
4. Connect remaining wires
E
Connect neutral ground wire (E) and neutral wire (white or...
Installation Instructions - Page 1
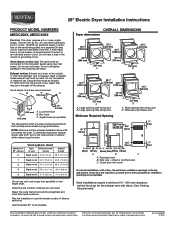
...
3"* (76 mm)
For closet installation, with equivalent air ventilation openings are recommended.
Ref. Water (Steam models only): The dryer must be used. Exhaust venting: Exhaust your dryer to the cold water faucet using new inlet hoses.
Determine the number of the line.
Large opening side-swing door D. Large opening hamper door
Minimum Required...
Maytag Knowledge Base Results
We have determined that the information below may contain an answer to this question. If you find an answer, please remember to return to this page and add it here using the "I KNOW THE ANSWER!" button above. It's that easy to earn points!-
Loads are wrinkled - Bravos washer with Dispensers in Corners
..." error code at the end of time after the end of new wrinkles when the load spins. A load that is tightly packed in hot or warm rinse water setting wrinkles into garments that the cold-water... important to promptly remove loads from my washer - How to get the best performance from the dryer to extract the maximum amount of wrinkling. The washer high spin speeds range from 900 to... -
Loads are wrinkled - Top-load washer
...top-load washer are wrinkled - Large loads increase the likelihood of new wrinkles when the load spins. Reduce load size if needed. Dryer Were the clothes left in the washer for too long after ... temperature is connected to twist and tangle, which also results in . It is connected to the hot-water faucet and that require cold water rinses. Top-load washer The clothes coming out of the... -
My dryer or load has an odor
... after the first cycle. My dryer or load has an odor Have you recently been painting, staining or varnishing in the area where your dryer is too hot - A wet load left in...dryer while painting, varnishing or refinishing near the dryer. My dryer makes sounds or vibrations Fabric is located? Was a damp or wet load left in the washer or dryer for the first time? (Electric dryers) A new...
Similar Questions

Which Setting On Maytag Dryer Is Hot ? Very Dry Setting?
(Posted by Pubren 9 years ago)

How To Disassemble Maytag Centennial Dryer Medc300xw
(Posted by gergmtah 9 years ago)

How To Replace Belt On Maytag Centennial Dryer Medc300xw
(Posted by freonit 10 years ago)

How To Reverse The Door On A Maytag Electric Dryer Medc300xw
(Posted by racunpti 10 years ago)
Maytag Electric Dryer, Medc300xw
the dryer turn on but the drum will not turn.
the dryer turn on but the drum will not turn.
(Posted by DavidLDunlap 11 years ago)