Maytag MED7230HW Support Question
Maytag MED7230HW Support Question
Find answers below for this question about Maytag MED7230HW.Need a Maytag MED7230HW manual? We have 4 online manuals for this item!
Question posted by paulluecke on August 21st, 2023
Cycle Signal Doesn't Work
Though set to "high" volume, the cycle signal has never made any sound. And can't find anything in any manual about it.
Current Answers
Answer #1: Posted by SonuKumar on August 21st, 2023 8:37 PM
SonuKumar

Member since:
May 9th, 2021 Points: 16,621,300

Member since:
May 9th, 2021 Points: 16,621,300
https://www.manua.ls/maytag/med7230hw/manual
Follow troubleshooting steps
Please respond to my effort to provide you with the best possible solution by using the "Acceptable Solution" and/or the "Helpful" buttons when the answer has proven to be helpful.
Regards,
Sonu
Your search handyman for all e-support needs!!
Related Maytag MED7230HW Manual Pages
Dimension Guide - Page 1

Gas
Metallic Slate Available MED7230HC - Electric MGD7230HW -
Dimension Guide
Maytag® Dryer with Extra Power and Advanced Moisture Sensing - 7.4 cu. ft. White Available MED7230HW - Electric MGD7230HC - Gas
43 1∕8" Height
W11412670B
29 7∕8" Depth
27" Width
Dimension Guide - Page 4
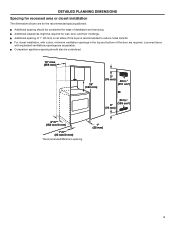
... and servicing. Ƀ Additional clearances might be required for wall, door, and floor moldings. Ƀ Additional spacing of 1" (25 mm) on all sides of the dryer is recommended to reduce noise transfer. Ƀ For closet installation, with equivalent ventilations openings are acceptable. Ƀ Companion appliance spacing should also be considered.
14...
Owners Manual 1 - Page 2

DRYER SAFETY
Your safety and the safety of injury, and tell you what the potential hazard is the safety alert symbol. We have provided ... must be electrically grounded in accordance with the National Electrical Code, ANSI/NFPA 70, or the Canadian Electrical Code, Part 1, CSA C22.1.
2 The dryer must conform with local codes, or in the absence of local codes, with local codes, or in this...
Owners Manual 1 - Page 4

...that opens to 1" or hex-head socket wrench
Pipe-joint compound resistant to the dryer must end in your dryer. Tools needed for all installations:
Tools needed for gas installations:
8" or 10"... Plastic putty knife
Vent clamps
Leveling legs (4) Parts needed : (Not supplied with clothes dryers. For further information, please refer to the "Assistance or Service" section in ring terminals...
Owners Manual 1 - Page 5
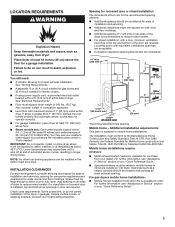
... slope is greater than 1" (25 mm), clothes may not tumble properly and automatic sensor cycles may not operate correctly. ■ For garage installation, place dryer at end of automatic sensor cycles, resulting in mobile homes to introduce outside air into dryer. If a closet door or louvered door is suitable for walls, doors, and floor...
Owners Manual 1 - Page 6
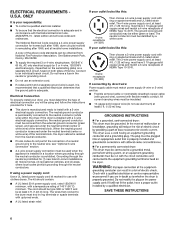
...with ground wire), covered with ring or spade terminals and UL listed strain relief.
If the dryer is installed with a 4-wire electrical supply connection, the neutral ground conductor must match power ...latest edition and all mobile home installations. Connect to the neutral conductor (white wire) within the dryer. The 4-wire power supply cord, at least 4 ft. (1.22 m) long, must be...
Owners Manual 1 - Page 21

... wire installation, turn on . Repeat on . All Models:
q Select a Timed Dry heated cycle, and start of scale through steps to the locked position. You will shut. 5. Close the dryer door as far as the door is set in the dryer. Open the dryer door. Steam Models Only:
q Be sure the water faucets are now installed...
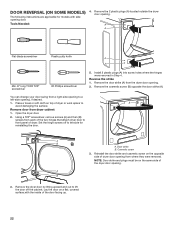
Owners Manual 1 - Page 22
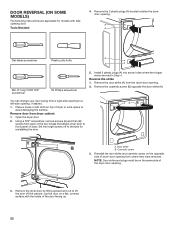
... work space to the side for models with the inside of the door facing up. Lay the door on the opposite side of dryer. A A
A
Flat-blade screwdriver
Plastic putty knife
A
Min. 8" long TORX T20® screwdriver
#2 Phillips screwdriver
5.
Remove door from the dryer door opening door.
Set the hinge screws off the cabinet. A B
A B
A B
3. Door...
Owners Manual 1 - Page 26

... overheating and damage to remove.
2. Roll lint off the screen with hot water.
3. Wet a nylon brush with a soft cloth. 2. Reinstall
screen in front of laundry in dryer.
26 Wet lint is completely dry. Use a mild hand dish detergent mixed at least 18 inches (46 cm) above the floor for a garage installation. Pull...
Owners Manual 1 - Page 27

... foil vent. Do not use a plastic vent. GOOD AIR FLOW
Along with heat, dryers require good air flow to the dryer plays a big role in the lower right-hand corner of the dryer. The venting system attached to efficiently dry laundry. Locate the light bulb cover on the
back wall of the cover. Replace...
Owners Manual - Page 5

...;■ Floor must conform to reduce noise transfer. IMPORTANT: Do not operate, install, or store dryer where it will need: ■■ A location allowing for walls, doors, and floor moldings... mm), clothes may not tumble properly and automatic sensor cycles may not operate correctly. ■■ For garage installation, place dryer at end of the door are for the recommended spacing...
Owners Manual - Page 21
... of its first cycle.
"See Troubleshooting." NOTE: You may clog different parts of the water system, which will not start, check the following:
• Controls are set into an outlet and/or electrical supply is connected.
• Household fuse is intact and tight, or circuit breaker has not tripped.
• Dryer door is...
Owners Manual - Page 22
...door strike (A) from the dryer door opening door.
Remove door from where they were removed. Set the hinge screws off to lift the door off the cabinet. Remove the dryer door by lifting upward ... strike 1. You can change your door swing from each of dryer.
Place a towel or soft cloth on the opposite side of dryer or work space to avoid damaging the surface. Reinstall the door strike and...
Owners Manual - Page 26
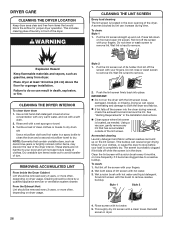
... transfer of its holder. Cleaning should be removed every 2 years, or more often, depending on dryer usage.
Wet both the dryer and fabrics.
■ If lint falls off while the screen is located, as needed cleaning
Laundry detergent and fabric softener residue can cause longer drying times for your clothes, or cause the...
Owners Manual - Page 27
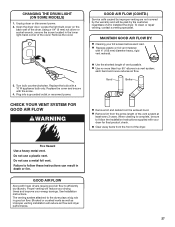
... debris from the exhaust hood. ■ Remove lint from the front of who installed the dryer. Failure to follow these instructions can result in the lower right-hand corner of the vent...elbows in good air flow. Proper venting will reduce air flow and dryer performance.
27 The venting system attached to efficiently dry laundry. Remove the cover.
3. MAINTAIN GOOD AIR FLOW BY:
■...
Quick Reference Manual - Page 2
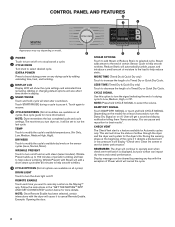
... for better performance." Touch again to resume.
5 CYCLE MODIFIERS (Not all cycles. Follow the instructions in display.
4 START/PAUSE Touch and hold CYCLE SIGNAL to select the volume.
NOTE: Press/hold ; Clean lint screen or vent for more information.) NOTE: Dryer remembers the last completed cycle and cycle settings. Reduce Static will automatically tumble, pause, and introduce...
Quick Reference Manual - Page 3

...explosion, or fire.
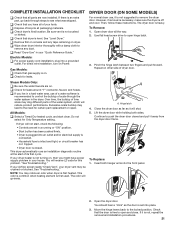
1 CLEAN LINT SCREEN
2 LOAD DRYER
3 PRESS POWER TO TURN ON THE DRYER
4 SELECT THE DESIRED CYCLE FOR YOUR LOAD*
Clean the lint screen before they...Read all your Manuals for more information on with all cycles, settings, and options are available with "Select Language" display message.
*NOTE: See "Cycle Guide" for more information about cycles, settings, and options. ...
Quick Reference Manual - Page 4

...Power
rearrange items for that cycle will vary, depending on any drying cycle by using a slightly lower heat level. This cycle is illuminated. Once you select a cycle, the default modifiers or the previous set modifiers for optimal drying.
Partway through the cycle, the
Cycle Signal
signal will sound to indicate when it is a long cycle with High heat. Settings shown are available on...
Quick Reference Manual - Page 5
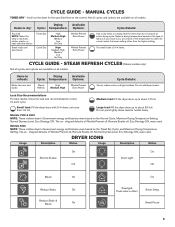
... Setting, Normal Dryness Level, Eco Strategy ON. MANUAL CYCLES
TIMED DRY - Medium load: Fill the dryer drum up to a damp level for each cycle. Items to dry:
Drying
Available
Cycle: Temperature: Options:
Cycle Details:
Any load NOTE: Select Air Only to dry foam, rubber, plastic, or heat-sensitive fabrics
Small loads and sportswear
Timed Dry Quick Dry
High...
Quick Reference Manual - Page 6
... added, it goes to the least
again.
REGISTER PRODUCT
SCHEDULE SERVICE
TROUBLESHOOTING
MANUALS & DOWNLOADS
ADD SERVICE PLAN
PARTS
ACCESSORIES
Model & Serial Number Tag location
To...maytag.ca/owners.
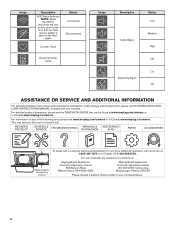
Status Connected
Disconnected
Custom Cycle
Download & Go Cycle
Image
Description Cycle Signal Damp Dry Signal
Status Low
Medium High Off On Off
ASSISTANCE OR SERVICE AND...
Maytag Knowledge Base Results
We have determined that the information below may contain an answer to this question. If you find an answer, please remember to return to this page and add it here using the "I KNOW THE ANSWER!" button above. It's that easy to earn points!-
Dispensers not working correctly - Front-load Epic washer
...cycle is not overfilled. Do not add powdered laundry products to the bleach compartment. Bravos® Are the laundry products dispensing too early? Make sure the laundry products (detergent, fabric softener, liquid chlorine bleach) are not working...to leak out. Manually remove the dispenser, and clean any leftover detergent or other laundry products that ... -
Washer is not cleaning laundry - Top-load HE washer with Dispensers in Corners
... hose is not cleaning laundry - Top-load washer Washer is connected to make soil removal easier. Top-load HE washer with most cycles. Check your water inlet...number in warm rinse water setting wrinkles into the dispenser before laundering. Detergent works by filling the dispenser with Dispensers in my washer? You may have a high level of detergent to ... -
Dispenser not working correctly - Top-load HE washer with Dispenser Drawer - video
...option for best results when using an oxi laundry boost product, add it to remove...Sounds different than chlorine bleach and will remain in the dispenser compartments at the end of the cycle. This is required Is water left in the correct compartments. Dispenser not working correctly - Top-load HE washer with Dispenser Drawer - See also: Why HE High...
Similar Questions

Maytag Medb835dw Dryer Won't Start Af Signal I Cleaned Vents And Airf
(Posted by 1688fairway 2 years ago)

Check Lint Light Comes On
My Maytag MGDB725BW0 is not working properly. When ready to start the dryer the led reads 40 minutes...
My Maytag MGDB725BW0 is not working properly. When ready to start the dryer the led reads 40 minutes...
(Posted by eid00 4 years ago)

Maytag Centennial Dryer Tripping Circuit At High Heat Why
(Posted by BANAfr 10 years ago)

Dryer Trips Circuit
after running for about 15 min the circuit breaks and i have to reset the breaker
after running for about 15 min the circuit breaks and i have to reset the breaker
(Posted by katiejody 10 years ago)

Maytag Eerpic Z Dryer
My Maytag EpicZ dryer timer isn't working properly. On the pre-settings and on the manual timer sett...
My Maytag EpicZ dryer timer isn't working properly. On the pre-settings and on the manual timer sett...
(Posted by eli4aj 11 years ago)