Get support for Maytag MDB8959SKZ

Maytag MDB8959SKZ Support Question

Maytag MDB8959SKZ Support Question

Find answers below for this question about Maytag MDB8959SKZ.
Need a Maytag MDB8959SKZ manual? We have 2 online manuals for this item!
Question posted by Nick9075 on May 5th, 2023

Error Shows

Just got installed and shows F6 E1

Current Answers

Answer #1: Posted by SonuKumar on May 5th, 2023 8:14 PM
This answer was accepted by the poster of the original question.
SonuKumar

Member since:
May 9th, 2021

Points: 16,617,810
1,100
points
The F6 E1 error code on your Maytag MDB8959SKZ dishwasher indicates a communication error between the user interface control board and the main control board. This can be caused by a variety of issues, such as a loose wire connection, a faulty control board, or a problem with the keypad.

Here are some steps you can take to troubleshoot the issue:

Turn off the dishwasher: Turn off the dishwasher and unplug it from the power source for at least five minutes.

Check the wiring: Inspect the wiring connections between the user interface control board and the main control board. Make sure all connections are secure and tight.

Reset the control boards: After checking the wiring, reconnect the power and turn on the dishwasher. If the error code persists, try resetting both the user interface control board and the main control board.

Contact customer support: If the above steps do not resolve the issue, it may be necessary to contact Maytag customer support for assistance. They can help you diagnose and fix the problem, or schedule a service appointment if needed.


Please respond to my effort to provide you with the best possible solution by using the "Acceptable Solution" and/or the "Helpful" buttons when the answer has proven to be helpful.

Regards,
Sonu
Your search handyman for all e-support needs!!

Related Maytag MDB8959SKZ Manual Pages

Dimension Guide - Page 1

...MDB4949SK, MDB7959SK, MDB8959SK, MDB9959SK, MDB9979SK PRODUCT DIMENSIONS 241/2" (62.2 cm) 337/16" (84.9 cm)* *Dishwasher can be raised 17/16" (3.7 cm) with feet fully extended. 23⅞" (60.6 cm) Because ... numbers starting with product. 24" Dishwasher DETAILED PLANNING DIMENSIONS GUIDE Applies to change without notice. For complete details, see Installation Instructions packed with ;
Dimension Guide - Page 2

... notice. 2 Dimensions are for planning purposes only. For complete details, see Installation Instructions packed with feet fully extended. Specifications subject to change materials and specifications ... (60.6 cm) B* Height to top of handle C Height of adjustable toe kick D Width of recessed dishwasher (min.) J† Depth with door fully open (min.) 335/8" (85.4 cm) 503/16" (127.4...
Dimension Guide - Page 3

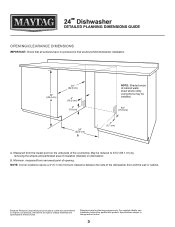
... DIMENSIONS GUIDE OPENING/CLEARANCE DIMENSIONS IMPORTANT: Check that all surfaces have no protrusions that would prohibit dishwasher installation. 34" (86.4 cm) A 24" (62.0 cm) 4" (10.2 cm) 3" (7.6 cm) 24" (62.0 cm) B NOTE: Shaded areas of cabinet walls show where utility connections may be reduced to change without notice. May be installed. 6¼" (15.9 cm) 2" (5.1 cm) A. B.
Dimension Guide - Page 4

...: 1/2" (1.3 cm) minimum plastic tubing is supplied with the National Electrical Code, ANSI/NFPA 70 - Circuit Requirements: ■ The dishwasher may exist in accordance with the air gap installation instructions. WATER SUPPLY REQUIREMENTS ■ This dishwasher has a water heating feature and also requires a connection to a hot water supply line. ■ A hot water line with...
Owners Manual - Page 2

... not abuse, sit on, or stand on all enclosure panels are in doubt whether the dishwasher is installed and grounded in accordance with all instructions before using the dishwasher turn on the door, lid, or dish racks of the dishwasher. Under certain conditions, hydrogen gas may be plugged into an appropriate outlet that they...
Owners Manual - Page 3

...dishwasher until completely installed. Typical cycle time is specifically designed to be connected to your drying and wash performance. Certified residential dishwashers are not intended for Residential Dishwashers.... mineral deposits (15 grains per U.S. Add detergent just before starting a cycle. ■■ Fresh automatic dishwasher detergent results in serious injury or cuts. Rinse ...
Owners Manual - Page 6

...on . 2. When the "Start/Resume" button is pressed in Tub OFF when door is opened Light in step 4, the dishwasher will change to show for nondisplay models.) 6. For Models with a Display, an "A" will return to step 1. Menu Rinse Aid Level Rinse Aid ...selection. Press the "Start/Resume" button to select the feature and enter the sub-menu. The dishwasher will show the current setting.
Owners Manual - Page 7

..., DO NOT turn off power and keep door closed. If the water cannot be turned off, DO NOT turn off power and keep door closed . ERROR CODES ERROR CODES / BLINKING LIGHTS Issue Code Shown (7 Seg Display) (if present) Dishwasher fails to operate fill valve correctly Motor controller failure No water present at...
Owners Manual - Page 9

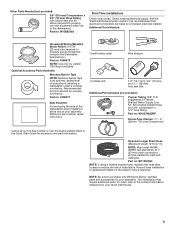
... appliance. Kit includes braided hose and 3/8" compression x 3/4" hose fitting. NOTE: Be sure to heat and detergent. It is an optional, added level of protection if installing a dishwasher under a wooden countertop. Recommended but not required for future reference. Optional Accessory Parts Available: Moisture Barrier Tape NOTE: Moisture barrier tape is recommended that electrical...
Owners Manual - Page 10

...-free number or visit the brand website listed in your appliance. Straight W11365011 Cord Kit - Motor should not touch the floor. ■■ Do not install dishwasher over carpeted flooring. 10 To order, refer to purchase only Whirlpool factory-certified parts and accessories for accessory and part information. If it winterized by...
Owners Manual - Page 11

....0 cm) E D. Insulation may protrude forward of the face of opening. Door handles may be installed. 6¼" (15.9 cm) 2" (5.1 cm) 11 Measured from narrowest point of the dishwasher, varies by removing the wheels and perforated area of cabinet walls show where utility connections may be compressed (not used on the underside of the countertop. E.
Owners Manual - Page 12

... psi (138 kPa to 862 kPa) water pressure can be made inside of the water inlet valve. ■■ If installed in the supply line. WATER SUPPLY REQUIREMENTS ■■ This dishwasher has a water heating feature and also requires a connection to heat and detergent, and fits the 1" (2.5 cm) drain connector of 12...
Owners Manual - Page 13

... not required. Drill a 11/2" (3.8 cm) drain hose hole in the "Service & Support" section "How To's & FAQ. 2. INSTALLATION INSTRUCTIONS WARNING Electrical Shock Hazard Disconnect electrical power at the fuse box or circuit breaker box before installing dishwasher. Disconnect power Disconnect electrical power at whirlpool.com in the side or rear of cabinet, depending on...
Owners Manual - Page 14

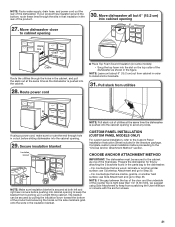
...kitchen floor is in use. 6. Do not connect the wire to avoid movement when the dishwasher is higher than the cabinet opening's floor - This connection will prohibit cable from power ....1 cm). If installing into cabinet opening (15.2 6" cm) If installing with direct wire, route the cable as needed , in area shown. Route cable from moving when dishwasher is installed into the cabinet ...
Owners Manual - Page 15

... its back. DISCONNECT AND REMOVE DRIP TRAY ASSEMBLY 10a. Do not use dishwasher until completely installed. PREPARE DISHWASHER WARNING REMOVE ACCESS PANEL AND INSULATION 9. Take caution not to move and install dishwasher. Doing so can result in back or other injury. 8. Remove drip tray assembly Drip tray assembly To remove the drip tray assembly, press...
Owners Manual - Page 16

...CONNECT WATER LINE TO FILL VALVE - The unit comes with compression fittings. Legs can be installed. For Flexible line, begin with Step 14 12. Copper Water Line Measure the height ...to the floor where the dishwasher will be removed if necessary for a 331/2" (85.1 cm) height installation. Use wrench to length, and attach with the legs set for tight installations. 16 11. For ...
Owners Manual - Page 18

...connect the drain hose. Route the hose out of the back of the box forward. Install a UL Listed/CSA Approved metallic strain relief. Connect drain hose Drain Hose Location 18....hose is provided with the hose facing underneath the dishwasher. Do not use . 20. Proceed to follow these instructions can result in the cabinet opening. 18 If installing product using a Power Cord. Using 1/4" (6.4...
Owners Manual - Page 20

.... Do not remove insulation blanket-the blanket reduces the sound level. Tighten the setscrews 1/4 turn past the point of the side shields under dishwasher (if used). 20 Figure: 4 Figure: 5 INSTALL DOOR HANDLE (ON SOME MODELS) 25. Retain hex key with the setscrews facing down. Remove cardboard from the packaging. There are already...
Owners Manual - Page 21

... 33. CHOOSE ANCHOR ATTACHMENT METHOD IMPORTANT: The dishwasher must be secured by attaching the 2 brackets found in order to the Custom Panel Installation Instruction Sheet included in the figure. NOTE: ...Insulation blanket Secure blanket NOTE: Make sure insulation blanket is secured at the same time the dishwasher is tight (less than 1/4" [6.35 mm]), we suggest using a power cord, make ...
Owners Manual - Page 22

... Using pliers, bend/twist tab to be done later. Side Attachment: 33. FINAL INSTALLATION CHECK 35. You may need to adjust alignment to lock the brackets in place. Countertop Attachment: 32. and right-hand top of the dishwasher. Counter top attachment Push bracket into the open slots on the left- Insert bracket...

Maytag Knowledge Base Results

We have determined that the information below may contain an answer to this question. If you find an answer, please remember to return to this page and add it here using the "I KNOW THE ANSWER!" button above. It's that easy to earn points!

  • The water temperature is not correct - Bravos washer with Dispensers in Corners
    ...you have your Installation Instructions, enter your product model number in water temperature during installation. Is the washer new or just recently installed? Are you ...display an "HC" error code at the end of hoses: Check to the washer can produce. To check the installation of the cycle. ...or just recently installed? Are the hot and cold water inlet hoses reversed?...
  • No or low ice production - French door refrigerator with exterior dispenser
    ...cubes or low ice production. If ice is either clogged or incorrectly installed. If the refrigerator has just been installed, allow 24 hours for full ice production to a cold ... the sediment filter in order to be a minimum of high household water consumption (laundry, dishwasher, etc.) can reduce water flow. Straighten the water source line. Periods of 40-60...
  • The water temperature is not correct - Top-load HE washer with Dispenser Drawers - video
    ...can produce. video Learn more about the temperature control: Is the washer new or just recently installed? Are the hot and cold water inlet hoses reversed? Is the water heater... washer with Dispenser Drawer - The water temperature is not working correctly - Top-load washer Display shows LF - video The chlorine bleach dispenser is not correct - Warm and hot water wash may ...

Similar Questions

When I Start Unit, It Drains And Wont Stop Draining
this unit i am working on wont stop draining, it stops only when i cancel the cycle. no error. i am ...
(Posted by madarangvito 1 year ago)
Error Codes F2 And E2 : The Dishwasher Is Inoperable Showing These Two Codes
The dishwasher is inoperable and has E2 and F2 flashing on a little display. Power failing the dishw...
(Posted by jlg0840 8 years ago)
Installed New Built-in Dishwasher.replaced Main Control.1month Same Problem.why
Didnt Work Out Of Box. Factory Service Repair.new Main Control. Work Just Over 1month.problem Has Re...
(Posted by howardtisha 11 years ago)
Ask a New Question
Use the box below to post a new question about this Maytag product .
Points & Prizes
  • You can earn points for nearly everything you do on HelpOwl.com
  • You can trade in those points for gift cards at leading retailers such as Amazon.com and Walmart
  • It's that simple!
See How it Works
Create a Free Account

Maytag Manuals

Find free Maytag MDB8959SKZ manuals and user guides available at ManualOwl.com. Try out our unique manual viewer allowing you to interact with manuals from directly within your browser!

Maytag Reviews

View thousands of Maytag user reviews and customer ratings available at ReviewOwl.com.

Contact Information

Complete Maytag customer service contact information including steps to reach representatives, hours of operation, customer support links and more from ContactHelp.com.

Scoreboard Ratings

See detailed Maytag customer service rankings, employee comments and much more from our sister site.

Maytag Recalls

Find comprehensive Maytag recall information updated hourly on RecallOwl.com.