Makita LS1040 Support Question
Makita LS1040 Support Question
Find answers below for this question about Makita LS1040.Need a Makita LS1040 manual? We have 2 online manuals for this item!
Question posted by chris35183 on January 13th, 2013
How To Reassemble The Guard
can any one help with the guard assembly please
Current Answers
Related Makita LS1040 Manual Pages
Owners Manual - Page 1
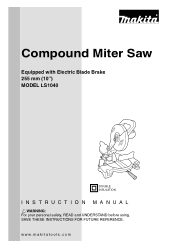
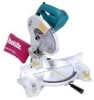
Compound Miter Saw
Equipped with Electric Blade Brake 255 mm (10") MODEL LS1040
DOUBLE INSULATION
INSTRUCTION MANUAL
WARNING: For your personal safety, READ and UNDERSTAND before using. www.makitatools.com SAVE THESE INSTRUCTIONS FOR FUTURE REFERENCE.
Owners Manual - Page 2
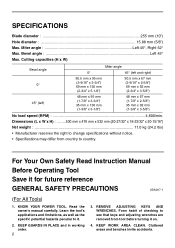
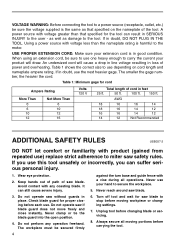
Learn the tool's applications and limitations, as well as the specific potential hazards peculiar to country. KEEP GUARDS IN PLACE and in ...92 mm (1-3/8" x 3-5/8")
No load speed (RPM 4,600/min. For Your Own Safety Read Instruction Manual
Before Operating Tool
Save it on.
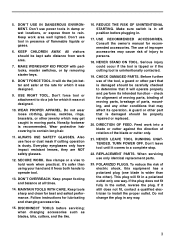
4. Cluttered areas and benches invite accidents.
REMOVE ADJUSTING KEYS AND WRENCHES. Read the owner's manual ...
Owners Manual - Page 3
... or cutter against the direction of rotation of flammable liquids or gases.
6. Don't force tool or attachment to persons.
18. Also use of the tool, a guard or other part that it comes to install the proper outlet. MAINTAIN TOOLS WITH CARE. USE RECOMMENDED ACCESSORIES. Consult the owner's manual for best and safest performance. TURN...
Owners Manual - Page 4
..., the heavier the cord. Wear eye protection.
2. Never use your product will cause a drop in line voltage resulting in loss of the tool. Never reach around saw without guards in place. Always secure all operations.
It can result in SERIOUS INJURY to the user - Do not perform any coasting blade. Table 1 shows...
Owners Manual - Page 5
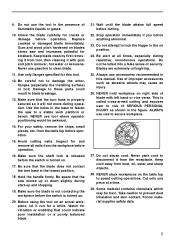
...presence of improper accessories such as shown in blade breakage.
13. NEVER use the tool in the base to secure workpiece.
27. Inspect for kickback. Stop operation immediately if...during operation. ALWAYS use accessories recommended in the on .
17. Keep cord away from tool, then cleaning it will not move during repetitive, monotonous operations. Follow material supplier safety ...
Owners Manual - Page 7
...
1
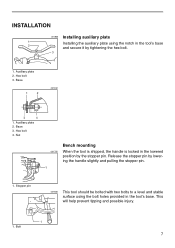
1. Base
1
2
001832
3
4
1. Nut
Bench mounting 001792 When the tool is shipped, the handle is locked in the tool's base
2
and secure it by tightening the hex bolt.
3
1. Bolt
7 ...1
Installing the auxiliary plate using the bolt holes provided in the tool's base. Auxiliary plate 2. Stopper pin
001856 This tool should be bolted with two bolts to a level and stable surface...
Owners Manual - Page 8
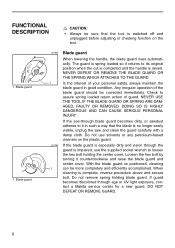
... the blade is no longer easily visible, unplug the saw and clean the guard carefully with a damp cloth. The guard is switched off and unplugged before adjusting or checking function on the plastic guard. NEVER USE THE TOOL IF THE BLADE GUARD OR SPRING ARE DAMAGED, FAULTY OR REMOVED.
Loosen the hex bolt by turning...
Owners Manual - Page 9
... saw blade. Socket wrench 2. Adjusting bolt
2 1
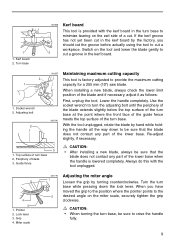
002257 Maintaining maximum cutting capacity
This tool is provided with the tool unplugged.
4
3 1. Guide fence
CAUTION:
• After installing a new blade, ...any part of the blade and if necessary, adjust it as follows:
First, unplug the tool. Lock lever 3.
Kerf board 2. When you should cut a workpiece. Periphery of the ...
Owners Manual - Page 10
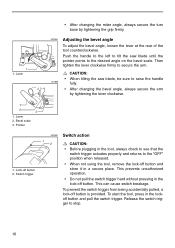
...bevel angle
To adjust the bevel angle, loosen the lever at the rear of the tool counterclockwise.
CAUTION:
• When tilting the saw blade until the pointer points to...turn base by tightening the lever clockwise.
1
2
3
1. Switch trigger
• When not using the tool, remove the lock-off button is provided.
Pointer
001862 Switch action
1 2
CAUTION:
• Before plugging ...
Owners Manual - Page 11
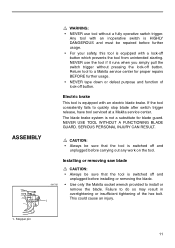
... trigger without a fully operative switch trigger. ASSEMBLY
CAUTION: • Always be repaired before installing or removing the blade.
• Use only the Makita socket wrench provided to a Makita service center for blade guard. Installing or removing saw blade
001792
1
CAUTION:
• Always be sure that the tool is equipped with an electric blade...
Owners Manual - Page 12
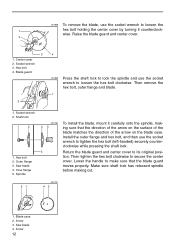
...the blade, use the socket
wrench to tighten the hex bolt (left-handed) securely counter- Blade guard
2
4
001859 Press the shaft lock to lock the spindle and use the socket wrench to secure ...4. Socket wrench 3.
Socket wrench 2. clockwise while pressing the shaft lock.
3
Return the blade guard and center cover to make sure that the direction of the arrow on the surface of the
...
Owners Manual - Page 13
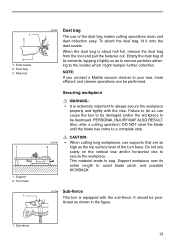
...long workpieces, use of its entire length to your saw, more efficient and cleaner operations can cause the tool to be performed. Also, after a cutting operation, DO NOT raise the blade until the blade has... connect a Makita vacuum cleaner to avoid blade pinch and possible KICKBACK.
001766 Sub-fence
This tool is equipped with the vise. Sub-fence
13 Do not rely solely on the vertical vise...
Owners Manual - Page 14
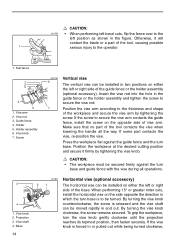
... vise arm contacts the guide fence, install the screw on either the left or right side of the tool contacts the vise when lowering the handle all operations.
3
4 1. Press the workpiece flat against the turn...screw is released and the vise shaft can be moved rapidly in the guide fence or the holder assembly and tighten the screw to secure the vise rod. Insert the vise rod into the hole in ...
Owners Manual - Page 15
Rod 12
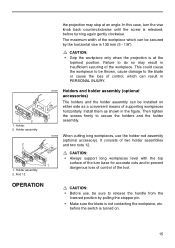
002247 Holders and holder assembly (optional accessories)
The holders and the holder assembly can be secured by pulling the stopper pin.
• Make sure the blade is turned on either side as shown in the figure. It consists of the tool. CAUTION:
• Always support long workpieces level with the top
surface...
Owners Manual - Page 16
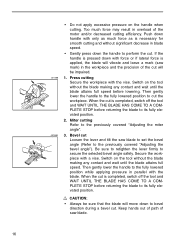
...is applied, the blade will move down with force or if lateral force is completed, switch off the tool and WAIT UNTIL THE BLADE HAS COME TO A COMPLETE STOP before returning the blade to its fully ... out of path of the cut the workpiece. • Do not apply excessive pressure on the tool without the blade making any contact and wait until the blade attains full speed. If the handle ...
Owners Manual - Page 21
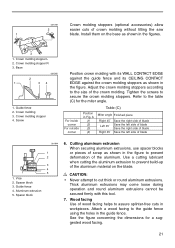
Install them on the blade. Crown molding 3. Screw
Position crown molding with this tool.
7. Vise 2. Spacer block
001844
1 2
3 4 5
6. Thick aluminum extrusions may come ... as shown in the figure. Adjust the crown molding stoppers according to prevent build-up of wood facing helps to the table (C) for a suggested wood facing.
21 Tighten the screws to cut thick or round aluminum...
Owners Manual - Page 25
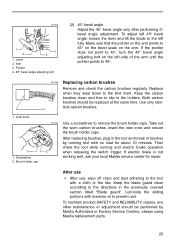
...free to 45° on the bevel scale on the left fully.
Then check the tool while running tool with no load for repair.
To maintain product SAFETY and RELIABILITY, repairs, any other ...until the pointer points to prevent rust. After replacing brushes, plug in the tool and break in the holders. Keep the blade guard clean according to the limit mark. 001770
1 2
4 3
1. Brush ...
Owners Manual - Page 26
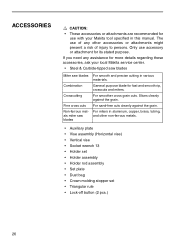
... other accessories or attachments might present a risk of any assistance for more details regarding these accessories, ask your Makita tool specified in this manual. If you need any other non-ferrous metals.
• Auxiliary plate • Vise assembly (Horizontal vise) • Vertical vise • Socket wrench 13 • Holder set • Holder...
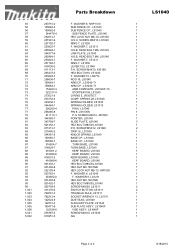
Parts Breakdown - Page 3
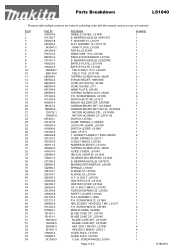
..., LS1011N BAFFLE PLATE, LS1045
FIELD ASS'Y 115V, LS1045 FIELD 115V, LS1011N TAPPING SCREW 4X18, 4323K STRAIN RELIEF, HM1500B CORD (2X14X8 SJ), 2414B CORD GUARD, 2711 NAME PLATE, LS1040 TAPPING SCREW 4X18, 4323K P.H. SCREW M5X12, LS1040 HEX.SOCKET HEAD BOLT M6, LS1211 P.H. BEARING 6202LLB, NHP1310 F. SCREW M5X16, 4301BV MAKITA MARK, 5402NA BLADE CASE CP...
Parts Breakdown - Page 4
... F. WASHER 6, NHP1310 SUB FENCE CP., LS1040 SUB FENCE CP., LS1040
SUB FENCE PLATE, LS1040 HEX LOCK NUT M6-10, LS1040 H.S.H. SCREW M5X12, LS1040 GRIP 32, LS1030 KNOCK SPRING, LS1040 BASE CP., LS1040 BASE CP., LS1040 TURN BASE, LS1040 TURN BASE, LS1040 KERF BOARD, LS1040 KERF BOARD, LS1040 KERF BOARD, LS1040 KERF BOARD, LS1040 HEX BOLT M8X30,LS1040 HEX NUT M8, 5037NB HEX LOCK NUT M8...
Similar Questions

Plastic Blade Guard Sticks And Does Not Rise Smoothly.
How do I fix the plastic guard not rising easily without unsafely pushing down to hard on the tool. ...
How do I fix the plastic guard not rising easily without unsafely pushing down to hard on the tool. ...
(Posted by nathanseymour 7 months ago)

Release Saw Arm
how do you release ether saw to place timber on the plate for cut
how do you release ether saw to place timber on the plate for cut
(Posted by jcunningham56752 1 year ago)

Guard Binds When Lowering Blade
The blade is very hard to lower for the first couple of inches, then it suddenly makes a click noise...
The blade is very hard to lower for the first couple of inches, then it suddenly makes a click noise...
(Posted by smithjran 7 years ago)

Cannot Get The Guard Back On My Ls1011 Makita Miter Saw
(Posted by bomengen2 8 years ago)
Dropped My Ls1040 Of The Bench Whilst In The Open Position
the machine will not now come down to snip the timber there is a bar under the saw guard which is co...
the machine will not now come down to snip the timber there is a bar under the saw guard which is co...
(Posted by charlesdavidferguson28 11 years ago)