
1999 Lincoln Navigator Support Question
1999 Lincoln Navigator Support Question
Find answers below for this question about 1999 Lincoln Navigator.Need a 1999 Lincoln Navigator manual? We have 3 online manuals for this item!
Question posted by chnuma on November 12th, 2013
How To Remove Brake Backing Plate 99 Lincoln Navigator
The person who posted this question about this Lincoln automobile did not include a detailed explanation. Please use the "Request More Information" button to the right if more details would help you to answer this question.
Current Answers
Related Manual Pages
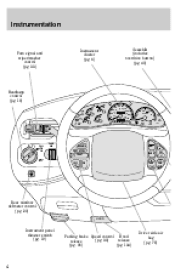
Owner's Manual - Page 4
.... 6)
Gearshift (includes overdrive button) (pg. 40)
Headlamp control (pg. 18)
LOW FUEL
F H
DOOR AJAR BRAKE
40 30 20
40 60
50
80
60
100
70 3
120
E H
000000
80 90 1
2
THEFT
4 5 6
CHECK SUSP LOW RANGE
140 20 160 MPH
NAVIGATOR
10
!
- +
18 8
0
0
0
0
km/h
100
RPMx1000
CHECK ENGINE
ABS
P R N
21
FUEL RESET
4X4
INT...
Owner's Manual - Page 6

... OBD II system protects the environment by ensuring that monitors the engine's CHECK emission control system. Instrumentation
WARNING LIGHTS AND CHIMES
LOW FUEL
F H
DOOR AJAR BRAKE
40 30 20
40 60
50
80
60
100
70 3
120
E H
000000
80 90 1
2
THEFT
4 5 6
CHECK SUSP LOW WASH LOW RANGE
140 20 160 MPH...
Owner's Manual - Page 12

...the key is not in the ignition) and either front door is in motion. GAUGES
LOW FUEL
F H
DOOR AJAR BRAKE
40 30 20
40 60
50
80
60
100
70 3
120
E H
000000
80 90 1
2
THEFT
4 ...5 6
CHECK SUSP LOW WASH LOW RANGE
140 20 160 MPH
NAVIGATOR
10
!
- +
18 8
0
0
0
0
km/h
100
RPMx1000
CHECK ENGINE A4WD
ABS
P R N
21
FUEL RESET
4X4
Fuel...
Owner's Manual - Page 55

...IF EQUIPPED) The compact disc changer is located on the compact disc changer, refer to lock in. To remove the floor mat, reverse the installation procedure.
55 POSITIVE RETENTION FLOOR MAT Position the floor mat so that ...the eyelet is over the pointed end of the accelerator or the brake pedal. Hard objects can injure you in the cupholder. Controls and features
Use only soft cups in a collision...
Owner's Manual - Page 72

... outboard safety belts have two types of the driver and passengers.
72 For example, if the driver brakes suddenly or turns a corner sharply, or the vehicle receives an impact of 8 km/h (5 mph)... movements and locking in response to vehicle movement. To unfasten, push the red release button and remove the tongue from the buckle. The front and rear outboard safety restraints in the buckle.
2....
Owner's Manual - Page 79

See your Ford or Lincoln-Mercury dealer. Children should always wear their safety belts. Children and air bags For additional important safety information, read all the way back.
79 Failure to follow this instruction may come into contact with a deploying air bag. Air bag can kill or injure a child in front seat areas...
Owner's Manual - Page 86

...put the retractor in place.
86 Before placing the child in the seat, forcibly tilt the seat forward and back to indicate it retracts to make sure the seat is securely held in the automatic locking mode, grasp the ... child seat.
8. Seating and safety restraints
5. Allow the safety belt to retract to retract. Allow the belt to remove any slack in the automatic locking mode. 7.
Owner's Manual - Page 87

... in the automatic locking mode (you should not be obtained at no charge from any Ford or Lincoln-Mercury dealer. Otherwise, the safety seat may not be properly secured and the child may be able...retractor to make sure the child seat is in the front seat. Put the tether strap over the back of the front seat cushion. If the retractor is provided in a sudden stop or collision.
87 ...
Owner's Manual - Page 90
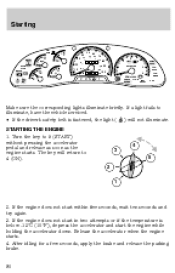
Starting
LOW FUEL
F H
DOOR AJAR BRAKE
40 30 20
40 60
50
80
60
100
70 3
120
E H
000000
80 90 1
2
THEFT
4 5 6
CHECK SUSP LOW WASH LOW RANGE
140 20 160 MPH
NAVIGATOR
10
!
- +
18 8
0
0 0
0
km/h
100
RPMx1000
CHECK ENGINE A4WD
ABS
P R N
21
FUEL RESET
4X4
Make sure the corresponding lights illuminate briefly. Turn...
Owner's Manual - Page 96
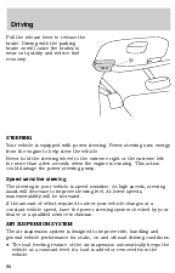
... steer your vehicle changes at a constant level if a load is designed to improve steering feel. AIR SUSPENSION SYSTEM The air suspension system is added or removed from the engine to release the brake. Never hold the steering wheel to wear out quickly and reduce fuel economy.
Owner's Manual - Page 98
... from forward and reverse gears in the Roadside emergencies chapter. Driving
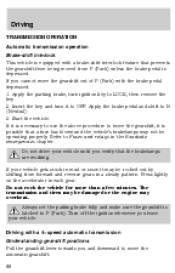
TRANSMISSION OPERATION Automatic transmission operation
Brake-shift interlock This vehicle is equipped with the brake pedal depressed: 1. Apply the brake pedal and shift to LOCK, then remove the key. 2. Refer to Fuses and relays in a steady pattern. Do not drive your vehicle until...
Owner's Manual - Page 99
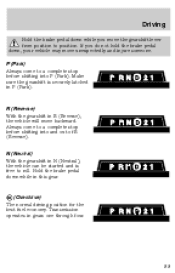
... the gearshift in P (Park). Transmission operates in this gear.
(Overdrive) The normal driving position for the best fuel economy.
Hold the brake pedal down while in gears one through four.
99 If you move the gearshift lever from position to a complete stop before shifting into P (Park). Always come to roll. Driving
Hold...
Owner's Manual - Page 108

... in this chapter. • Use extra caution when driving while trailer towing. Refer to the trailer for taillamps, stop and turn lamps, back up lamps, battery charge, electric brakes (when a customer provided controller is pre-wired for towing. This connector provides power to the severe duty schedule in the "Service Guide". •...
Owner's Manual - Page 110

... excessive downshifting and upshifting for more frequent service intervals.
Trailer towing tips • Practice turning, stopping and backing up in an area before starting on a trip to the Severe Duty Schedule in traffic for long distances,... optimum fuel economy and transmission cooling. • Anticipate stops and brake gradually. Your vehicle cannot be parked on long, steep grades.
Owner's Manual - Page 114
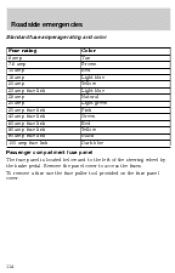
... green Pink Green Red Yellow Black Dark blue
Passenger compartment fuse panel The fuse panel is located below and to access the fuses. Remove the panel cover to the left of the steering wheel by the brake pedal. To remove a fuse use the fuse puller tool provided on the fuse panel cover.
114
Owner's Manual - Page 123

...Jack handle On top of the radiator support at the front of the engine compartment Item Spare tire
Removing the jack handle 1. Location of the spare tire and tools The spare tire and tools for your... - Not Used
CHANGING THE TIRES If you get a flat tire while driving, do not apply the brake heavily. Hold the steering wheel firmly and slowly move to the other tires on the drivers side of the...
Owner's Manual - Page 125

...jack from their storage locations. 5.
Use the tip of the lug wrench to jacking, hoisting or towing your vehicle. HOOD
BRAKE
3. Block the diagonally opposite wheel. 4. Roadside emergencies
Tire change procedure On vehicles equipped with the jack) for detailed tire change... trim access panel with Air Suspension, turn OFF the Air Suspension switch prior to remove any wheel trim.
125
Owner's Manual - Page 126

Position the jack according to the following guides and turn counterclockwise but do not remove them until the wheel is blocked. To prevent the vehicle from moving when you change the tire, be seriously ...off the jack, even if the transmission is raised off the jack, someone could be sure that the parking brake is set and the diagonally opposite wheel is completely off the ground.
Owner's Manual - Page 160

... 2. The oil from your hand could cause the bulb to expose the electrical connectors.
160 At the back of the headlamp, remove the headlamp assembly retainers by its plastic base and do not touch the glass. Pull the headlamp assembly ... • foglamps • high-mount brakelamp • brakelamps • turn signals • license plate lamp • tail lamps • back-up . 4.
Owner's Manual - Page 166
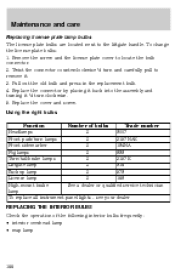
...lamp 2 168 High-mount brake See a dealer or qualified service technician lamp To replace all instrument panel lights - Remove the screw and the license plate cover to the liftgate ...plate lamp bulbs The license plate bulbs are located next to locate the bulb connector. 2. Replace the connector by placing it back into the assembly and turning it ¼ turn and carefully pull to remove...
Similar Questions


Repair Compressor For Suspension 99 Navigator Wont Stop Running When Engine
turned off
turned off
(Posted by chdar 10 years ago)

How To Remove Flasher Relay Block On 99 Navigator
(Posted by as16vl 10 years ago)
