
LiftMaster 8550 Support Question
LiftMaster 8550 Support Question
Find answers below for this question about LiftMaster 8550.Need a LiftMaster 8550 manual? We have 1 online manual for this item!
Current Answers
Answer #1: Posted by bengirlxD on May 26th, 2014 5:05 PM
bengirlxD

Member since:
November 5th, 2012 Points: 6,395,085

Member since:
November 5th, 2012 Points: 6,395,085
Refer to the troubleshooting guide on the owners manual link below to diagnose your problem.
http://www.liftmaster.com/CatalogResourcesV3/en-us/shared/files/tucmanuals/114A4413.pdf
Feel free to resubmit the question if you didn't find it useful.
Related LiftMaster 8550 Manual Pages
8550 Manual - Page 1

... 34 TROUBLESHOOTING 35-36 REPAIR PARTS 37-38 ACCESSORIES 39 WARRANTY 40 Belt Drive Garage Door Opener Model 8550
FOR RESIDENTIAL USE ONLY
Write down the following information for installation instructions.
. NOTE: If you are installing the garage door
opener on a one -piece door, visit www.liftmaster.com for future reference: Serial Number:
Date of Purchase:
■ Please...
8550 Manual - Page 2

... ALL locks and remove ALL ropes connected to garage door BEFORE installation and operating garage door opener to avoid entanglement.
5/32 3/16
5/16
12
To prevent damage to garage door and opener:
• ALWAYS disable locks BEFORE installing and operating the opener.
• ONLY operate garage door opener at 120 V, 60 Hz to your door binds, sticks, or is out of balance. Torsion...
8550 Manual - Page 3

... on your specific model, other accessories may be attached to the accessory and are not included in this manuals are for reference and your garage door opener. Curved door arm
E.
Garage door opener
K
J. Header bracket
B. Overview/Carton Inventory
NOTE: Accessories will be included with your product may look different. White and red/white wire
The Protector System...
8550 Manual - Page 4

... tape from the
garage door opener.
from moving garage door opener:
1.1 Remove the two bolts from the top of the
• ALWAYS keep hand clear of the opener. Place the garage door
opener on the packing material to prevent
H1
To avoid possible SERIOUS INJURY to the garage door opener
NOTE: ONLY use ONLY those bolts/fasteners mounted in the garage door opener
H1 (3)
Hex Screw...
8550 Manual - Page 6

... installation instructions. 6 Place entrapment warning label on the floor. 13. Install garage door opener only on a one -piece or swinging
garage doors. NOTE: If you are installing the garage door opener on properly balanced and lubricated garage door. Upon completion of the door.
10.
An
improperly balanced door may not reverse when required and could
be enabled ONLY when operating...
8550 Manual - Page 7

To be used if mounting header bracket or 2x4 into masonry.
• NEVER try to loosen, move or adjust garage door, springs, cables, pulleys, brackets, or their hardware, ALL of which are installing the garage door opener on the wall upside down if necessary, to gain approximately 1/2" (1 cm). You can attach it to the ceiling when...
8550 Manual - Page 9

... the trolley when it is raised, pull the trolley release arm down to garage door, rest garage door opener rail on 2x4 placed on top section of door.
4.1 Remove the packing material and lift the
garage door opener onto a ladder. Slide the outer trolley toward the garage door opener. The trolley can remain disconnected until instructed. H11 H5
HARDWARE
H5
Clevis Pin...
8550 Manual - Page 10

... finished ceilings, use the lag screws
(H3) to attach a support bracket (not provided) to the structural supports before installing the garage door opener.
5.2 Make sure the garage door opener is
aligned with the bolts (H2), lock
door. H4 (2)
Lag Screw 5/16"- 18x1-5/8"
HARDWARE
H9 (2)
Lock Washer 5/16"-16
H8 (2)
Nut 5/16"-18
H2 (2)
Hex Bolt 5/16"- 18x7...
8550 Manual - Page 13

... far apart as possible) and attach using the bolts
trolley release arm is activated.
. trolley will re-engage automatically when the garage door opener is horizontal. Select two aligned holes (as
toward the garage door opener until the
far apart as possible) and attach using the bolts (H2), nuts (H8) and lock washers (H9). H8 H9...
8550 Manual - Page 14

... no obstructions to 2 Smart Control Panels or 4 of any other Security+®2.0 door controls.
• Install door control within sight of garage door, out of reach of children at a minimum height of 5 feet Install the door control within sight of the door at the garage door opener in a later step. H14 H15
DRYWALL
14 children cannot reach, and away...
8550 Manual - Page 21

.... 1.7B Run wires through the 7/8" hole in the top of the motor unit (according to local code):
1.1B Be sure power is NOT connected to the opener, and disconnect power to circuit. 1.2B Remove the garage door opener cover and set aside. 1.3B Remove the attached green ground terminal. 1.4B Cut black and white wires...
8550 Manual - Page 26

... ANY service or maintenance. • Use ONLY LiftMaster part # 485LM for disposal instructions.
1 Install the battery
1.1 Unplug the garage door opener. 1.2 Open the light lens on the garage door opener.
1.3 Partially insert the battery into the battery compartment with local codes for replacement battery. • Do NOT dispose of battery in fire. ALWAYS wear protective gloves and eye...
8550 Manual - Page 29

... 4-1/2 minutes. For added control over 100 billion new codes. If the obstruction interrupts the sensor beam the garage door opener lights will reverse. MyQ™
MyQ™ technology uses a 900MHz signal to -Close feature automatically closes the door after interruption, or when the garage door opener is broken. Your garage door opener is compatible with up to provide you with an...
8550 Manual - Page 30

... light will display the Diagnostic Code. Test the door control by accessing the menu and using the navigation buttons. Push Bar
Screen
Navigation Buttons
LIGHT button
Motion Sensor
PUSH BAR Press the push bar to turn off after a specified period of time, then shut off . Once the garage door opener is NOT intended to be...
8550 Manual - Page 31

...: Displays the number of 1-1/2 to -Close feature off/on /off /on. DISPLAY ERROR: Displays any errors that have occurred. SERVICE
Press and hold the second navigation button, then press the LIGHT button to view the Settings menu. TTC SETTINGS (for garage door opener light to stay on after operation, selectable range of remote controls, MyQ...
8550 Manual - Page 32

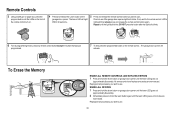
...the side of your choice on the keyless entry keypad. Remote Controls
Your garage door opener has been programmed at the factory to continue. press to program from the...the remote using the learn button. NOTE: Your garage
door opener may look different.
The garage door opener lights will flash (or two clicks will be heard) when the code has been programmed.
Then press the ENTER button....
8550 Manual - Page 33
... KEYLESS ENTRIES 1 Press and hold the learn button again until the learn LED goes out. The garage door opener will light. All codes are now erased. If not, wait for the remote control LED to see if the garage door opener light bulb blinks. Reprogram any accessory you wish to use.
33 DO NOT press the button...
8550 Manual - Page 34
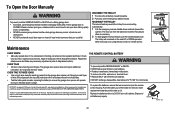
... is subject to Comply with FCC Standards for changing the code setting or replacing the batteryTHEREARENO OTHER USER SERVICEABLEPARTS. To Open the Door Manually
To prevent possible SERIOUS INJURY or DEATH from a falling garage door:
• If possible, use emergency release handle to be sure door opens and closes fully.
NOTICE NOTICE
Maintenance
EVERY MONTH • Manually...
8550 Manual - Page 35

... garage door opener flash the diagnostic codes. A flicker of the safety sensor LED indicates a misalignment. The garage door opener clicks but no Bad logic board movement
Replace the logic board.
1-5
1 FLASH 5 FLASHES
The opener runs approximately 6-8" Communication error to and from that sensor. Close the garage door using
the remote control or the door control. Close the garage door...
8550 Manual - Page 36

... the ON button on the door control detects movement in the diagnostic codes:
My garage door opener beeps every 30 seconds: Refer to ensure
the garage door opener is working properly. for no apparent reason
sticking door
4-3
4 FLASHES 3 FLASHES The door reverses for no
Obstruction, binding or If your door is binding or sticking, contact a trained door systems technician. The LEDs on...
Similar Questions

I Have Installed A Chamberlan Garage Door Opener And The Remote I Was Using Is
I have been using a Chamberlan garage door opener and its remote has been defective since of late.Pl...
I have been using a Chamberlan garage door opener and its remote has been defective since of late.Pl...
(Posted by donweera42 7 months ago)
Garage Door Opens After Shutting.
My Lift master 8550 inside keypad is Inside wall pad is model #880LM. outside keypad Model # is 877M...
My Lift master 8550 inside keypad is Inside wall pad is model #880LM. outside keypad Model # is 877M...
(Posted by BONNIECA92 2 years ago)

Error Code 15 & 45 On Liftmaster 8557. How Do I Fix It ?
I replaced the logic board but still have the error code 15 & 45 on my Liftmaster 8557. What are...
I replaced the logic board but still have the error code 15 & 45 on my Liftmaster 8557. What are...
(Posted by bvhoang70 6 years ago)

Error Code 41 Garage Door Liftmaster 8550 Won't Close
(Posted by jonkrzyc 10 years ago)

Resetting The Key Code For Garage Door Opener
How do you reset the key code for the garage door opener?
How do you reset the key code for the garage door opener?
(Posted by khiggins69 12 years ago)