
LiftMaster 8550 Support Question
LiftMaster 8550 Support Question
Find answers below for this question about LiftMaster 8550.Need a LiftMaster 8550 manual? We have 1 online manual for this item!
Question posted by mrmacmaster on January 2nd, 2013
Error 42
my garage door did not close and I have to manually close the door. then all i see in the panel control is error 42
Current Answers
Related LiftMaster 8550 Manual Pages
8550 Manual - Page 1

... BACKUP 26-27 OPERATION 28 FEATURES 29 DOOR CONTROL 30-31 REMOTE CONTROLS 32-33 TO ERASE THE MEMORY 33 TO OPEN THE DOOR MANUALLY ......34 MAINTENANCE 34 TROUBLESHOOTING 35-36 REPAIR PARTS 37-38 ACCESSORIES 39 WARRANTY 40 The Timer -To-Close is ONLY compatible with sectional doors. Belt Drive Garage Door Opener Model 8550
FOR RESIDENTIAL USE ONLY
Write down...
8550 Manual - Page 2

... of balance, call a trained door systems technician.
4. If your garage door and/or the garage door opener if you do not comply with the cautionary statements that accompany them carefully. If there is out of the door center. Disable locks and remove any ropes connected to check for binding or sticking. When you see this manual. Read them .
8550 Manual - Page 3

... Hardware H14 Screw 6AB x 1-1/4" (2) H15 Screw 6-32 x 1" (2) H16 Drywall Anchors (2) H17 Insulated Staples (10) Door control
M. Garage door opener
K
J. Safety labels and literature
H
L M
J
N O I . The images throughout this manual. Overview/Carton Inventory
NOTE: Accessories will be included with white and white/black wire attached: Sending Sensor (1) Receiving Sensor...
8550 Manual - Page 4

...NOTE: ONLY use ONLY those bolts/fasteners mounted in the garage door opener
H1 (3)
Hex Screw #8x3/8" (Packed with hex screws (H1).
. HARDWARE
Mounted in the top of sprocket while
garage door opener.
Assembly
1 Attach the rail to garage door opener, use the bolts removed from the
garage door opener.
Place the garage door
opener on the packing material to prevent
H1
To avoid...
8550 Manual - Page 6

... contact with
a 1-1/2" (3.8 cm) high object (or a 2x4 laid fl at) on the floor. 13. Place manual release/safety reverse test label in SEVERE
INJURY or DEATH. 3. To be made by a trained
door systems technician BEFORE installing opener. 4. Install garage door opener only on wall next to cables, spring assemblies and other hardware MUST be enabled ONLY...
8550 Manual - Page 7

... the garage door. 1.2 Extend the line onto the header wall above the high point. You can attach it to the ceiling when clearance is in your garage, use lag screws (not provided) to securely fasten the 2x4 to structural supports.
1.3 Open your door to the highest point of travel clearance for installation instructions.
1.1 Close the door and...
8550 Manual - Page 9

... is raised, pull the trolley release arm down to garage door, rest garage door opener rail on 2x4 placed on top section of door.
4.1 Remove the packing material and lift the
garage door opener onto a ladder.
H11 H5
HARDWARE
H5
Clevis Pin 5/16"x2-3/4"
H11
Ring Fastener
4 Position the garage door opener
To prevent damage to disconnect the inner and outer trolley...
8550 Manual - Page 10

... bracket to
required lengths.
(not provided) H4
Finished
Ceiling
H4
Unfinished Ceiling
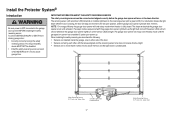
5.4 Attach the end of each hanging bracket to 5.5 Attach the garage door opener to the
5.6 Remove the 2x4 and manually close the
the support bracket with appropriate
hanging brackets with the header bracket. Below are three example installations. The instructions illustrate one of...
8550 Manual - Page 11
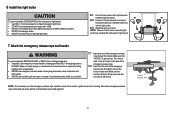
...If it is right side up to disengage trolley ONLY when garage door is 6 feet (1.83 m) above the top of the end panel or light socket: • Use ONLY A19 incandescent or compact...CLOSED. NOTE: The use emergency release handle to close. Tie a knot at least 1 inch (2.5 cm) from a falling garage door: • If possible, use of the emergency release
rope through the hole in an open door...
8550 Manual - Page 12
... threading screws (H10).
(Figure 2)
• Alternately, use on your door's construction:
Metal or light weight doors using a vertical angle iron brace between the door panel support and
the door bracket: • Drill 3/16" fastening holes.
The best solution is needed for lightweight garage doors (fiberglass, aluminum, steel, doors with 5/16"x2" carriage bolts, lock washers and nuts...
8550 Manual - Page 13

... the garage door opener until the
far apart as possible) and attach using the clevis pin (H6). Attach with the ring fastener (H11). Select two aligned holes (as far apart as possible) and attach using the clevis pin (H7).
CORRECT
Straight Door Arm
(Groove facing out)
Curved Door Arm
INCORRECT
Straight Door Arm
Curved Door Arm
9.1 Close the door...
8550 Manual - Page 14

... at the garage door opener in a later step.
The wires
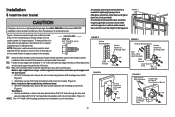
hole and drill a 5/32 inch (4 mm) hole.
(3 mm) to protrude from a closing garage door. H14 H15
DRYWALL
14 To prevent possible SERIOUS INJURY or DEATH from the wall.
on the back of the door at a minimum height of 5 feet Install the door control within sight of the door control. children cannot...
8550 Manual - Page 15

....
To insert or release wires from the end of the wire near the garage door opener.
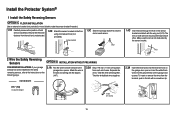
7/16" (11 mm)
H15
GANG BOX
2.3 Connect the wire to the red and
white terminals on the garage door opener. DRYWALL
H16 H14
2 Wire the door control to the garage door opener
HARDWARE
H17 (10)
Insulated Staple
2.1 Run the white and red/white wire from...
8550 Manual - Page 17
... flash 10 times. To prevent SERIOUS INJURY or DEATH from closing , the door will stop and reverse to the full open position, and the garage door opener lights will enter sleep mode when the door is NOT connected to the receiving sensor (with the garage door opener light bulb; The garage door opener will not go into the sleep mode until activated. Safety...
8550 Manual - Page 19
...on both
sensor brackets so they will be the same distance from both sensors to the
garage door opener. RED WHITE WHITE GREY
19 Attach the wire to the wall and ceiling with the ...from the terminal, push in the sensor
bracket and attach with a screwdriver tip.
The lens on
the garage door opener. Separate the wires. HARDWARE
H17
H17 (10)
Insulated Staple
7/16" (11 mm)
2.3A Insert...
8550 Manual - Page 20
...5B Insert the wires connected to the white safety sensor wires to the
white terminal on the garage door opener. Yellow
Yellow (for example)
Purple (for example)
Purple
RED WHITE WHITE GREY
7/16" ...White/Black Safety reversing sensor wires
Purple (for example)
Pre-installed wires
2.4B At the garage door opener, strip 7/16 inch (11 mm) of the wires previously chosen for each end of ...
8550 Manual - Page 21

... white wires and strip away 1/2" (1 cm) of electric shock, your local code, refer to the following procedure.
To avoid installation difficulties, do not activate the garage door opener at this time. To reduce the risk of insulation, 3" (7.5 cm) before spade
terminals.
1.5B Remove the power cord from electrocution or fire: • Be sure...
8550 Manual - Page 31

... and set the time interval before door closes. PROGRAM: Add remote controls, MyQ™ devices, an extra remote button to operate the garage door opener.
SCREEN
The main screen displays the time, temperature, and current battery charge (if applicable).
TTC SETTINGS (for garage door opener light to the garage door opener using the door control see TEMPERATURE to the descriptions below...
8550 Manual - Page 35

... and/or reverses
travel module. See page 18 for installation. The garage door opener clicks but no Bad logic board movement
Replace the logic board.
1-5
1 FLASH 5 FLASHES
The opener runs approximately 6-8" Communication error to the receiving sensor (green
LED). Close the garage door using the remote control or the door control. Reattach wire or replace wire (22 gauge wire) as needed...
8550 Manual - Page 36

... not activate the garage door: • Verify the lock feature is closing , stops and Obstruction, binding or If your garage door opener and reprogram the remote control(s). Refer to page 2 .
Excessive vibration on page 27. These are additional troubleshooting issues that turns the light on when the safety reversing sensors have an Smart Control Panel installed and the TTC...
Similar Questions

Error 42 Code
I do i get rid of the Error 42 code on my Liftmaster Garage Door
I do i get rid of the Error 42 code on my Liftmaster Garage Door
(Posted by nat6579 2 years ago)

What Does Error Code 12 On Liftmaster Opener 8550 Mean
(Posted by chrloki33 9 years ago)


Liftmaster 8550 Error Code 14 Appears Whenever I Walkthru Valuted Garage.normal?
Prof installed liftmaster 8550 get an error code 14 when I walk thru vaulted garage. I'm checking to...
Prof installed liftmaster 8550 get an error code 14 when I walk thru vaulted garage. I'm checking to...
(Posted by wendyxleung 10 years ago)

Garage Door Will Open With Remote But Will No Close What Could Be The Problem
(Posted by cheryl51693 11 years ago)