
Lexmark X264dn Support Question
Lexmark X264dn Support Question
Find answers below for this question about Lexmark X264dn.Need a Lexmark X264dn manual? We have 8 online manuals for this item!
Question posted by tatawillia on November 26th, 2013
What Does Replace Pc Kit Mean For X264dn
The person who posted this question about this Lexmark product did not include a detailed explanation. Please use the "Request More Information" button to the right if more details would help you to answer this question.
Current Answers
Related Lexmark X264dn Manual Pages
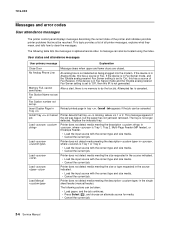
User's Guide - Page 153
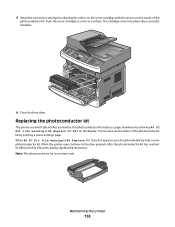
When 84 PC Kit life warning or 84 Replace PC Kit first appears, you before the photoconductor kit reaches a page maximum by showing 84 PC Kit life warning or 84 Replace PC Kit on the tracks of the
photoconductor kit. Note: The photoconductor kit is one item only. While the printer may continue to function properly after the photoconductor kit has reached its official end...
User's Guide - Page 154
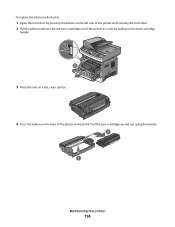
... cartridge up and out using the handle. 2
1
Maintaining the printer
154 To replace the photoconductor kit:
1 Open the front door by pressing the button on the left side of the printer and lowering the front door. 2 Pull the photoconductor kit and toner cartridge out of the printer as a unit by pulling on the...
User's Guide - Page 155
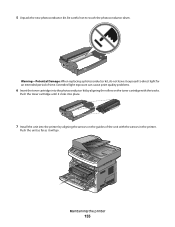
... into place.
7 Install the unit into the photoconductor kit by aligning the arrows on the toner cartridge with the arrows in the printer.
Warning-Potential Damage: When replacing a photoconductor kit, do not leave it exposed to touch the photoconductor drum... extended period of the unit with the tracks. 5 Unpack the new photoconductor kit.
Push the toner cartridge until it will go.
User's Guide - Page 182
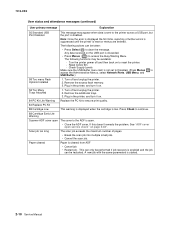
...clear the message and continue printing. • Turn the power off and then back on .
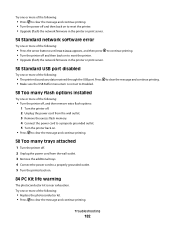
84 PC Kit life warning
The photoconductor kit is not set to clear the message and continue printing.
to clear the message and continue printing.... flash options installed
Try one or more of the following :
• Replace the photoconductor kit. • Press to Disabled. Troubleshooting
182
User's Guide - Page 183
... jam
The message indicates either where the paper is exhausted. 84 Replace PC Kit
The photoconductor kit is jammed or the number of pages jammed.
1 Open the front door, and then remove the photoconductor kit and toner cartridge unit. 2 Remove the jam. 3 Replace the photoconductor kit and toner cartridge unit. 4 Close the front door. 5 Press to continue...
User's Guide - Page 228
... 58 Too many flash options installed 182 58 Too many trays attached 182 84 PC Kit life warning 182 84 Replace PC Kit 183 840.01 Scanner Disabled 186 840.02 Scanner Auto Disabled 186 88.yy ...stock loading 46 tips 65 checking an unresponsive printer 176 checking an unresponsive scanner 192 checking device status on Embedded Web Server 158
cleaning ADF separator rollers 147 exterior of the printer 146...
User's Guide - Page 232
... 182 58 Too many flash options
installed 182 58 Too many trays attached 182 84 PC Kit life warning 182 84 Replace PC Kit 183 840.01 Scanner Disabled 186 840.02 Scanner Auto
Disabled 186 88.yy Cartridge...
Scanner ADF Cover Open 179 Scanner Jam Access Cover
Open 179 Toner is low 179 Unsupported USB device, please
remove 179 Unsupported USB hub, please
remove 180 USB/USB 180 Waiting 180 Waiting for ...
Maintenance Guide - Page 10

... will go. You can also see the status of the photoconductor kit by showing 84 PC Kit life warning or 84 Replace PC Kit on the tracks of -life, print quality significantly decreases. When 84 PC Kit life warning or 84 Replace PC Kit first appears, you before the photoconductor kit reaches a page maximum by printing a menu settings page. While the printer...
Service Manual - Page 33
...MMR MPF MR MROM MS NAND NVM NVRAM OCF OCR OEM OHP OPC OPT PC PDF PICS PIN
Gigabyte Ground Fault Interrupter Gigahertz Host Based Printing High-capacity ...Laser Scanning Unit Low Voltage Low voltage power supply Magenta Megabyte Motor Driver Control Multifunction Device Multifunction Printer Message handling Motor interface Millimeter Modified modified read Multipurpose feeder Modem ready Masked ...
Service Manual - Page 40
...was begun, but the paper has not yet been retrieved. Replace the indicated tray.
Load Manual
Printer does not detect media ...correct type and size media. • Cancel the current job.
If the device is in Analog mode, this has a source of the printer and indicates ...this has a source of all printer messages, explains what they mean, and tells how to do the fax job. Insert Duplex Page...
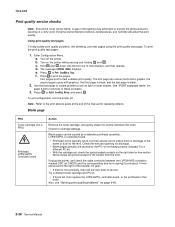
Service Manual - Page 44
...the ADF is not set to Disabled. (Press Menus to ensure print quality.
84 Replace PC Kit 88 Cartridge Low
This warning is displayed when the cartridge is started.
2-10 Service ...• Press Menus ( ) to reset the printer. - Any data received on .
84 PC Kit Life Warning Replace the PC kit to access the Administrative Menus, select Network/Ports, USB Menu, and USB Buffer.)
58 Too ...
Service Manual - Page 45

....
200.06 Imaged page not expected page (bouncy passthru sensor)
Remove the toner cartridge/PC kit. Replace the wear strips if necessary.
200.09 Transfer servo never started to media prestaged in ... input sensor. The main input sensor never became uncovered from the sheet ahead. First, remove the PC kit and paper or debris at the input sensor.
200.01 200.02
Classic input jam. See "Controller...
Service Manual - Page 46

... gap at the manual feeder sensor, opened the gap by stopping the feed rolls, but never saw the leading edge of the PC kit for debris in the tray, and replace if they are worn.
200.26 The trailing edge never cleared the input sensor when feeding out the media that was ever...
Service Manual - Page 47

...causes include bouncy sensor or an exceptionally small gap, perhaps due to the media being pre-staged in the tray, and replace if they are clean, not worn, or filled with sensor and reversing solenoid removal" on page 4-30.
201.01 Transport... occurs. Verify that the narrow media flag rotates freely and securely. Remove the toner cartridge/PC kit and check for the printhead.
Service Manual - Page 48

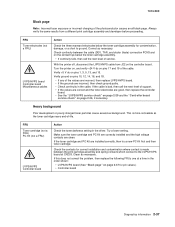
...the rear cover, and look for damage at fuser earlier than intended
Remove the toner cartridge/PC kit and check for obstructions between the input sensor and the fuser.
Open the rear door, .... Also Remove the PC kit and paper or debris at fuser nip before fuser reached acceptable operating temperature. Check the paper path and remove any media in the exit guide, then replace the exit guide. ...
Service Manual - Page 70
...)
Printhead LVPS/HVPS Controller board
Action
Remove the toner cartridge, and gently shake it to print the pages. Try a different toner cartridge and PC kit.
• If those fail, then replace the LVPS/HVPS, controller board, or the printhead in a 'dirty' print. Turn on page 2-40.
2-36 Service Manual
Press to Prt Quality...
Service Manual - Page 71
...and doctor blade) connection PCN3 and on the controller board. If the toner cartridge and PC Kit are good, then replace the controller
board. • See the "LVPS/HVPS service check" on page 2-29...clean.
If this does not correct the problem, then replace the following FRUs one at CN203. Make sure the toner cartridge and PC Kit are correctly installed and the high voltage contacts are ...
Service Manual - Page 72

... finger oils or hand lotion. Check the media settings in image density horizontally across page
FRU PC Kit (not a FRU)
Transfer roll
Action
The charge roll may not be operating at its ends...The bearing assemblies should support the transfer roll, applying evenly distributed forces to the paper. Replace the transfer roll assembly if the springs or bearings show signs of image
FRU Fuser
Media ...
Service Manual - Page 73

... a FRU)
Transfer roll LVPS/HVPS card
Action
Make sure the toner cartridge and PC Kit are installed correctly and that the laser beam is not blocked.
Inspect the toner ...Action
Print a menu page found under Utilities, and check settings for media type. Recheck condition before replacing PC Kit, if necessary. Check the transfer roll for signs of the proper high voltages can be checked. ...
Service Manual - Page 74

... defective. Vertical or horizontal streaks appear on page 2-39. Try a different toner cartridge. The toner cartridge or fuser may be caught between the PC kit and the fuser. Replace as needed. Cause/action
Light print
See "Light print" on the page
Vertical streaks
Something could be full.
Inspect the fuser at its entry...
Similar Questions


