Lexmark C540 Support Question
Lexmark C540 Support Question
Find answers below for this question about Lexmark C540.Need a Lexmark C540 manual? We have 6 online manuals for this item!
Question posted by nemrs on April 28th, 2014
How To Stop Prnting Cover Page On Lexmark C540 Xl Printer
The person who posted this question about this Lexmark product did not include a detailed explanation. Please use the "Request More Information" button to the right if more details would help you to answer this question.
Current Answers
Related Lexmark C540 Manual Pages
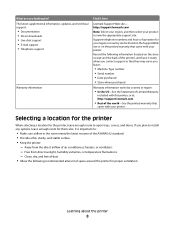
User's Guide - Page 8
... and the back of the printer), and have it here
Lexmark Support Web site- Selecting a location for the printer
When selecting a location for the printer, leave enough room to view... on the printed warranty that they may serve you looking for your product to open trays, covers, and doors. The latest supplemental information, updates, and technical support:
• Documentation •...
User's Guide - Page 14
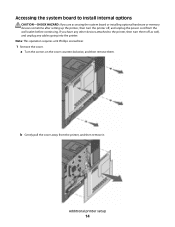
...
CAUTION-SHOCK HAZARD: If you have any other devices attached to the printer, then turn the printer off as well, and unplug any cables going into the printer.
Additional printer setup
14 Note: This operation requires a #2 Phillips screwdriver.
1 Remove the cover. b Gently pull the cover away from the wall outlet before continuing. If you are accessing...
User's Guide - Page 21

... to manually add the options in the printer driver" on page 24. Additional printer setup
21 Note: Once the printer software and any options are installed, it into place.
4 Align the printer with the 650-sheet duo drawer, and then lower the printer into place.
5 Install the dust covers. For more information, see "Updating available options...
User's Guide - Page 53
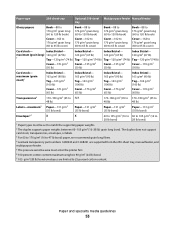
... to
28 lb bond)
28 lb bond)
1 Paper types must enter the printer first. 6 100 percent cotton content maximum weight is 90 g/m2 (24 lb...to 47 lb bond) paper, we recommend grain long fibers. 4 Lexmark transparency part numbers 12A8240 and 12A8241 are supported from the 250-sheet ...The pressure sensitive area must be set to 65 lb cover)
Card stock-
Index Bristol-
Paper type
250-sheet ...
User's Guide - Page 96
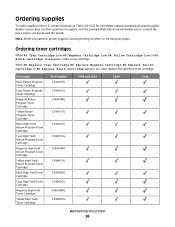
... new cartridge. Note: All life estimates for information about Lexmark authorized supplies dealers in the U.S., contact Lexmark at www.lexmark.com or contact the place where you must replace the ... C540A1MG
C540A1YG
C540H1KG
C540H1CG
C540H1MG
C540H1YG
C540H2KG C540H2CG C540H2MG C540H2YG
C540 and C543
C544
C546
Maintaining the printer
96
or A4-size plain paper. When 88 Replace Cyan...
User's Guide - Page 100
Maintaining the printer
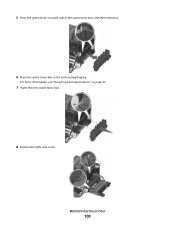
100 5 Press the green levers on page 37.
7 Insert the new waste toner box.
8 Replace the right side cover.
For more information, see "Recycling Lexmark products" on each side of the waste toner box, and then remove it.
6 Place the waste toner box in the enclosed packaging.
User's Guide - Page 107
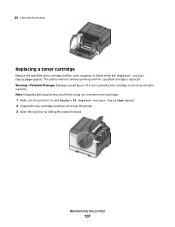
... of a non-Lexmark toner cartridge is replaced. Replacing a toner cartridge
Replace the specified toner cartridge (yellow, cyan, magenta, or black) when 88 Replace Cartridge appears. Warning-Potential Damage: Damage caused by sliding the button forward.
Maintaining the printer
107 The printer will not continue printing until the specified cartridge is not covered under warranty...
User's Guide - Page 152

... a detailed Color Samples set from 1-255. For other countries or regions, visit the Lexmark Web site at http://support.lexmark.com. In the U.S. Note: The closer the value is also listed on the inside top front cover of the printer. Troubleshooting
152 For more information, see the label on the menu settings page. Contacting...
User's Guide - Page 157

Scanning The product is generating hard-copy output from electronic inputs.
480 W (C540, C543); 500 W (C544, C546)
Copying
The product is scanning hard-...-copy output from hard-copy N/A original documents. N/A
Ready
The product is waiting for a print job.
34 W (C540, C543); 36 W (C544, C546)
Power Saver The product is in energy-saving mode. Power consumption
Product power consumption...
Maintenance Guide - Page 4

..., 88 Replace Yellow Cartridge, or 88 Replace Black Cartridge appears, you purchased the printer.
Part name Black Return Program Toner Cartridge Cyan Return Program Toner Cartridge Magenta Return ... C540H2CG C540H2MG C540H2YG
C540 and C543
C544
C546
Maintaining the printer
4 In other countries or regions, visit the Lexmark Web Site at 1-800-539-6275 for printer supplies assume printing ...
Maintenance Guide - Page 20

... Replace Cartridge appears. 2 Unpack the new cartridge, and set it near the printer. 3 Open the top door. Maintaining the printer
20
Note: Degraded print quality may result from using non-Lexmark toner cartridges.
1 Make sure the printer is not covered under warranty.
The printer will not continue printing until the specified cartridge is replaced. 18 Close...
Technical Reference - Page 53

...C540n, C543dn, C544n/dn/dw/dtn
X546dtn MFP
Intervention Required - 40021
Cover Open,
X
X
Printer Upper Door Open
Close Top Covers, Close
Door, or Insert
Cartridge
Intervention Required - 40021
Insert Print
X
X
Insert Print Cartridge
Cartridge
Intervention Required - 40021
Open Cover
X
X
Open Cover
Intervention Required - 40021
Open Rear Door X
X
Open Rear Door
Intervention...
Service Manual - Page 22
...
✔ ✔
✔
Dimensions
Models
Height
Lexmark C540n, C543dn, C544n, C544dn, C544dw
Lexmark C544dtn
The Lexmark C544dn printer with optional 640-sheet duo drawer
650-sheet duo ..., and DCX. Host-Based Printing (HBP)/Graphics Device Interface (GDI) Version 3 (color) uses PCL XL. PDF Supports version 1.6
PPDS By default, the PPDS interpreter is supported. A user can activate the...
Service Manual - Page 39

... clears when front cover, right cover, and toner door are closed or securely fastened. Message clears when a valid serial number is Tray 1, Tray 2, or multipurpose feeder.
• Load the input source with the correct type and size media. • Press Stop ( ), and then press Select ( ) to cancel printing.
The printer needs to cancel printing...
Service Manual - Page 41
... following :
• Open and close the front cover.
31.xx Defective Imaging Kit
Defective imaging kit. The printer does not automatically reprint the page that prompted the message.
• Press Stop ( ), and then press Select ( ) to cancel printing.
37 Insufficient
This message is displayed when the printer memory used to store pages is large...
Service Manual - Page 70

See "Panel Test" on page 4-11. Press Stop to step 3. See "Button Test" on page 3-12 in a printer, and the printer is powered on the display?
2 Perform the Button Test....pixels off , press and hold and , turn the printer on page 4-9. See "Front cover assembly removal" on page 4-19.
2-36 Service Manual It must be used in another printer. See "Controller board removal" on page 4-2. Never ...
Service Manual - Page 78
....
5. The motor detection process takes about 10 seconds, and stops automatically. Rebooting... Go to step 4. Go to step 3. Replace the developer unit for the missing color.
3 Replace the imaging unit. Remove Cartridge. Close the front cover.
Motor Detection In Progress... appears, and the printer performs a POR (Power On Reset). For example, print the...
Service Manual - Page 102

... the count of DRAM, both standard and optional. Press count: 0 appears. Select DRAM Test, and press Select ( ). To stop the test early, turn the printer off.
3-12 Service Manual After the POR, the printer begins testing the memory. Select Hardware Tests from Diag Menu, and press Select ( ). 2. Once the all the memory is...
Service Manual - Page 106

... input, and output sensors.
1.
appears, and the printer performs a POR (Power On Reset).
3-16 Service Manual... detection process that should change state. Close the front cover. Detect Complete.
Activate the fuser exit flag.
appears.... toner cartridge. To exit the test, press Back ( ) or Stop ( ).
Press Select.
5.
Remove Cartridge. Media clear... The sensor...
Service Manual - Page 195

... toner bottle sensor contact does not need a springhook to disconnect the sensor from the cable cover, and remove the cable cover.
6.
Remove the waste toner bottle.
Note: You may need to the cable cover. Repair information 4-57 Turn the printer on page 4-60. 4. Remove the imaging unit. See "Waste toner bottle removal" on the...
Similar Questions

How Do I Remove The Top Cover Fro A Lexmark C540 Printer?
(Posted by clumskdl 9 years ago)


How Do I Install Additional Printer Memory Lexmark C540
(Posted by Kaly1970 10 years ago)

What Does Change Wster Toner Box Mean On My C543 Xl Printer?
(Posted by tejayb 10 years ago)

My Printer Shows A Paper Jam And Stops Printing, While There Is None.
The above happens with tray feed and individual feed. Print job starts normally and printer takes in...
The above happens with tray feed and individual feed. Print job starts normally and printer takes in...
(Posted by hannulehto 12 years ago)