Get support for Lenovo G570

Lenovo G570 Support Question

Lenovo G570 Support Question

Find answers below for this question about Lenovo G570.
Need a Lenovo G570 manual? We have 1 online manual for this item!
Question posted by sharmakaran16 on July 23rd, 2012

Drive Partition

hello,        i bought a new lenovo G570 notebook.. i wanted to make a new partition but my HDD already has 4 partitions.. the 1st one is the c drive (total 421GB) second is d drive (total 29GB) third is the recovery drive (hidden its 14.5GB) and 4th one is some 200mb partition and it is being used......... the max. no. of partitions that could be made are 4... so please help me to create a new partition (i do not want to convert my drive type to dynamic to have another partition)

Current Answers

Answer #1: Posted by baklogic on July 23rd, 2012 6:52 AM
This answer was accepted by the poster of the original question.
baklogic

Member since:
June 28th, 2012

Points: 442,480
1,090
points
It is a bit complicated-

First of all you cannot partition the C partition, before doing a lot of moving of the other partitions.

You cannot move or, delete a partition that resides before the last partition.

It is a difficult process, and you have to start by delting/moving the last partition first, then the third, then the second partition.

Using Partition Wizard, or, a similar tool, it can be done. However, itis a little risky.

I have done it, and if you want to keep the recovery partition, (the 200mb could be the hard drive buffer, as it is being used ( disks used to be 8/16/32mb buffer)- or, it could be a link to the recovery partition. I am sorry I am a little out of date on this.

A drive's buffer is an amount of RAM on the drive to store frequently accessed data from the drive. Since RAM is faster at transferring data than the drive head operation, it increases the speed of the drive. The more buffer on the drive, the more data that can be stored in the cache to decrease the amount of physical drive operation. (These can be chips on the motherboard)

If you want to try it Download Partition Wizard FREE HOME EDITION

NOW IN STAGES IGNORE 200MB-LEAVE IT AS IT SHOULD NOT COUNT

Using partition wizard-

Click on the C partition, and click on move/re-size 

Use the slider to reduce the size of the C partition to allow for the extra partition (say 200gb, or, whatever)

click apply- It will show greyed out, until you do the next steps

Now select the hidden partition, and click move/resize, and slide it along to the end of the newly sized C partition

 then create a new partition in the remaining unallocated partition

Read through an old answer on majorgeeks that I was involved with- It worked -but read to the last entry from me.

http://forums.majorgeeks.com/showthread.php?t=259365&page=2


25 years playing with computers/laptops, software, and 10 years a geek/nerd -always learning
Answer #2: Posted by roqa on September 25th, 2012 2:06 PM
roqa

Member since:
September 25th, 2012

Points: 140
140
points
This is what i've done my self

go to manage (right click my computer)

click on disk management to the left and your partitions will appear to the right


Right click on D: Drive box and select Delete Volume from the dropdown menu and the 29 GB will become unallocated , right click again and select delete partition>


Now right click the C: Drive box and select Extend Volume and continue till finish when you are done your C will be 29 GB MORE than it was before.


Now right click on C: Box again and select Shrink Volume and shrink the volume by the amount of space you want for your new D: drive in my case I left only 120 GB for the C and the rest I shrinked which was about 340 GB right on the new space and make new simple volume.

LEAVE the quick format so the new drive will be formatted>


with that you are done and you now have about 120 GB for C and about 340 GB for D; where you can now store your data in>

note not to touch what so ever the two hidden partitions>


also note the your onekey recovery will restore your system to the initial state ( shut down the laptop and after that hit the rescue button and keep the selection as is and your system will be restored to the new 120 GB C:


now copy your data from removable media to the d drive>


good luck to you>


Answer #3: Posted by skmrnnr on April 15th, 2013 5:09 AM
skmrnnr

Member since:
April 15th, 2013

Points: 0
100
points
Start > My Computer > RightClik > Manage (Computer Management screen will open) From the left pane click on Disk Management. Now you can see your Hard Disk Partitions. You may be noticed this. No problem. Now Right-click on Partition which have more than 200GB in size. See there will be option SHRINK and select to do so. Now a new window show you that how much space available for shrink. Now select ok for shrink. After completing the task You can see your big in size partition became small. And you can see another new space as unallocated. Don't do anything with this unallocated space.ok. Now right-click on partition Lenovo(D:) and select for extend. Now all the unallocated space will be added to Lenovo(D:) partition and your both partitions will have enough space. Be careful about your power supply. Restart and go for creating REPAIR Disk. Make a Backup also. Thanks.

Related Lenovo G570 Manual Pages

Lenovo G470/G475/G570/G575 User Guide V1.0 - Page 1

Lenovo G470/G475/ G570/G575 User Guide V1.0 Read the safety notices and important tips in the included manuals before using your computer.
Lenovo G470/G475/G570/G575 User Guide V1.0 - Page 2

... described in this user guide. • The illustrations used in this manual are for Lenovo G570 unless otherwise stated. • The illustrations in this guide may assume that you are ... reproduction, or disclosure is subject to restrictions set forth in this guide are common to read Lenovo Safety and General Information Guide first. • Some instructions in this manual may not be sure...
Lenovo G470/G475/G570/G575 User Guide V1.0 - Page 3

... 10 First use 10 Using AC adapter and battery ...12 Using the touchpad 14 Using the keyboard 15 Connecting external devices.......18 Special keys and buttons 20 System...7 Chapter 2. CRU instructions 31 Replacing the battery 31 Replacing the hard disk drive ....33 Replacing memory 37 Removing the optical drive ........40 Trademarks 42 Index 43 i Connecting to know your computer 22 Using ...
Lenovo G470/G475/G570/G575 User Guide V1.0 - Page 6

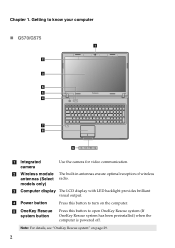
... (If OneKey Rescue system has been preinstalled) when the computer is powered off. e OneKey Rescue system button Press this button to know your computer „ G570/G575 1 2 3 6 5 4 7 8 6 a Integrated camera Use the camera for video communication. b Wireless module antennas (Select models only) The built-in antennas ensure optimal reception of wireless radio...
Lenovo G470/G475/G570/G575 User Guide V1.0 - Page 8

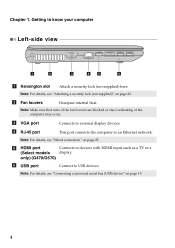
b Fan louvers Dissipate internal heat. Note: Make sure that none of the fan louvers are blocked or else overheating of the computer may occur. Getting to devices with HDMI input such as... details, see "Attaching a security lock (not supplied)" on page 19. 4 d RJ-45 port This port connects the computer to external display devices. only) (G470/G570) f USB port Connect to USB devices.
Lenovo G470/G475/G570/G575 User Guide V1.0 - Page 9

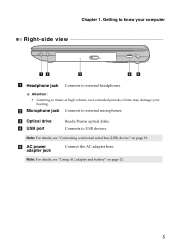
... battery" on page 19. Chapter 1. Connects to external microphones. e AC power adapter jack Connect the AC adapter here. b Microphone jack Connects to USB devices. c Optical drive d USB port Reads/Burns optical disks. Note: For details, see "Connecting a universal serial bus (USB) device" on page 12. 5 Getting to external headphones.
Lenovo G470/G475/G570/G575 User Guide V1.0 - Page 12

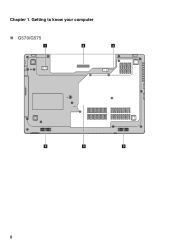
Getting to know your computer „ G570/G575 1 2 3 5 4 5 8 Chapter 1.
Lenovo G470/G475/G570/G575 User Guide V1.0 - Page 13

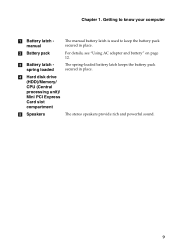
... AC adapter and battery" on page 12. c Battery latch spring loaded The spring-loaded battery latch keeps the battery pack secured in place. d Hard disk drive (HDD)/Memory/ CPU (Central processing unit)/ Mini PCI Express Card slot compartment e Speakers The stereo speakers provide rich and powerful sound. 9 Chapter 1. Getting to know your...
Lenovo G470/G475/G570/G575 User Guide V1.0 - Page 16

... computer. • To increase the life of the following situations: • When you purchase a new battery • If the battery status indicator starts blinking • If the battery has not been used... for example, how often you access the hard disk drive and how bright you make the computer display. „ Charging the battery When you find that the battery power...
Lenovo G470/G475/G570/G575 User Guide V1.0 - Page 19

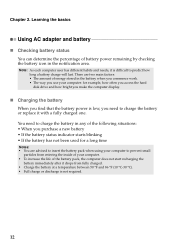
... G470/G475 The keyboard has keys that, when enabled, work as a 10-key numeric keypad. To enable or disable the numeric keypad, press Fn+F8 . G570/G575 The keyboard has a separate numeric keypad. Chapter 2.
Lenovo G470/G475/G570/G575 User Guide V1.0 - Page 21

...+ F4: Open the interface for the display device switch to select this notebook or an external display. Fn + F11: Skip to the next track....Fn + F6: Enable/Disable the touchpad. Fn + F3: Open the interface for display resolution settings. Fn + Insert (G570/G575): Fn + PgUp (G470/G475): Enable/Disable the scroll lock. Fn + F5: Open the interface for integrated wireless...
Lenovo G470/G475/G570/G575 User Guide V1.0 - Page 22

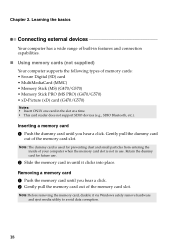
... the inside of memory cards: • Secure Digital (SD) card • MultiMediaCard (MMC) • Memory Stick (MS) (G470/G570) • Memory Stick PRO (MS PRO) (G470/G570) • xD-Picture (xD) card (G470/G570) Notes: • Insert ONLY one card in features and connection capabilities. „ Using memory cards (not supplied) Your computer...
Lenovo G470/G475/G570/G575 User Guide V1.0 - Page 25

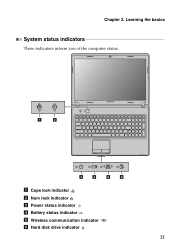
Chapter 2. Learning the basics System status indicators These indicators inform you of the computer status. 1 2 3 4 5 6 a Caps lock indicator b Num lock indicator c Power status indicator d Battery status indicator e Wireless communication indicator f Hard disk drive indicator 21
Lenovo G470/G475/G570/G575 User Guide V1.0 - Page 33

... can back up the data on the hard disk drive, other storage devices, or by default to physically create the recovery discs. Notes: • The backup process and creation of Lenovo OneKey Recovery. 29 You can be used to your hard disk already includes a hidden partition by creating recovery discs. For more instructions, see the Help file...
Lenovo G470/G475/G570/G575 User Guide V1.0 - Page 34

... Rescue system. • Shut down your system partition to the original factory status, or to launch OneKey Rescue system. Within the program, you can choose to restore your computer. • Press the key to a previously generated backup. Note: The recovery process is irreversible. Chapter 4. Make sure to back up any critical data before...
Lenovo G470/G475/G570/G575 User Guide V1.0 - Page 35

If this chapter are of the Lenovo G570, unless otherwise stated. • The following : 1 Turn off the computer. 2 Close the computer display... 3 2 31 Note: If you are the same for the G470, G475, G570 and G575. CRU instructions Notes: • The illustrations used in the direction shown by Lenovo. Disconnect the AC adapter and all cables from the computer. Any other battery could...
Lenovo G470/G475/G570/G575 User Guide V1.0 - Page 37

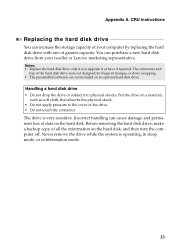
... increase the storage capacity of your reseller or Lenovo marketing representative. CRU instructions Replacing the hard disk drive You can purchase a new hard disk drive from your computer by replacing the hard disk drive with one of all the information on the hard disk. Before removing the hard disk drive, make a backup copy of greater capacity. Appendix...
Lenovo G470/G475/G570/G575 User Guide V1.0 - Page 38

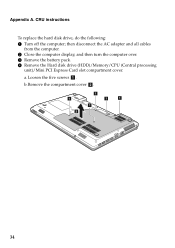
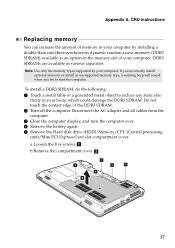
... adapter and all cables from the computer. 2 Close the computer display, and then turn the computer over. 3 Remove the battery pack. 4 Remove the Hard disk drive (HDD)/Memory/CPU (Central processing unit)/Mini PCI Express Card slot compartment cover. a.Loosen the five screws a . b.Remove the compartment cover b. 1 1 1 1 1 2 34 Appendix A. CRU instructions To...
Lenovo G470/G475/G570/G575 User Guide V1.0 - Page 40

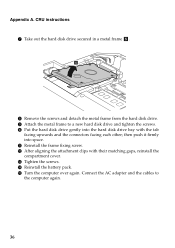
... then push it firmly into the hard disk drive bay with their matching gaps, reinstall the compartment cover. D Reinstall the battery pack. C Tighten the screws. Connect the AC adapter and the cables to a new hard disk drive and tighten the screws. 0 Put the hard disk drive gently into space. E Turn the computer over again...
Lenovo G470/G475/G570/G575 User Guide V1.0 - Page 41

... AC adapter and all cables from the computer. 3 Close the computer display, and turn the computer over. 4 Remove the battery again. 5 Remove the Hard disk drive (HDD)/Memory/CPU (Central processing unit)/Mini PCI Express Card slot compartment cover. If you incorrectly install optional memory, or install an unsupported memory type, a warning...

Similar Questions

I Just Got The New Lenovo Laptop G570 Today And The Wireless Mouse Does Not
work!! I like using the wireless mouse intead the touchpad..what are the reason??and why the wireles...
(Posted by dhodgson 11 years ago)
Lenovo Laptop G570 Bios Password Reset
lenovo laptop g570 bios password reset
(Posted by jankiinfo 11 years ago)
Ask a New Question
Use the box below to post a new question about this Lenovo product .
Points & Prizes
  • You can earn points for nearly everything you do on HelpOwl.com
  • You can trade in those points for gift cards at leading retailers such as Amazon.com and Walmart
  • It's that simple!
See How it Works
Create a Free Account

Lenovo Manuals

Find free Lenovo G570 manuals and user guides available at ManualOwl.com. Try out our unique manual viewer allowing you to interact with manuals from directly within your browser!

Lenovo Reviews

View thousands of Lenovo user reviews and customer ratings available at ReviewOwl.com.

Contact Information

Complete Lenovo customer service contact information including steps to reach representatives, hours of operation, customer support links and more from ContactHelp.com.

Scoreboard Ratings

See detailed Lenovo customer service rankings, employee comments and much more from our sister site.

Lenovo Recalls

Find comprehensive Lenovo recall information updated hourly on RecallOwl.com.