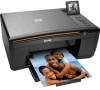
Kodak ESP3250 Support Question
Kodak ESP3250 Support Question
Find answers below for this question about Kodak ESP3250 - Es Printer.Need a Kodak ESP3250 manual? We have 2 online manuals for this item!
Question posted by jefgaremu on November 18th, 2013
How To Remove Rear Access Cover On 3250 Kodak
The person who posted this question about this Kodak product did not include a detailed explanation. Please use the "Request More Information" button to the right if more details would help you to answer this question.
Current Answers
Related Kodak ESP3250 Manual Pages
User Manual - Page 1

KODAK ESP 3200 Series
All-in-One Printer
Back Home
MS
SD/HC
MMC
Includes Information for the: ESP 3250 All-in-One Printer ESP 3260 All-in-One Printer
Extended User Guide
User Manual - Page 7

...
Back Home
MS
SD/HC
MMC
MS SD/HC MMC
7
11 10
9
1 Memory card slot 2 Control panel 3 LCD 4 USB port 5 Power cord connection port 6 Rear-access cleanout area 7 Printer access door
8
8 Printhead with ink cartridges installed 9 Right paper-edge guide 10 Paper tray 11 Paper tray extender / paper stop 12 Left paper-edge guide...
User Manual - Page 8

...Printer Overview
Control panel
ESP 3250
1
All-in-One-Printer
2
Back
Home
8
3
4 7
OK
Back Home
MS
SD/HC
MMC
6
5
Cancel Start
Feature 1 LCD 2 On/Off button 3 Home button 4 Navigation buttons 5 Start button 6 Cancel button
7 OK button
8 Back button
Description Displays pictures, messages, and menus Turns the printer... Displays the previous screen
2
www.kodak.com/go/aiosupport
User Manual - Page 9

....
You can check for service personnel. takes you can also access the KODAK Tips and Projects Center Web site or upgrade your printer from your computer. From the File menu of diagnostic data for software updates. Clicking one printer from a list of connected printers and check the printer ink levels. Tools pane - Use this icon to...
User Manual - Page 11

... dock, open System Preferences. 2. Select Start > All Programs > Kodak > Kodak Printer Network Setup Utility. For WINDOWS XP OS-based computers
1. In the Hardware section, click Print & Fax. 3. Connecting to another ESP 3250 printer or to Default Printer.
Select Start > Control Panel > Hardware and Sound > Printers. 2. If your all -in -One Printer
If you are connecting to the computer and...
User Manual - Page 15
... the paper. Remove any paper from the tray. 2. Move the left paper-edge guide
Back Home
MS
SD/HC
MMC
www.kodak.com/go/aiosupport
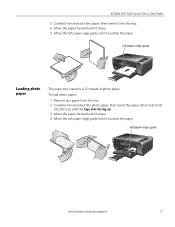
9 To load photo paper:
1. Carefully fan and stack the photo paper, then insert the paper (short side first)
into the tray. 6. KODAK ESP 3200 Series All-in-One Printer
5.
left...
User Manual - Page 18

... photo paper,
page 9), and move the left paper-edge guide until it touches the paper.
12
www.kodak.com/go/aiosupport Adjusts the image brightness to Prints No (default) Yes
Save as the new default, press...picture(s) (the date the picture was taken or last edited) in the printer. do not remove the memory card while leaving the adapter in a corner of the picture.
Printing a picture If you ...
User Manual - Page 19

...paper-edge guide until it from the printer while printing. Press Back. 3. www.kodak.com/go/aiosupport
13 Load photo ...paper with options other than the default settings (such as a different
using non-default print size, black-and-white instead of data from your memory card, do not remove it touches the paper.
KODAK ESP 3200 Series All-in-One Printer...
User Manual - Page 20

.... IMPORTANT: To prevent loss of data from your memory card, do not remove it touches the paper.
14
www.kodak.com/go/aiosupport
NOTE: Refer to your camera user guide to change the selection...9), and move the left paper-edge guide until the picture is recognized by the tag from the printer while printing. Printing tagged pictures
6. Press or to print, then press OK.
This creates a ...
User Manual - Page 29
... cleaning the scanner glass and lid regularly to remove dust and fingerprints, which affect the quality and accuracy of KODAK Products for cleaning the printer, keep the printer plugged in with the
painted surface of the printer. • If the printer has been exposed to the printer before cleaning it dry completely. If you use harsh or...
User Manual - Page 35

KODAK ESP 3200 Series All-in the printer. 4. Lift the printer access door, and wait for the carriage to move to the access position.
3. www.kodak.com/go/aiosupport
29 Make sure your printer is not a regular maintenance procedure.
Remove both ink cartridges and set them aside. Replace the printhead only if you receive a new printhead from Kodak. Remove any paper that...
User Manual - Page 41
...cable was disconnected from the printer, then reconnected, or
if power to the printer was interrupted, restart the computer. Printhead carriage jam
• Open the printer access door and clear any ...printer.
• www.kodak.com/go/esp3250downloads to download the latest software and firmware files.
• www.kodak.com/go /itg to use non-Kodak brand or refilled ink cartridges.
• Remove...
User Manual - Page 42

... plugged into the back of any paper from inside the
printer. • Make sure the paper in -one printer, then Paper jam. Wait for paper in the rear-access cleanout area. • Open the printer access door and gently remove any error message(s)
For more information, see www.kodak.com/go/contact), have power. - Status light
The status...
User Manual - Page 46

...
Memory
512 MB RAM
Available Disk Space 500 MB available
Interface
USB 2.0
Removable Drive
CD-ROM
Other
Internet access capability
Recommended
MICROSOFT WINDOWS VISTA OS 32- x 11.7.
or 64-bit ...processor 2 GHz 1024 MB RAM 500 MB available USB 2.0 CD-ROM Internet access capability
40
www.kodak.com/go/aiosupport x 7.1 in.)
5.6 kg (12.3 lb)
5°C (41°F) to...
User Manual - Page 47

....kodak.com/go/aiosupport
41 KODAK ESP 3200 Series All-in-One Printer
MACINTOSH Computers
MACINTOSH Computers
Operating System CPU
Clock Speed Memory Available Disk Space Interface Removable Drive Other
Minimum
Recommended
MACINTOSH OS X 10.4.8 PowerPC G4, G5, or Intel Based Mac 1.2 GHz 512 MB RAM 200 MB available USB 2.0 Full Speed CD-ROM Internet access...
User Manual - Page 49
... • Do not block this product's covers or openings, or insert any objects through ...removing the power plug from the outlet.
• Do not allow the power cord to become damaged or frayed. • If you do not tilt or stand it from the display gets on inks, go to www.kodak...kodak.com/go /MSDS. Never turn this product off by using the On/Off button. KODAK ESP 3200 Series All-in-One Printer...
User Manual - Page 55

KODAK ESP 3200 Series All-in Home Center Software, 22 multiple pictures simultaneously, 23
Service agreements, 24 Settings
basic printer, 4 Software support, 40 Software, ..., 16 tagged image photos, 15 Protecting the printer, 24
R
Rear-access cleanout area, 1 Recycling printer or supplies, 24 Reducing or enlarging a copy
document, 20 photo, 20 Removing the printhead, 31 Replacing ink cartridges, 27...
User Manual - Page 2

Remove all shipping tape from the inside of the printer. d. Lift the printer access door. Close the printer access door.
2
www.kodak.com/go /inkjetvideo. 1 Unpacking the Printer
Included with your KODAK All-in-One Printer:
Inkjet Printer Software FOR WINDOWS & MACINTOSH
Power Cord and Adapter
Back Home
MS
SD/HC
MMC
Printhead
Black & Color Ink Cartridges
Software CD
IMPORTANT: ...
User Manual - Page 4

Carriage
b. c.
d. e. Do not touch the copper-colored contacts. Remove the two plastic protective shields. Place the printhead into the carriage.
Push firmly against the target label of the printhead until you hear a loud snap.
4
www.kodak.com/go/aiosupport Lift the printer access door. Carefully remove the printhead from its bag.
Insert at the angle shown...
User Manual - Page 5

...printer access door and press OK.
e.
Back Home
MS
SD/HC
MMC
f. Insert the black ink cartridge into position. Press down on the ink cartridge until you hear it click into the printhead.
b.
c. Carefully remove... and discard the orange cap. d. Repeat steps 4a - 4d with the color ink cartridge. www.kodak.com/go/aiosupport
5 ...
Similar Questions

Kodak Esp 3250 Printer How To Put Rear Access Cover On
(Posted by afoddjbil 10 years ago)

How To Remove Rear Access Cover Kodak Esp 3250
(Posted by rschsmerri 10 years ago)

How To Attach Rear Access Cover Kodak Esp 3250
(Posted by terrduce 10 years ago)
How To Remove Rear Access Cover Kodak Esp 3250 Manual
(Posted by mrbran 10 years ago)

How To Remove Rear Access Door On Kodak Esp 3250 Printer
(Posted by lehocmi 10 years ago)