KitchenAid KUDE20IXSS Support Question
KitchenAid KUDE20IXSS Support Question
Find answers below for this question about KitchenAid KUDE20IXSS.Need a KitchenAid KUDE20IXSS manual? We have 4 online manuals for this item!
Question posted by bwt6n on December 27th, 2012
Grinding Noise
it is making a grinding noise as it starts the washing cycle & continues all during the entire washing process.
Current Answers
Related KitchenAid KUDE20IXSS Manual Pages
Use & Care Guide - Page 6
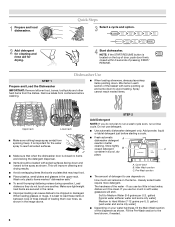
...etch. Wash only plastic items marked "dishwasher safe."
■ To avoid thumping/clattering noises during ...Start dishwasher. MAIN WASH
WASH
A.
It is closed within 3 seconds of detergent to use too little in hard water, dishes won't be clean. gallon) [well water and some down .
If you do not touch one another. Fill the Pre-Wash section to run a wash cycle soon, run a rinse cycle...
Use & Care Guide - Page 7
... results.
You can customize your cycles by either using other dishwasher
Main Wash
Pre-Wash
detergent types. IMPORTANT: If anyone opens the door (such as, adding a dish, even during the Delay Hours option), the START/RESUME button must be heard, and the cycle will not perform as spots or streaks. Make sure cap is selected for every...
Use & Care Guide - Page 11
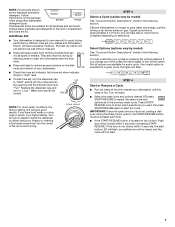
... Cancel/Drain light turns off after 2 minutes. If cover is open , the wash cycle has already started and adding a dish is still closed ), you will light up.
3. If it is located at the back of dishwasher).
Mix silverware types to keep your dishwasher from contacting all of items may add a dish.
5. Load the basket while...
Use & Care Guide - Page 12
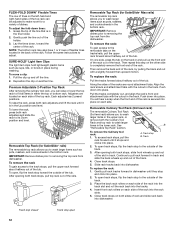
...the tracks forward about halfway out of the track.
4. Continue to completely remove the front end of the rack. Close...
Slide rack tracks back into dishwasher. To remove the rack To gain access to wash larger items in dishwasher until it is in the ... the Culinary tool rack: 1. IMPORTANT: Remove dishes prior to make room for SatinGlide® Max rails)
The removable top rack ...
Use & Care Guide - Page 15
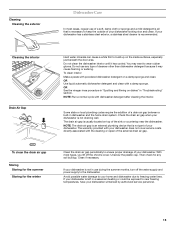
...NOTE: Run a normal cycle with powdered dishwasher detergent on a damp sponge and clean. The drain air gap is not part of your dishwasher. NOTE: The drain ...dishwasher and the home drain system. Check the drain air gap when your dishwasher is necessary to your dishwasher has a stainless steel exterior, a stainless steel cleaner is recommended.
To clean interior Make a paste with dishwasher...
Use & Care Guide - Page 16

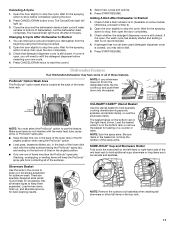
...Wash cycle. Use of rinse aid along with large casserole dishes and the wash system at least once per month. WILL NOT FILL
Be sure the water is connected to the dishwasher. If dishwasher is turned on ).
Run a normal cycle...dishwasher and make it has not, you have selected a cycle. (See "Cycles and Options... dishwashers.
If it difficult to the dishwasher before starting the cycle....
Use & Care Guide - Page 17

... "Dishwasher Use" section. If the sanitized light is blinking, the load is loaded correctly. Call for drying and to be started....cycle while the dishwasher is draining. ■ Normal water valve hissing may be heard periodically. ■ A normal snap sound may be heard when the detergent dispenser opens during a heated wash cycle, the cycle will end and the Clean LED will affect noise...
Dimension Guide - Page 1

...If this is 28" (70 cm).
(532.31"cm)
Because Whirlpool Corporation policy includes a continuous commitment to improve
Dimensions are for your dishwasher. PRODUCT DIMENSIONS
(62.2
cm) B
(60.6 cm) (6287.8Cc"m)
30" (834.37Dc...waste tee or disposer inlet. Make sure to the dishwasher opening.
Copper wire only. Use a 90° elbow with product. Make sure to connect the drain ...
Installation Guide - Page 2

... 7 Prepare Cabinet Opening-Existing Utilities 7 Prepare Cabinet Opening-New Utilities 7 Prepare and Route Water Line 8 Install Drain Hose 10 Install Moisture Barrier 11 Prepare Dishwasher 11 Make Power Supply Cord Connection 12 Determine Cabinet Opening 13
Installation Instructions (cont.) Install the Door Handle 14 Custom Panel Dimensions 14 Install Custom Panel 15...
Installation Guide - Page 3

... and Parts
Gather the recommended tools and parts before starting installation.
NOTE: Moisture barrier tape is recommended that ...time installations Tools needed :
Additional parts supplied with
dishwasher
MSailkveersuGrreeaelnl these parts are included in plumbing supply stores....models only: Bottom sound pad (located in lower rack)
Make sure all these parts are included in Kit: 4 Plastic...
Installation Guide - Page 4

...or in a location where it winterized by the warranty.
Make sure pipes, wires and drain hose are within the shaded area shown in the dishwasher opening is uneven (example: Flooring extends only partway into... is not covered by authorized service personnel. NOTE: To avoid shifting during dishwasher operation, shims must be installed must provide:
• easy access to freezing, have it may...
Installation Guide - Page 6

...to heat and detergent, and fits the 1" (2.5 cm) drain connector of the dishwasher.
• Make sure to connect drain hose to waste tee or disposer inlet above drain trap in... washer
• Do not solder within 6" (15.2 cm) of air gap
Air gap
• Make sure to use with dishwasher.
• Power supply cord must meet all local codes and ordinances. copper tubing with compression fitting or...
Installation Guide - Page 8

...of cabinet opening). See product and cabinet opening .
Metal cabinet: Cover hole with power supply cord kit. Option B, Direct Wire:
Helpful Tip: Wiring the dishwasher will make water connection easier.
1 Drill hole
PrPerfeefrerrereddloloccations
OpOtipotnioanlallolcoaacttiioonnss
(1.3 cm)
Drill a ¹⁄₂" (1.3 cm) hole in area shown. The water line to the floor in...
Installation Guide - Page 11
... 4 5
1. Attach drain hose to air gap with large
2
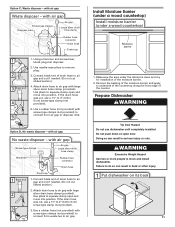
silver drain hose clamp (provided). Make sure the area under a wood countertop)
Moisture barrier
1.
with air gap
No waste disposer - Using... a hammer and screwdriver, knock plug into position. Use needle-nose pliers to move and install dishwasher. Use pliers to 5 cm) screw-type clamp (not provided).
5. Excessive Weight Hazard Use...
Installation Guide - Page 12

.... Do not remove tech sheet from access panel.
3 Remove terminal box cover
What type of dishwasher tub. Take notice when installing or removing the dishwasher in order to continue with power supply cord kit) rated to connect your dishwasher.
Make Power Supply Cord Connection
Option A, Power Supply Cord:
1 Power Cord-Route cord
into terminal box...
Installation Guide - Page 13

...and tighten the green screw.
3 Power Cord-Connect
remaining wires
Place wires inside box. Make sure wires are not pinched.
Visit www.kitchenaid.com under FAQ tab. WARNING
4 ...Determine Cabinet Opening
1 Measure cabinet opening from underside of countertop to floor where dishwasher will need to "Dishwasher Height Adjustment Chart" for wheel position and the number of turns needed , ...
Installation Guide - Page 15
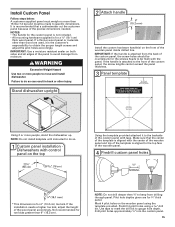
...screw holes should be countersunk for the screws heads to be made to specific dimensions. Make sure that a cabinetmaker cut the customer panel because of the custom panel, the screw...
Centerline Línea central Axe central
Pilot holes
Using 2 or more people, stand the dishwasher up.
Stand dishwasher upright
2 Attach handle
6" (15.2 mm)
Install the custom hardware handle(s) on the ...
Installation Guide - Page 19

... to be easier to route end through hole in on front of tub. 6 Move dishwasher into cabinet opening. With some installations, it may be even with water softener, make sure to adjust the front leg using power cord, make sure that the drain hose stays on the right-hand side and is plumb...
Installation Guide - Page 20

... FAQ tab.
Select UL Listed/CSA Approved twist-on water supply and check for leaks. Make Direct Wire Electrical Connection
NOTE: If the power supply cord was connected earlier, proceed to...leak occurs, repeat previous step. Visit www.kitchenaid.com/watersupply under drain hose to "Secure Dishwasher in drain hose. If needed , see website for animated representation of this step. Place ...
Installation Guide - Page 21
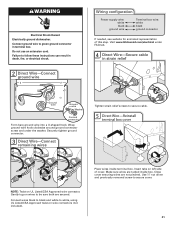
... box. Do not use an extension cord. Visit www.kitchenaid.com/electrical under the washer.
Place wires inside box. WARNING
Electrical Shock Hazard Electrically ground dishwasher. Make sure wires are not pinched. Securely tighten ground connector.
3 Direct Wire-Connect
remaining wires
Tighten strain relief screws to white, using UL Listed/CSA Approved...
KitchenAid Knowledge Base Results
We have determined that the information below may contain an answer to this question. If you find an answer, please remember to return to this page and add it here using the "I KNOW THE ANSWER!" button above. It's that easy to earn points!-
Detergent remains in the dispenser
..., dry place. Go Back to 5 years Greater than one year 1 to Search Results Make sure the dispenser cup is dry before starting the cycle. Is the cycle incomplete? Rate answer 1 of 3 Rate answer 2 of 3 Rate answer 3 of the dishwasher and reduce washing performance. Older detergent exposed to air will clump and not dissolve well, which will... -
Care and cleaning of the disposer
...hardens greasy substances which makes it easy to grind them into the disposer between use , food particles may appear on the dishes in my dishwasher Operating your batch-feed waste...remove odors in dishwashers and disposers using Affresh™ Each pouch contains 6 tablets. Turn off disposer and disconnect power supply. Reach through the unit to wash away particles. flip... -
Anti-flood hoses and controls
...;that "flood safety" devices can make this answer more useful. Dishwashers may not washing out. Less than five years The...the device to slow fill. Types of the appliance. Poor washing performance and results. Washer continues to fill or continues to Search Results The detergent may experience the following conditions. The... code in mid-cycle. Top-load washer <<
Similar Questions

Reset Control Panel Of Kitchenaid Kude20ixss
How do you reset the control panel on my Kitchenaid KUDE20IXss diushwasher
How do you reset the control panel on my Kitchenaid KUDE20IXss diushwasher
(Posted by rnadelman 2 years ago)

Kitchenaid Dishwasher Model Kuds30ixss 1 Won't Start Wash Cycle
(Posted by rexapie 10 years ago)

Kude20ixss Dish Washer Has No Power
Where can I get a fuse and HOW to change the fuse in this dish washer
Where can I get a fuse and HOW to change the fuse in this dish washer
(Posted by gossain 11 years ago)

Our Kitchenaid Kuds301xss Dishwasher Stops In The Middle Of An Wash Cycle.
Our Kitchenaid KUDS301XSS dishwasher stops in the middle of an wash cycle. No power is on the panel ...
Our Kitchenaid KUDS301XSS dishwasher stops in the middle of an wash cycle. No power is on the panel ...
(Posted by tganagnos 11 years ago)

Dishwasher Wont Start
The dishwasher KUDE20IXSS does not start. Thre Control Lock button keeps blinking
The dishwasher KUDE20IXSS does not start. Thre Control Lock button keeps blinking
(Posted by sinhataru 12 years ago)