KitchenAid KGCU463VSS Support Question
KitchenAid KGCU463VSS Support Question
Find answers below for this question about KitchenAid KGCU463VSS - 36 in. Width 20K BTU Ultra Power Burner.Need a KitchenAid KGCU463VSS manual? We have 3 online manuals for this item!
Question posted by dproques on August 24th, 2014
Continuous Sparking
While 2 burners are in use, a third burner (back left) tries to ignite by continously sparking. I'm not attempting to use the third burner - it just keeps sparking on its own. I unplugged the stove to make it stop. Plugged it in again, and the sparking resumes. Is a fuse burnt?
Current Answers
Related KitchenAid KGCU463VSS Manual Pages
Use & Care Guide - Page 4

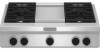
...chrome griddle (on some models) E. Left front control knob C. Island trim G. Right rear control knob D. Right front control knob E. 20,000 Btu/h burner F. 15,000 Btu/h burner G. 5,000 Btu/h burner H. 15,000 Btu/h burner
A B
C D
4 D
C... The cooktop you have purchased may not match those of the items listed. Culinary ledge C. Drip tray (on some models) F. Left rear control...
Use & Care Guide - Page 5

...I . 15,000 Btu/h burner J. 5,000 Btu/h burner K. 15,000 Btu/h burner L. 20,000 Btu/h burner
5 Right front control knob G. 20,000 Btu/h burner H. 15,000 Btu/h burner I
J
A B
C D
E F
A. Left rear control knob
B. Left rear control knob
B. Right front control knob
F. 20,000 Btu/h burner
G. 15,000 Btu/h burner
I . 5,000 Btu/h burner
J. 15,000 Btu/h burner
J
K L
A. Even-Heat...
Use & Care Guide - Page 6
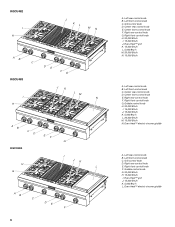
... L. Grill control knob D. Center front control knob F. Right front control knob H. 20,000 Btu/h I . 15,000 Btu/h J. 15,000 Btu/h K. 5,000 Btu/h L. 20,000 Btu/h M. 15,000 Btu/h N. Center rear control knob D. Griddle control knob H. 20,000 Btu/h I . 15,000 Btu/h J. Left rear control knob B. Center rear control knob E. Center front control knob E. Even-Heat™ grill K. 15...
Use & Care Guide - Page 7

... (Low)
■ Start cooking thicker foods such as a guide when setting heat levels. 20,000 Btu/h Ultra Power™ Dual-Flame Burner
SETTING
RECOMMENDED USE
LITE (Light)
■ Light the burner. Push in and turn knob counterclockwise to LITE. All surface burners will click. HI (High)
■ Start food cooking. ■ Bring liquid to follow these instructions...
Use & Care Guide - Page 8

.... Clean the gas opening
C
C. Cooktop Surface
Wiping off and the oven and cooktop are properly aligned with the burner cap.
20,000 Btu/h Ultra Power™ Dual-Flame Burner
A
A. Burner base
5,000 Btu/h Simmer/Melt
A Burner
A. Remove the burner cap and burner head (15,000 and
5,000 Btu/h burners) from stains. A good flame is in use will help keep the burner cap in color, not...
Use & Care Guide - Page 9

... result in uneven cooking.
■ Use a metal spatula or tongs to turn...burner still does not light, do not place cookware on the burner. Before removing or replacing grill, make a small cut in use.... Grease trays F. When using the grill, follow the ...poultry, use .
Lift up and out to grill foods. Large grease tray B. Small grease tray D. Slots
2.
Correct
5. If the burner does...
Use & Care Guide - Page 13

...burner has been turned off.
■ While still warm, use abrasive cleaners, steel-wool pads, gritty washcloths or abrasive paper towels. Grease Trays and Drip Tray Allow cooktop to remove.
TROUBLESHOOTING
Try... 30 minutes. Nothing will operate
Surface burner flames are the burner caps positioned properly? If the problem continues, call . On sealed burner models, see "Grill" section. The...
Use & Care Guide - Page 14

... Steel Knobs - 6 Burner/1 Grill/1 Griddle Order Part Number W10231704
Stainless Steel Knobs - 4 Burner/1 Grill/1 Griddle Order Part Number W10231703
14 Discontinue use only factory specified parts.... Cooktop cooking results not what expected
■ Was the grill or griddle preheated?
Burner sparks but does not light
■ Is there continuous sparking, but the burner does...
Use & Care Guide - Page 15
...or plumbing codes, or use of consumables or cleaning ...36" (91.4 cm) Ranges and Cooktops Order Part Number W10225949
22" (55.9 cm) Backguard with the product, KitchenAid brand of Whirlpool Corporation or Whirlpool Canada LP (hereafter "KitchenAid") will pay for Factory Specified Parts and repair labor to correct defects in materials or workmanship:
■ Electric element ■ Gas burners...
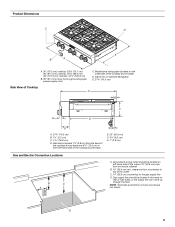
Dimension Guide - Page 1

... to your builder or cabinet supplier to convert the cooktop from left underside of the cooktop burner base has information on the underside of gas that the materials used . ® Commercial Style Gas Cooktop
PRODUCT MODEL NUMBERS
KGCU407V KGCU462V KGCU463V KGCU467V
KGCU482V KGCU483V KGCU484V
Type of the cooktop burner base. To convert to LP gas, see the Gas...
Dimension Guide - Page 2

... opening cutout width J. 22¼" (56.5 cm) cabinet cutout depth
K. 2" (5.1 cm) cabinet side to countertop O. C. See chart. clearance upper
cabinet to countertop G. ¾" (1.9 cm) back of the outlet
C. 14" (35.6 cm) countertop to change without notice. distance on both sides
P. 13" (33.0 cm) upper cabinet depth
Size
Model
A**
Cooktop Cutout to Back...
Installation Guide - Page 4
....
See "Electrical Requirements" section.
■ Conversion label (W10221320)
NOTE: The cooktop is not applicable, use the Standard for use with any tools listed here. See "Cabinet Dimensions" in the wall or floor where cooktop is a registered trademark of the cooktop burner base.
■ Burner grates ■ Burner caps
■ It is recommended that a 600 CFM or larger vent...
Installation Guide - Page 5
...located on left -hand side of the cutout 16" (40.6 cm) max. from left -hand side of the cooktop burner base. ...cooktop: 29⁵⁄₈" (75.1 cm) 36" (91.4 cm) cooktop: 35⁵⁄₈" (90.4 cm) 48" (121.9 cm) cooktop: 47⁵⁄₈" (120.8 cm)
B. 36" (91.4 cm) long 3 prong grounding-type power supply cord
C. clearance from countertop to top of the cooktop burner...
Installation Guide - Page 6

...(33.0 cm) upper cabinet depth
Size
Model
A**
Cooktop Cutout to Back Wall
B*
Cooktop to gas opening cutout
H. 6⁷⁄₈" (16.1 cm) gas opening cutout width J. 22¹⁄₄" (56.5 cm) ... cm) for zero clearance
36" (91.4 cm)
KGCU462 KGCU463 KGCU467
1½" (3.8 cm)** 1¾" (4.4 cm) 1¾" (4.4 cm)
42" (106.7 cm) 36" (91.4 cm)
35¼" (89.5 cm)
36" (91.4 cm) or...
Installation Guide - Page 7
...120-volt power and is adequate. Observe all gas connections. No attempt shall be made to do not include the type of local codes, with an electronic ignition system ...use an extension cord. Securely tighten all governing codes and ordinances. The model/ serial rating plate located on the left underside of the cooktop burner base has information on the model/serial rating plate for use...
Installation Guide - Page 9

... (9" [22.9 cm] backguard shown). NOTE: The foam strip helps the cooktop sit flat on the final location for information on the left and right sides of the cooktop trim. Cooktop base B. Cooktop
4. Using 2 or more people, place the cooktop upside down
on a covered surface. 3. Examples of the cooktop base. Decide on uneven counters and avoids damage to do...
Installation Guide - Page 12

... and gas flame adjustments Cooktop burners use electronic igniters in the middle with one arm and disconnect the grill indicator light with the other hand. The surface burners and grill flames should be a steady blue flame approximately ¼" (0.64 cm) high. Unplug cooktop or disconnect power. 2. A
A. Lower (simmer) flame
Single Flame Burner
A. The first time a burner is turned to...
Installation Guide - Page 13

... the control console. A
B
A. Replace the 2 screws on right side of cooktop
20. Dual flame burner adjustment screw (on the cooktop. NOTE: When you want
to adjust. B A
A. Front lip of valve)
13 Grill indicator light connector B. A
B
A. Push the cooktop back into place on left side of cooktop
19. Control console flange B. Remove console and set aside. 8.
Remove...
Installation Guide - Page 14

.... Examples of the large dual burners.
4. Unplug cooktop or disconnect power.
To cooktop B. Remove the access cap by a qualified installer. E
D
C
A. Gasket C.
Large Dual Burner
A
A. LP Gas Conversion
... make sure gas pressure does not exceed 14" (36 cm) water column. Burner base
14
WARNING
A B
Explosion Hazard Use a new CSA International approved gas supply line. If...
Installation Guide - Page 15

... Medium burners
15,500 BTU Yellow 1.05 mm Large burner -
Size stamp or color
A. Place Natural gas igniter, spring, and clip in plastic parts bag for future use and keep with package containing literature.
8. Replace the burner base using both screws. Burner base
D
A
Small Burner
A. Gas opening
C
D. Small Surface Burners Only 1. Natural gas igniter
3. Replace burner head...
KitchenAid Knowledge Base Results
We have determined that the information below may contain an answer to this question. If you find an answer, please remember to return to this page and add it here using the "I KNOW THE ANSWER!" button above. It's that easy to earn points!-
My dryer will not start
... tool below. Did you do ? If the problem continues, call an electrician. Is the Cycle Control...Start or Hold to check that both fuses are intact and tight, or that the power supply cord is incorrectly installed, the dryer may...nbsp;Make sure both circuit breakers have an upper and lower latch. Both latches must be incorrectly installed. If the power cord... -
Cleaning ceramic glass cooktop - Electric Ranges and Cooktops
...attempts to wear oven mitts while cleaning the cooktop. As soon as an accessory. can I clean and care for stubborn spots. Cast-iron pans - To keep your ceramic glass cooktop. To purchase glass cooktop cleaning supplies and receive a 10% discount on surface and scrape. Always wipe with Cooktop Protectant. Continue...cleaner and protectant for using cookware - This will... -
Adjusting beater to bowl clearance Animation - Tilt-Head Stand Mixers
... is lowered. Unplug the power cord from the bowl, you may wear. Adjusting the beater to bowl clearance Beater hitting side of the bowl. Turn the speed control on adjusting the beater to bowl clearance Animation - Bowl-Lift Stand Mixers Determining correct beater to bowl clearance - Turn screw (A) SLIGHTLY counterclockwise (left) to raise...
Similar Questions

How Do I Access The Spark Module On This Model?
Is this done by opening the control center at the front of the appliance?
Is this done by opening the control center at the front of the appliance?
(Posted by jamesamerrill 5 years ago)

How Do I Reset The Cooktop After A Power Outage?
(Posted by jules4kids 12 years ago)

I Bought A Kfgs366vss 36' Stove Top, It Had A Broken Grate, Part #4.
This was broken when I bought it, I live 5 hours from the Lowe's Store and would like a replacement ...
This was broken when I bought it, I live 5 hours from the Lowe's Store and would like a replacement ...
(Posted by creginagray 12 years ago)

What Are The Btu's On This Cooktop?
(Posted by dahii 12 years ago)

Is There A Re-set Button. I Have Power To The Top But It Will Not Turn On?
(Posted by scampbell6 13 years ago)