KitchenAid KFCS22EVMS Support Question
KitchenAid KFCS22EVMS Support Question
Find answers below for this question about KitchenAid KFCS22EVMS - ARCHITECT Series II 72.Need a KitchenAid KFCS22EVMS manual? We have 3 online manuals for this item!
Question posted by carhnh136 on October 21st, 2013
How To Remove The Rear Inside Panel Of The Freezer Kfcs22evms
The person who posted this question about this KitchenAid product did not include a detailed explanation. Please use the "Request More Information" button to the right if more details would help you to answer this question.
Current Answers
Related KitchenAid KFCS22EVMS Manual Pages
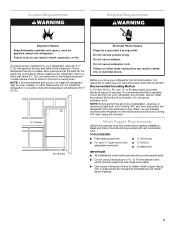
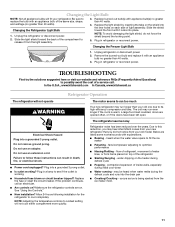
Energy Guide - Page 1
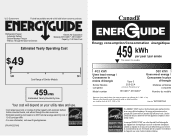
...
Federal law prohibits removal of similar capacity with automatic defrost, bottom mounted freezer, and without through-the-door-ice service.
· Estimated operating cost based on this EnerGuide label signifies that this appliance compares to determine how this is an offense (S.C. 1992, c. 36). Canada
Refrigerator-Freezer ·Automatic Defrost ·Bottom Mounted Freezer ·Without...
Use & Care Guide - Page 1
....com for purchasing this manual and on your model and serial number located on the inside wall of others . Always read and obey all safety messages. These words mean:...assistance, call us at 1-800-422-1230.
W10183203A If you and others are not followed.
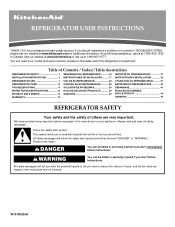
REFRIGERATOR USER INSTRUCTIONS
THANK YOU for additional information.
If you don't immediately follow instructions. This is ...
Use & Care Guide - Page 2
... into many small, pebble-size pieces. If you remove all parts and panels before turning on ice maker
kit ready models only). Wipe with warm water and dry.
■ Do not use an extension cord. ■ Disconnect power before installing ice maker (on the refrigerator. Important information to know about glass shelves and...
Use & Care Guide - Page 3
... Volt, 60 Hz., AC only 15- It is important to follow the instructions provided with any type of installation, cleaning, or removing a light bulb, turn Cooling ON. When you move your refrigerator next to a fixed wall, leave 2¹⁄₂" (6.3 cm) minimum on the hinge side (some models require more easily.
■...
Use & Care Guide - Page 4
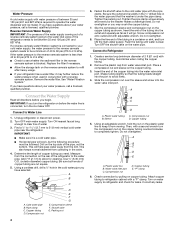
...185;⁄₄" drilled hole in conjunction with a reverse osmosis system. Remove the water filter.
Unplug refrigerator or disconnect power. 2. Compression sleeve F. Do not overtighten or you ... Check connection by pulling on the rear of the refrigerator to completely tighten. Correct any leaks. If you have questions about your refrigerator has a water filter, it from...
Use & Care Guide - Page 5
.... Tighten screws. Align the door so that the bottom of the freezer drawer. Remove and Replace Freezer Drawer Front
IMPORTANT: Two people may be required to the hinge. 5. Remove Drawer Front 1.
Completely tighten the four screws. Do not use an extension cord. Refrigerator Door(s) and Drawer
Graphics are included later in place while you keep...
Use & Care Guide - Page 6
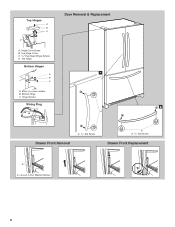
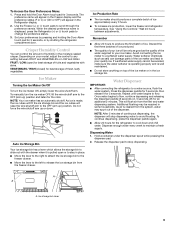
Bottom Hinge C. Hinge Screws
Wiring Plug
2
A
Drawer Front Removal
A. 3/32" Set Screw
A
A. 3/32" Set Screw
Drawer Front Replacement
A
A. Top Hinge Cover C. 5/16" Hex-Head Hinge Screws D. Top Hinge
Bottom Hinges
1
A B C
A. Loosen 4 Door Bracket Screws
6 Top Hinges
A B C
D
Door Removal & Replacement
A. Hinge Cover Screw B. Shim (on some models) B.
Use & Care Guide - Page 7
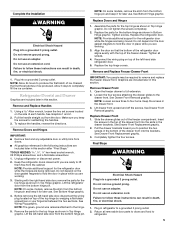
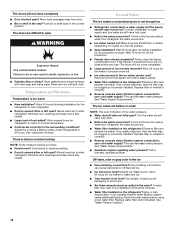
... freezer temperature controls to a colder than recommended setting will not cool the compartments any faster. ■ If the temperature is located at the factory. Remove the base grille. There is a vertically-hinged seal on each side. Using a ¹⁄₄" hex driver, turn the screws. Rear roller adjustment screw B. Adjust the Doors
Your refrigerator...
Use & Care Guide - Page 8
... temperature in approximately 12 hours. The FREEZER control adjusts the freezer compartment temperature.
CONDITION/REASON: REFRIGERATOR too warm FREEZER too warm/too little ice REFRIGERATOR too cold FREEZER too cold
ADJUSTMENT:
REFRIGERATOR Control 1° lower
Adjust FREEZER Control 1° lower
Adjust REFRIGERATOR Control 1° higher
Adjust FREEZER Control 1° higher
Filter Reset...
Use & Care Guide - Page 9
...Avoid connecting the ice maker to a water source, flush the water system. Water Dispenser
IMPORTANT:
■ After connecting the refrigerator to a softened water supply. Repeat until water begins to scroll through the preference names.
To continue dispensing, press the ... of ice approximately every 3 hours.
■ To increase ice production, lower the freezer and refrigerator temperature.
Use & Care Guide - Page 10
...will transfer to the other harsh cleaning tools.
1. Both the refrigerator and freezer sections defrost automatically.
To Clean Your Refrigerator: NOTE: Do not use with water that is microbiologically unsafe or... be filtered.
or 1-800-807-6777 Canada. However, clean both sections to remove. 2.
Remove sealing label from replacement filter and insert the
filter end into contact with a ...
Use & Care Guide - Page 11
...Refrigerator Light Bulb
3. Changing the Freezer Light Bulb
1. Remove the burned-out bulb and replace it with explanations. ■ Buzzing -
Do not use an adapter.
Plug in death, fire, or electrical shock.
■ Power cord unplugged? Replace
the fuse or reset the circuit breaker. Allow 24 hours following installation for the refrigerator...the back of inside walls, especially...
Use & Care Guide - Page 12
...way? A kink in the ON position.
■ New installation? Wait 72 hours for ice maker to begin. If the freezer compartment door will not close all the way, see "The doors will not...ice production.
■ Freezer door closed . ■ Large load of food added? Remove ice from the ejector arm with a plastic utensil.
■ Water filter installed on the refrigerator? A water filter may...
Use & Care Guide - Page 13
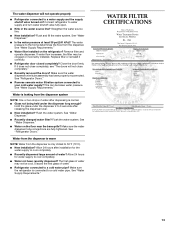
... system. Water is leaking from the dispenser. See "Water Dispenser."
■ Is the water pressure at least 35 psi (241 kPa)? See "Refrigerator Doors."
Flush the water system. Remove filter and operate dispenser. Flush and fill the water system.
WATER FILTER CERTIFICATIONS
13 Replace filter or reinstall it does not close completely...
Use & Care Guide - Page 14
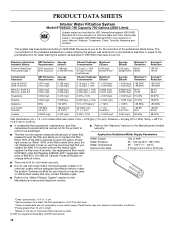
....2
0.000 mg/L 96.50%
Average% Reduction
>99.35% >99.33%
95.70 86.22
92.97%
76.99%
>99.99%
>99.99 97.09
98.72%
Test Parameters: pH = 7.5 ± 0.5 unless otherwise noted. and against NSF/ANSI Standard 42 for the reduction of unknown quality without adequate disinfection before or after...
Use & Care Guide - Page 15
...or furnished with the product, KitchenAid will pay for replacement or repair of the refrigerator/freezer cavity liner (including labor costs) if the part cracks due to defective materials ...or workmanship.
On models with a water filter: 30 day limited warranty on the inside wall of the refrigerator compartment. These parts are : compressor, evaporator, condenser, dryer, and connecting tubing....
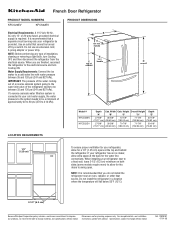
Dimension Guide - Page 1
... 15-
handle
C top of installation, cleaning or removing a light bulb, turn Cooling ON. If your refrigerator be a minimum of the refrigerator needs to be provided. Ref. 12828187 07-01-... we reserve the right to change materials and specifications without notice.
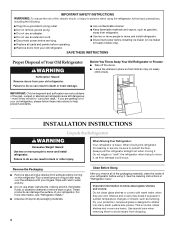
Do not install the refrigerator in a location where the temperature will fall below 55°F (13°C).
2-1/2"...
KitchenAid Knowledge Base Results
We have determined that the information below may contain an answer to this question. If you find an answer, please remember to return to this page and add it here using the "I KNOW THE ANSWER!" button above. It's that easy to earn points!-
Changing the oven light bulb - Superba built-in and microwave combination ovens
... models, both upper and lower lights will come on when the oven door is opened . Remove the bulb from the oven. Replace the bulb cover by grasping the front edge and pulling away from the socket. Architect Series II - To replace: Before replacing a bulb, make sure the oven is closed, touch Oven Light to... -
Temperature probe - Architect Series II - gas and electric ranges
...Press number pads to the jack. The probe symbol will appear on the oven display. Architect Series II - Keep the probe as far away from fat or bone at an angle as possible...(54°C and 88°C). After cooking, unplug the probe and remove food from the oven when removing food. Architect Series II My gas oven won't operate Temperature adjustment then repeat the above steps... -
Cleaning the Downdraft Vent System - Architect 2 electric cooktop with downdraft
...32;the dishwasher, a self-cleaning oven, or use abrasive cleaners or scrubbing pads. Remove the vent cover and filter and clean them with warm, soapy water. Was this...consists of KitchenAid, U.S.A. ©2008. Clean the vent cover using the venting system. Architect Series II - Customer Service > Rinse with mild detergent. The filter sits in the sink with...
Similar Questions

Need To Replace Control Board On Kitchen Aid Architect Series Ii Drawer Fridge
looking for an avtive part number
looking for an avtive part number
(Posted by Newcowoodworks 8 years ago)


Frost Build Up On Inside Of Freezer Door
We are getting alot of frost build up on the top of the freezer where the drawer seal goes to. Have ...
We are getting alot of frost build up on the top of the freezer where the drawer seal goes to. Have ...
(Posted by markbnelson1 9 years ago)

How To Remove Freezer Drawer From Kitchenaid Model Kfcs22evms 2
(Posted by seyodjoesa 10 years ago)
How Do I Remove The Freezer Drawer: Model #kfcs22evms
(Posted by dshr 11 years ago)