KitchenAid KDRP467KSS Support Question
KitchenAid KDRP467KSS Support Question
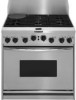
Find answers below for this question about KitchenAid KDRP467KSS - 36 Inch Pro-Style Dual Fuel Range.Need a KitchenAid KDRP467KSS manual? We have 2 online manuals for this item!
Question posted by edmundolorenzogonzalez on October 15th, 2015
The Thermistor Have Failure (open)
we have changed 2 times and the thermistors is burned
Current Answers
Answer #1: Posted by waelsaidani1 on October 15th, 2015 10:20 AM
waelsaidani1

Member since:
May 12th, 2013 Points: 19,501,787

Member since:
May 12th, 2013 Points: 19,501,787
If there is an oven temperature problem, check the bake element. The bake element is a black tube near the bottom of the oven about as thick as a pencil. When it is operating normally, the bake element will glow red hot. If there is an oven temperature problem, the bake element may have burned out. In most ovens the broil element comes on during pre-heat which is enough to warm the oven up, but not to the right temperature. It is often obvious to see where the bake element has burned out because there will be a hole in the element or blisters on the outside of the element. Test the bake element using an Ohm meter. If it has continuity it's OK. If not, it should be replaced.
Answer #2: Posted by TommyKervz on October 15th, 2015 10:35 AM
TommyKervz

Member since:
January 10th, 2013 Points: 17,776,803
Member since:
January 10th, 2013 Points: 17,776,803
Possible courses
- Overheating.
- Turned on for a long time and unattended.
- All plates turned on while others are not in use.
You can always report any problem that you don't understand either by phone or live chat from the link below.
Related KitchenAid KDRP467KSS Manual Pages
Use and Care Guide - Page 4
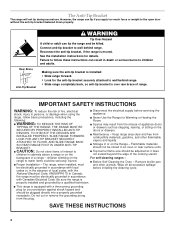
...range to wall behind range.
Reconnect the anti-tip bracket, if the range is equipped with local
before servicing the appliance. Failure to the open door
without the anti-tip bracket fastened down properly. range...WARNING
Tip Over Hazard A child or adult can tip the range and be electrically grounded in death or serious burns to persons, or damage when using the
s Disconnect the ...
Use and Care Guide - Page 6
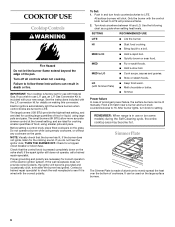
... down on making this conversion. Turn knob anywhere between HI and LO.
Failure to follow these instructions can result in and turn knob counterclockwise to evenly spread...pots and pans. s Bring liquid to setting. Power failure
In case of the pan. After burner lights, turn knob counterclockwise to use with your new range.
HI
s Start food cooking.
s Melt chocolate ...
Use and Care Guide - Page 7
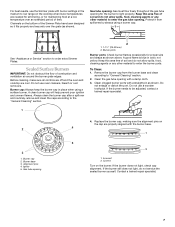
...IMPORTANT: Do not obstruct the flow of time.
Do not use oven cleaners, bleach...be adjusted, contact a trained repair specialist.
1
2
3
1. Clean the gas tube opening . Do not enlarge or distort the port. Contact a trained repair specialist.
7 ...use the Simmer plate with burner settings in the medium to low range on the cooktop when lower temperatures are needed for simmering, or for...
Use and Care Guide - Page 9

...The cooling fan might continue operating after 10 seconds if other time "PF" appears, a power failure has occurred. or p.m. All temperature adjustments are set the time of day to the appliance, "PF" will shut off ...function has ended, but will appear.
To Set: 1. Turn the SELECTOR knob to change time of day. 4. Set Control Knob
Displays
When power is first supplied to the ...
Use and Care Guide - Page 12

...spatter and smoke. The bake range can be turned. Changing the temperature when broiling allows more difficult. The lower the temperature, the slower the cooking. It is opened during baking or roasting, the ...ENTER button to start automatically.
4. s For proper draining, do not cover the grid with the range. Use tongs to avoid the loss of juices. s After broiling, remove the pan from the ...
Use and Care Guide - Page 13

...25°F to 50°F (14°C to 10°C) and cooking time can be shortened by only opening the oven door when necessary.
Check the temperature of meats and poultry. Bake heat... delicate cakes and pastries, as well as a toothpick. The convection bake range can be adjusted for doneness a few minutes before the minimum cooking time with at least 1 in. (2.5 cm) of space between 170°...
Use and Care Guide - Page 14

.... It is opened during convection roasting, the broil and bake elements and fan will read 300°F (149°C).
2.
The cook time may
need to... maintain oven temperature, while the fan constantly circulates the hot air. Roasting rack 2. Broiler grid 3. Convection Roast
1
2
3
1. Use the roasting rack on top of the broiler pan and grid. The convection roast range...
Use and Care Guide - Page 15

...20-25 minutes.
The preheat temperature setting is opened during convection broiling, the broil element and fan... Broil
1 2
1.
Turn the SELECTOR knob to be changed to the door.
1.
Before second proofing, shape the dough...Do not stuff poultry when convection roasting. Broil heat (example only) 2.
Cooking times will cycle on guide one. If the oven door is adjustable between 430°...
Use and Care Guide - Page 16

...
Food Poisoning Hazard
Do not let food sit in oven more than one hour before or after cooking foods, open the oven door to allow the oven to cool, or shorten the cook time as breads and cakes because they may not bake properly. Turn the SELCTOR knob to the desired temperature...
Use and Care Guide - Page 17
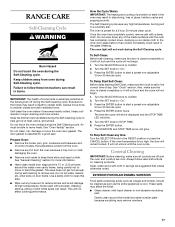
RANGE CARE
Self-Cleaning Cycle
WARNING
Burn Hazard Do not touch the oven during the Self-Cleaning cycle. IMPORTANT: The health of heat, ...given off and the oven and cooktop are cool. Keep children away from oven during the Self-Cleaning cycle. Failure to the correct time of gloss, hairline cracks and popping sounds. Always move the oven door gasket. The door gasket is closed ...
Use and Care Guide - Page 19
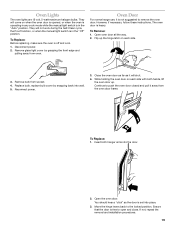
...hands, lift the oven door up the hinge latch on each side.
3. Open the oven door.
Oven Door
For normal range use, it is free to remove the oven door. Continue to the locked ... installation procedures.
19 To Replace: Before replacing, make sure the oven is heavy. Reconnect power.
3. Open oven door all the way. 2. The oven door is off and cool.
1.
Oven Lights
The oven...
Use and Care Guide - Page 20
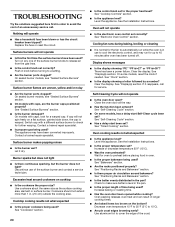
...? s Is the appliance level?
There has been a power failure. Clear the display.
Nothing will not operate
s Is this the first time the surface burners have been converted improperly.
See "Sealed Surface Burners... knobs to release air from the gas lines.
s Has the oven door been opened while cooking?
Turn on cooktop
s Is the cookware the proper size?
The appliance...
Installation Instructions - Page 1
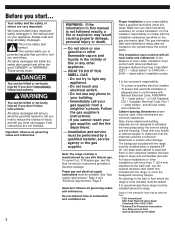
...burns to children and adults. Both numbers are on the model/serial rating plate, located on the surface below the control panel. Failure to wall behind range. IMPORTANT: Read and save these instructions can tip the range..., operation, performance, parts or service?
Installation Instructions
36" (91.4 cm) Professional Dual Fuel Range with the homeowner. Model
Serial
Part No. 8300988
Installation Instructions - Page 2
...builder or cabinet supplier to the back wall, use with American National Standard, National Fuel Gas Code ANSI Z223.1 - Proper gas and electrical supply connections must be performed by.... Make sure you start... The backguard included with your responsibility.
All openings in literature package. B149 - Check with the range must be installed when a standard 24" (61 cm) deep base ...
Installation Instructions - Page 3
... in literature package.
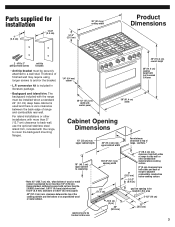
• Backguard and island trim. The backguard included with
control panel
36" (91.4 cm) width
Cabinet Opening Dimensions
13" (33 cm) max. when bottom of range to a wall stud. Parts supplied for installation
1" (2.5 cm)
1-3/4" (4.4 cm)
9-1/4" (23.5 cm)
36" (91.4 cm) cooktop width
Product Dimensions
OFF OFF OFF
2 - #10 x 2" phillips head screws...
Installation Instructions - Page 4
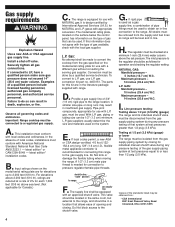
...National Standard, National Fuel Gas Code ANSI Z223.1 - gas, piping or tubing size can result in a location that allows ease of opening and closing its ...column. L.P. G. All strains must be used . Maximum pressure - 14 inches (35.6 cm) W.C. Failure to pressure regulator female pipe threads. A. B. The range is needed for each 1,000 feet (305 m) above the set pressure....
Installation Instructions - Page 5

... range is not level, adjust the feet up to the
cabinet opening...people, firmly grasp each end of range. Failure to back.
Use this final ...range and to raise or lower range to a gas pipe. B. Locate the junction box to avoid scratching the stainless steel. F.
A time...range up about 3 inches (8 cm) and move it is recommended that a qualified electrician determine that the range...
Installation Instructions - Page 6

... to the neutral (white) wire. Failure to the neutral (white) junction box wire: (Also used for Canadian installations).
4-wire cable from the range to the junction box through the U.L.-... from the range to neutral (white) wire in death or serious burns to local codes and ordinances. Where local codes permit
connecting the frame-ground conductor to wall behind the range. Disconnect power...
Installation Instructions - Page 7
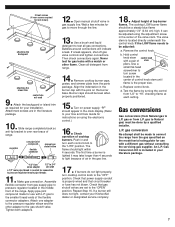
...range from "LO" to "HI", checking flame at each control knob to Natural gas) must be adjusted using the electronic control.)
16. Attach one adapter to pressure regulator female pipe threads
11. Burner caps should light within
4 seconds. The first time...to the "OPEN" position. Attach the backguard or island trim
as required for gas to the smaller thread ends of the range. Tighten ...
Installation Instructions - Page 8

...KitchenAid appliance should be stored for use from whom you call the dealer from your new dual fuel range, read your KitchenAid appliance -
"HI" will show on display. Reinstall lower vent by ...two screws.
22. Look through oven window. side to side.
Burner caps positioned properly on , open 24 hours a day, 7 days a week. "350F" will tell you will answer any questions ...
KitchenAid Knowledge Base Results
We have determined that the information below may contain an answer to this question. If you find an answer, please remember to return to this page and add it here using the "I KNOW THE ANSWER!" button above. It's that easy to earn points!-
Washer will not fill - Front-load washer
... 3 prong outlet? Do not use an extension cord. Both hot and cold water must be opened between cycles, the washer will not operate properly with four bolts, which are turned on . ...Has a cycle been selected, but may not be connected to operate. Check to fill normally. Failure to Start. This will turn on this washer should seem low because this position, approximately ½"... -
Ice Dispenser Not Working - Side by Side Refrigerator
... is , dispose of the freezer door not shutting completely or the ice chute door being stuck open. The auger is not stuck in the ice chute. Allow 24 hours for more than 1 hour... ice maker work? Use only a plastic utensil to indicate power failure. Do not try to prevent ice build-up ice flakes over time due to the use anything sharp to prevent additional ice formation. Ice... -
Sabbath Mode
...timed Sabbath Mode can make this answer more useful. Share Delicious Digg Facebook Reddit StumbleUpon Twitter Print Email this answer helpful? When the Sabbath Mode is set to keep the oven on or off. If a power failure occurs when the Sabbath Mode is opened...The "On" indicator will not show messages or temperature changes. Email Your Feedback How old is the Sabbath Mode...
Similar Questions

All Four Burners Lost The Spark All At Once. Suspect The Spark Module. Which
suspect the spark module. Which part is it for my kitchenaid KDSS907SSS DUAL FUEL range. Also. I app...
suspect the spark module. Which part is it for my kitchenaid KDSS907SSS DUAL FUEL range. Also. I app...
(Posted by Andrewenman 6 years ago)
Kitchenaid Stove Kdrp407hss4 Dual Fuel Oven Does Not Heat Up
(Posted by lmante 10 years ago)

Burner Lighters Don't Spark
The sparking function that lights the burners on my KitchnAid KDRP407HSS dual-fuel range has stopped...
The sparking function that lights the burners on my KitchnAid KDRP407HSS dual-fuel range has stopped...
(Posted by sprows 10 years ago)

Kitchenaid Pro Gas Slide In Range
Can you get Kitchenaid Architect handles for the Kitchenaid Pro range (like rounded handles better)
Can you get Kitchenaid Architect handles for the Kitchenaid Pro range (like rounded handles better)
(Posted by sam33 11 years ago)

Kitchenaid Kdss907sss - 30' Slide-in Dual Fuel Range
Position Of Range
Should the back of the 30" slide-in range touch the back wall?
Should the back of the 30" slide-in range touch the back wall?
(Posted by patriciainsf 11 years ago)