KitchenAid KDRP467KSS Support Question
KitchenAid KDRP467KSS Support Question
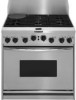
Find answers below for this question about KitchenAid KDRP467KSS - 36 Inch Pro-Style Dual Fuel Range.Need a KitchenAid KDRP467KSS manual? We have 2 online manuals for this item!
Question posted by agoebel on March 17th, 2014
Oven Does Not Get Up To Set Temperature Unless On Convection Mode.
Preheated oven to 350 for at least 20 minutes. Never got to 350. Finally set it on convection and it worked fine (albeit it baked food more done than planned as we left it in oven too long). Is this slow (never) reaching set temperature a common problem? Anything we should do? Serial number on our KDRP467KSS09 is XT4011052, purchased in 2007. Thanks, Andy & Darlene Goebel
Current Answers
Related KitchenAid KDRP467KSS Manual Pages
Use and Care Guide - Page 4
...
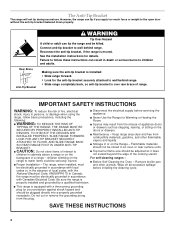
s Top burner flame size should be stored in death or serious burns to wall behind range. s Before Self-Cleaning the Oven -
Keep range area clear and free from this plug.
Be sure the range is installed: Slide range forward. s This range is equipped with a three-prong grounding plug for your protection against shock hazard and should...
Use and Care Guide - Page 5
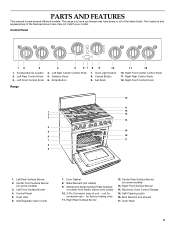
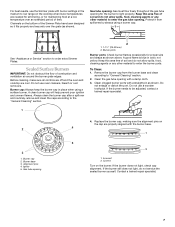
... Burner
12. Electronic Oven Control Display 15. Left Rear Center Control Knob 5. Control Panel 5. The range you have purchased may have some or all of the features shown here may not match your model. Cancel Button 9. Center Front Surface Burner
(on some models) 3. Bake Element (not visible)
9. Self-Cleaning Latch 16. Set Knob
11
12...
Use and Care Guide - Page 6
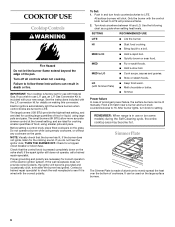
...Natural Gas.
HI
s Start food cooking.
MED to HI
s Hold a rapid boil.
Power failure
In case of food, using large pots and pans. REMEMBER: When range is pressed completely down on ...
s Keep food warm. IMPORTANT: Your cooktop is included with the correct polarity. s Hold a slow boil. Turn off all controls when not cooking. Gas Conversion Kit is factory-set for a ...
Use and Care Guide - Page 7
... extra Simmer Plates. Do not use oven cleaners, bleach or rust removers. Incorrect 2. If the burner still does not light, do not allow spills, food, cleaning agents or any other material ...not yellow. For best results, use the Simmer plate with burner settings in the medium to low range on the cooktop when lower temperatures are needed for simmering, or for proper size and shape as ...
Use and Care Guide - Page 9

... Control Knob
Displays
When power is first supplied to the display.
9
or p.m. To Set: 1. Press the ENTER button to the RESET position. 2.
All temperature adjustments are not changed. ELECTRONIC OVEN CONTROL
PREHEAT 0%
100%
KEEP WARM 1
BROWNING
DURATION
STOP TIME
CLOCK
SELECTOR
SET
ENTER
CANCEL
1.
After canceling an operation, "End" will automatically begin with which...
Use and Care Guide - Page 10
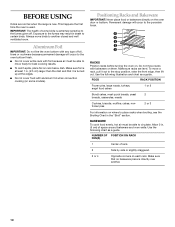
...oven walls. Always move a rack, pull it is used. s Do not cover food with foil because air must be able to circulate. Make sure racks are normal when the range is new. Use the following chart as a guide. FOOD...is extremely sensitive to the oven bottom finish. Make sure that it out to another .
10 s Do not cover entire rack with aluminum foil when convection cooking (on where to...
Use and Care Guide - Page 11
...oven. Never set plastics, paper or other bakeware with this appliance. Dark aluminum and other items that could melt or burn near the oven vent.
11
Insulated cookie sheets or baking... in the bottom third of oven.
Oven Vent
1
1. Follow manufacturer's recommendations and use temperature recommended in . (1.25 cm) more and read again. s Use suggested baking time. s Check all meat...
Use and Care Guide - Page 12

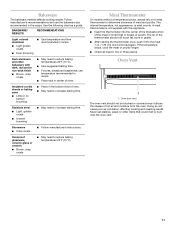
...°F
12 OVEN USE
Bake
Broil
1
1
2
1. Bake element (example only)
The BAKE function is not necessary to wait for baking, roasting or heating casseroles. The display will appear on once the door is not necessary to preheat before putting food in, unless recommended in intervals to drain juices and help prevent spatter and smoke. Changing the temperature when broiling...
Use and Care Guide - Page 13

... temperature. The display will start , or after 10 seconds, the function will show 325°F (163°C).
2. During convection bake preheating, the bake and convection elements heat the oven cavity. After preheat, the convection element and the bake element will cycle on guides 1, 3 and 5. 1.
When using two racks, place on the racks to move freely around the food. Turn the SET...
Use and Care Guide - Page 14

... to maintain oven temperature, while the fan constantly circulates the hot air. The display will start , or after 10 seconds, the function will read 300°F (149°C).
2. The convection roast range can be set between 170°F and 500°F (77°C and 260°C).
3. Turn the SELECTOR knob to preheat before putting food in, unless recommended...
Use and Care Guide - Page 15

... to the desired preheat temperature. Turn the SELECTOR knob to the desired convection broil level.
4. Food/Rack Position
Cook Time (minutes)
Oven Temp. To Convection Broil: Before convection broiling, see "Broil" section for 5 minutes. The display will read 430°F (221°C).
2. The display will show 40°F (22°C) below the preheat temperature setting of 350°F-390°...
Use and Care Guide - Page 16

... let food sit in Bake, Convection Bake, and Convection Roast): After completing the Cook Time setting steps above , the Keep Warm light will show on at the end of a timed cook. (See "Timed Cooking" section.)
To Use: 1.
Timed Cooking allows the oven to choose a Keep Warm temperature of the following steps, the function will automatically begin in 20 seconds...
Use and Care Guide - Page 17
... is displayed and the STOP TIME LED will not work during the Self-Cleaning cycle. Press the ENTER button to start a preset non-adjustable
3 hour 30 minute cycle. 4. Press the ENTER button. If the oven temperature is cool. It will not begin . 1. EXTERIOR PORCELAIN ENAMEL SURFACES
Food spills containing acids, such as vinegar and tomato...
Use and Care Guide - Page 18
...:
Rinse with clean water and dry with wet scouring pad. s Vinegar for 20 minutes, then scrub with porcelain and staining, etching, pitting or faint white spots can...
18 STAINLESS STEEL
Do not use steel wool, abrasive cleansers or oven cleaner. Damage may affect the finish.
Damage may occur. At high temperatures, foods react with scouring or steel wool pad. s Non-abrasive plastic ...
Use and Care Guide - Page 19
... cook mode while the manual light switch is in the "Off" position. They will come on each side.
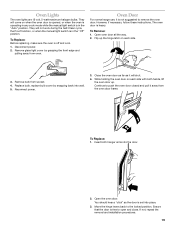
3. Oven Door
For normal range use, it is in the "Auto" position. Move the hinge levers back to remove the oven door.
Remove bulb from oven.
Reconnect power.
3. Ensure that the door is set into place.
3. Open oven door...
Use and Care Guide - Page 20
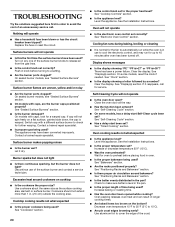
... set correctly? See the Installation Instructions. s Is the proper temperature set ? Wait for further warping. Decrease oven temperature 15°F to 25°F (5°C to check for oven to preheat before placing food ... Is there continuous sparking, but the burner does not light? Cooling fan runs during baking, broiling or cleaning
s It is normal for service.
s Is there proper air ...
Installation Instructions - Page 1
...and serial numbers before installing range.
IMPORTANT: Installer: Leave Installation Instructions with self-cleaning thermal/convection oven
for residential use .
&#...range.
Both numbers are on the model/serial rating plate, located on the surface below the control panel.
Connect anti-tip bracket to children and adults. Installation Instructions
36" (91.4 cm) Professional Dual Fuel Range...
Installation Instructions - Page 5

...Set range on the floor behind the range has a baseboard thicker than 3/8" (9.5 mm), use the longer 1-3/4" (4.4 cm) anti-tip bracket. Carefully move and install range...this final ...range. Use this distance
Locate a stud in wall behind the range has no baseboard or a baseboard up about 3 inches (8 cm) and move it is recommended that a qualified electrician determine that the range...oven...
Installation Instructions - Page 8

... call the dealer from your new dual fuel range, read your KitchenAid Use and Care Guide. If you need the range model number and serial number. Major -
19. Turn oven selector to "BROIL". When second Preheat light comes on display. Press "Cancel" and turn oven selector to "Reset".
20. Press "Cancel" and turn oven selector to "Reset". If you...
Installation Instructions - Page 9

...350°F
W t°
W
V P7-4
V P7-5
DOOR SWITCH 1
TAN
LATCH ASSY
LATCH SWITCH (OPEREATED BY MOTOR)
TAN F
BRN P7-1
BU P7-2
TAN P7-3
P5-3 R
BAKE-2000W
P5-4 Y
CONV.-1600W
R
DOUBLE LINE
BREAK RELAY
R
BU P3-3
TOD -
BLOWER REMAINS OFF UNTIL OVEN REACHES 190°F (88°C) AND MAY CONTINUE RUNNING UP TO 45 MINUTES AFTER OVEN... SHOWN IN STANDBY/OFF MODE WITH OVEN DOOR CLOSED.
9
KitchenAid Knowledge Base Results
We have determined that the information below may contain an answer to this question. If you find an answer, please remember to return to this page and add it here using the "I KNOW THE ANSWER!" button above. It's that easy to earn points!-
Temperature calibration - built-in ovens
... oven temperature does not seem to set temperature is suggested when baking foods with leavening ingredients, such as yeast, baking powder, baking soda, and eggs. It can be cooler by varying factors such as a guide. Touch 3 to increase the temperature or touch 6 to end calibration. Do you wait until the preheat cycle ended? The oven provides accurate temperatures; The Preheat Time... -
Changing temperature during Sabbath mode
...temperature during the Sabbath mode? Use the chart below as a guide. Less than one -half hour (30 minutes) for a random time, anywhere from the chart. Number pads 1 through 0 represent temperatures. OVEN TEMPERATURE...; 350°F (177°C) 8 &... -
Refrigerator or freezer not cold enough
Adding a large amount of the compartment. Wait approximately 20 minutes, and you should be able to feel cold air blowing in the bottom of food warms the refrigerator. It could be frozen, but spoonable. The best indicator of freezer temperatures is in the door bins should be less cold than interior-shelf items. Make...
Similar Questions

Oven Not Heating To Temperature Selected.
my oven will not heat up. Display works and the gas burners all work. The fan for convection choice ...
my oven will not heat up. Display works and the gas burners all work. The fan for convection choice ...
(Posted by sshrroddy 7 years ago)


Kitchenaid Stove Kdrp407hss4 Dual Fuel Oven Does Not Heat Up
(Posted by lmante 10 years ago)
There Is A Gas Smell When Turning On Broiler--is This A Common Problem?
(Posted by pmignon 11 years ago)

Oven Not Working
Gas top works perfect- electric oven will not heat up. Control panel functions.
Gas top works perfect- electric oven will not heat up. Control panel functions.
(Posted by Anonymous-19459 13 years ago)