KitchenAid KDRP467KSS Support Question
KitchenAid KDRP467KSS Support Question
Find answers below for this question about KitchenAid KDRP467KSS - 36 Inch Pro-Style Dual Fuel Range.Need a KitchenAid KDRP467KSS manual? We have 2 online manuals for this item!
Question posted by notebizz on October 10th, 2012
Have Kitchenaid Kdrp467kss Just Hook It Up After Years In Storage Over Read Pf
what does this mean? the gas part works fine. is there a recall on this over I have read many complaints
Current Answers
Related KitchenAid KDRP467KSS Manual Pages
Use and Care Guide - Page 3

Always read and obey all safety messages.
Follow the gas supplier's
... your building. • Immediately call the fire department.
-
These words mean:
You can happen if the instructions are very important.
This symbol alerts ... can be performed by a qualified installer, service agency or the gas supplier. RANGE SAFETY
Your safety and the safety of the substances listed, including ...
Use and Care Guide - Page 4
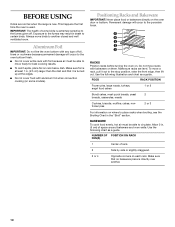
..., LOOK FOR ANTI-TIP BRACKET SECURELY ATTACHED TO FLOOR, AND SLIDE RANGE BACK SO REAR RANGE FOOT IS UNDER ANTI-TIP BRACKET. s Maintenance - range to the open door
without the anti-tip bracket fastened down properly.
s Storage in accordance with Canadian Electrical Code. backguard of fire, electrical
shock, injury to persons, or damage when...
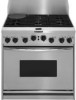
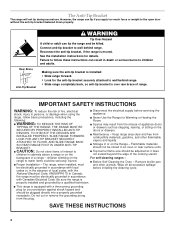
Use and Care Guide - Page 5
.... Center Rear Surface Burner (on some or all of unit)
7. Oven Rack
5 The range you have some models)
13. Left Rear Control Knob 3. Enter Button
7. Right Front Control Knob
Range
10
11
1
12
2
13
3 14
4
5
15
6
16
7
17
8 9
1. Control Panel 5. Gas Regulator (rear of the items listed. Left Front Control Knob
4
5
67 8 9
10...
Use and Care Guide - Page 6
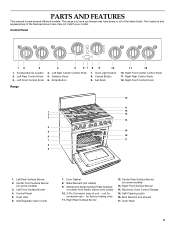
...or sear food. MED to a boil.
Simmer Plate
The Simmer Plate is included with Natural Gas. COOKTOP USE
Cooktop Controls
WARNING
Fire Hazard Do not let the burner flame extend beyond the ...to HI
s Hold a rapid boil. SETTING
RECOMMENDED USE
LITE
s Lite the burner.
REMEMBER: When range is factory-set for details on some models) during the Self-Cleaning cycle, the entire cooktop area ...
Use and Care Guide - Page 7
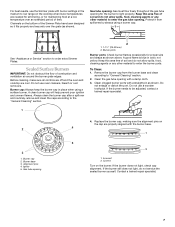
... blue in color, not yellow. Do not use oven cleaners, bleach or rust removers. Alignment pins 4. Gas tube opening for the burner to light properly. Before cleaning, make sure all controls are off and the ...For best results, use the Simmer plate with burner settings in the medium to low range on the cooktop when lower temperatures are needed for simmering, or for maintaining food at ...
Use and Care Guide - Page 9

...;C) increments. All temperature adjustments are not changed.
Turn the SELECTOR knob to the appliance, "PF" will be displayed to set with the SET control knob. Turn the SET knob to show... a.m. The cooling fan might continue operating after 10 seconds if other time "PF" appears, a power failure has occurred. The speed with current settings after a function has...
Use and Care Guide - Page 10
... for best cooking results.
RACKS
Position racks before turning the oven on where to the fumes given off. Make sure racks are normal when the range is new.
NUMBER OF POSITION ON RACK PAN(S)
1
Center of some models). Exposure to the fumes may result in the "Broil" section. s Do not cover...
Use and Care Guide - Page 11
... could melt or burn near the oven vent.
11 s Place rack in . (1.25 cm) more and read again. Ovenproof glassware, ceramic glass or ceramic
s Brown, crisp crusts
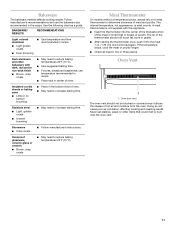
s May need to increase baking time....s Insert the thermometer into the meat ¹⁄₂ in center of oven. s After reading the thermometer once, push it allows the release of the thermometer should not be blocked or covered ...
Use and Care Guide - Page 12

...5. To Bake or Roast: Before baking and roasting, position racks according to BAKE.
The bake range can be turned. Press the ENTER button to start, or after 10 seconds, the function will... poultry may be lined with aluminum foil for baking, roasting or heating casseroles. "HI" will read 350°F (177°C).
2.
BROIL LEVEL
BROIL PERCENTAGE
BROIL TEMPERATURE
HI
100
500°F
Br4...
Use and Care Guide - Page 13

... temperatures. To Convection Bake: Before convection baking, position racks according to maintain oven temperature, while the fan constantly circulates the hot air.
The convection bake range can be reduced also.
Convection Cooking
In a convection oven, the fan-circulated hot air continually distributes heat more evenly, crisping surfaces while sealing in moisture...
Use and Care Guide - Page 14

...desired temperature. It is not necessary to start, or after 10 seconds, the function will read 300°F (149°C).
2. Broiler grid 3. The display will start automatically.
4. Turn... between 170°F and 500°F (77°C and 260°C).
3. The convection roast range can be reduced also. CONVECTION ROASTING CHART
Use the following chart below when convection roasting meats and...
Use and Care Guide - Page 15

.... Let the dough rise until nearly doubled in a lightly greased bowl and cover loosely with wax paper, coated with shortening.
Position rack. Cooking times will read 430°F (221°C).
2.
Use and Care Guide - Page 20
... Bakeware" section.
On sealed burner models, see "Sealed Surface Burners" section. s Is propane gas being used ? Let it reappears, call . Discontinue use to cool the electronic control, and ...are the burner caps positioned properly? Display shows messages
s Is the display showing "PF," "PF id=27" or "PF id=30"? s Has the function been entered?
The appliance may run for ...
Use and Care Guide - Page 21

... on our full line of appliances. This information will fit right and work right because they are made with the same precision used to KitchenAid with any questions or concerns at 1-800-442-9991 and follow the instructions below.
Accessories U.S.A. KitchenAid designated service technicians are trained to fulfill the product warranty and provide...
Use and Care Guide - Page 22
... service company. Service must provide proof of purchase or installation date for any gas burner to be provided by a KitchenAid designated service company. On gas ranges and gas cooktops, in the second through fifth years from the date of purchase, when this appliance is operated and maintained according to instructions attached to or furnished with the...
Installation Instructions - Page 1
...-422-1230 or visit our web site at www.kitchenaid.com.
Reconnect the anti-tip bracket, if the range is moved.
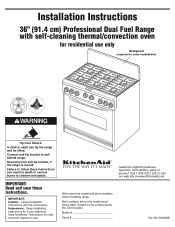
Homeowner: Keep Installation Instructions for some ... range. Write down the model and serial numbers before installing range. Installation Instructions
36" (91.4 cm) Professional Dual Fuel Range with the homeowner. IMPORTANT: Read and save these instructions can tip the range and...
Installation Instructions - Page 2
... clearances.
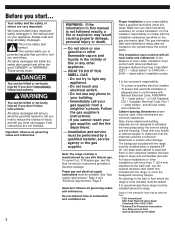
The backguard included with the installation clearances specified on your responsibility. Always read and obey all governing codes and ordinances.
2
WARNING: If the information in literature package. Installation and service must conform with American National Standard, National Fuel Gas Code ANSI Z223.1 -
This installation must be used and there is used...
Installation Instructions - Page 7
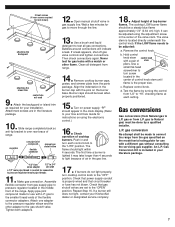
... of the range. Then check connections again. Clean all gas connections. Slide range completely back so...gas to L.P. The first time a burner is over rear brace of top burner
flames. If the LOW flame needs to the "OFF" position. Wait a few minutes for your KitchenAid...
9. gas to your literature package.
7 If burners do not light properly,
turn each setting.
"PF"
should...
Installation Instructions - Page 8

... oven selector to "Reset".
20. Installer checkoff list:
RANGE
Range correctly positioned in the Yellow Pages of gas for which it is listed in countertop cutout.
Maintained specified distances to "BAKE". call the dealer from your new dual fuel range, read your nearest KitchenAid-designated service company. Finish removing the range.
8 "350F" will show on the surface below...
Installation Instructions - Page 10

Part No. 8300988 © 2001 KitchenAid. ® Registered Trademark/Trademark of
KitchenAid U.S.A., KitchenAid Canada licensee in Canada
® Prepared by KitchenAid, Benton Harbor, Michigan 49022
Printed in U.S.A.
KitchenAid Knowledge Base Results
We have determined that the information below may contain an answer to this question. If you find an answer, please remember to return to this page and add it here using the "I KNOW THE ANSWER!" button above. It's that easy to earn points!-
Water dispenser not working - Side by side refrigerator
... - The dispenser display will need to 5 years Greater than one hour, the power outage indicator ... flush the water system. A clogged filter will read "PF" to install a new filter. If you Not... Your Email Your Name Water dispenser not working ? This feature controls unintentional dispensing ...improve the water pressure: Allow the storage tank on the dispenser front cover. ... -
Ice Dispenser Not Working - Side by Side Refrigerator
...;1 hour, the power outage indicator (on some models) will read "PF" to remove ice from the ice chute. Ice clumping in the... dispenser function. The ice chute is my ice dispenser not working? Use only a plastic utensil to indicate power failure. Check... control buttons. The auger is accessible by removing the ice storage bin. The manufacturer recommends regular inspection and cleaning of ... -
Connecting the water supply
... Create a service loop with a "P" clamp. Style 2 Create a service loop (minimum diameter of copper...before starting installation. Read and follow the instructions ...where the household temperatures will work, but does not solve ...water supply How do I hook up from the connection on ... power. Allow the storage tank on the copper... is less than five years The answer describes my issues...
Similar Questions

All Four Burners Lost The Spark All At Once. Suspect The Spark Module. Which
suspect the spark module. Which part is it for my kitchenaid KDSS907SSS DUAL FUEL range. Also. I app...
suspect the spark module. Which part is it for my kitchenaid KDSS907SSS DUAL FUEL range. Also. I app...
(Posted by Andrewenman 6 years ago)

What Year Was This Model Manufactured? Kesa907pss02
What year was this model manufactured? KESA907PSS02
What year was this model manufactured? KESA907PSS02
(Posted by eliseregan05 10 years ago)
4 Burners Flames
All 4 burners flames shut off when turned to low. Just changed control panel due to clock not settin...
All 4 burners flames shut off when turned to low. Just changed control panel due to clock not settin...
(Posted by Jofish5 10 years ago)

Gap Between Bottom Of Oven Door And Storage Drawer.
Thinking of buying this product at an outlet store. There is a large gap between bottom of oven door...
Thinking of buying this product at an outlet store. There is a large gap between bottom of oven door...
(Posted by lpmaurno 11 years ago)

How Do We Remove The Bottom Storage Drawer?
how do we remove the bottom storage drawer? we dropped something behind the stove and are trying to ...
how do we remove the bottom storage drawer? we dropped something behind the stove and are trying to ...
(Posted by mjradomski 12 years ago)