Get support for KitchenAid KCMC1575BSS

KitchenAid KCMC1575BSS Support Question

KitchenAid KCMC1575BSS Support Question

Find answers below for this question about KitchenAid KCMC1575BSS.
Need a KitchenAid KCMC1575BSS manual? We have 4 online manuals for this item!
Question posted by johnsonkb2000 on November 3rd, 2022

Why Does The Microwave Pop The Circuit Braker When Opening The Door?

The person who posted this question about this KitchenAid product did not include a detailed explanation. Please use the "Request More Information" button to the right if more details would help you to answer this question.

Current Answers

Answer #1: Posted by HelpHero on November 3rd, 2022 2:16 PM
This answer was accepted by the poster of the original question.
HelpHero

Member since:
September 3rd, 2022

Points: 523,380
1,100
points


I hope this is helpful? PLEASE "ACCEPT" and mark it "HELPFUL" to complement my little effort. Hope to bring you more detailed answers.

Helphero
Answer #2: Posted by SonuKumar on November 3rd, 2022 8:33 PM
SonuKumar

Member since:
May 9th, 2021

Points: 16,630,670
100
points
its burnt wire issue - avoid useing it and take it for repair asap


Please respond to my effort to provide you with the best possible solution by using the "Acceptable Solution" and/or the "Helpful" buttons when the answer has proven to be helpful.

Regards,
Sonu
Your search handyman for all e-support needs!!

Related KitchenAid KCMC1575BSS Manual Pages

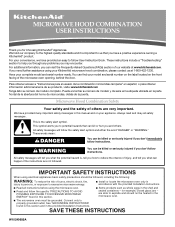
Use & Care Guide - Page 1

For additional information, you can find your complete model and serial number ready. You can visit the Frequently Asked Questions (FAQs) section of the microwave oven opening, behind the door. Puede encontrar su número de modelo y de serie en la etiqueta ubicada en la parte frontal de la abertura del horno de microondas, detr...
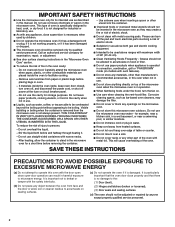
Use & Care Guide - Page 2

... A SPOON OR OTHER UTENSIL IS INSERTED INTO THE LIQUID. IMPORTANT SAFETY INSTRUCTIONS ■ Use the microwave oven only for its intended use as lye-based oven cleaners, may create a fire or risk of electric shock. ■ Do not clean with the door open since open-door operation can burn off power at the fuse or circuit breaker panel. -
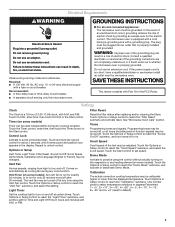
Use & Care Guide - Page 3

... installed and grounded. or 20-amp electrical supply with A.M. Recommended: ■ A time-delay fuse or time-delay circuit breaker. ■ A separate circuit serving only this microwave oven. GROUNDING INSTRUCTIONS ■ For all cord connected appliances: The microwave oven must be calibrated higher or lower than the displayed temperature. Control Lock Activate to reach the "Vent...
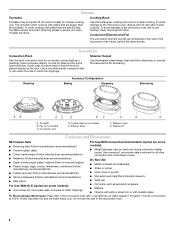
Use & Care Guide - Page 4

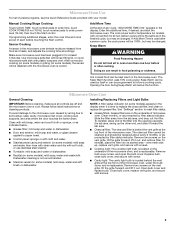
... during preset or sensor (on some models) for steaming, or use the dish in the microwave oven. 4 Convection Element and Fan The convection element and fan are side by side. Steamer Vessel...off during convection (bake) cycles. Some roast functions require that are embedded in the microwave oven with metallic glaze To Test Cookware/Dinnerware: Place dish in the wall of cook time ...
Use & Care Guide - Page 5

..., lift it is time to reset filter status. ■ Grease filters: Grease filters are off and the microwave oven is cool. Opening the door during Keep Warm will be 100%, but may be disabled until the microwave oven is replaceable. See "Settings" section to replace the charcoal filter, and clean or replace the grease filter. Slide...
Use & Care Guide - Page 6

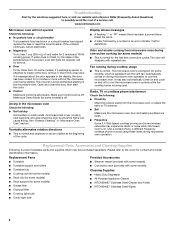
... has tripped, replace the fuse or reset the circuit breaker. It may experience static or noise while microwave oven is on motor rotation at 100% cooking power. If a message about the door appears in the display, the door has been closed for 5 minutes or more without the microwave oven being used. The odor will not operate Check...
Use & Care Guide - Page 7

...excluded from your correspondence. Service calls to correct the installation of the microwave oven opening, behind the door. Repairs to parts or systems resulting from unauthorized modifications made to ...■ Solid state touch control system parts SECOND THROUGH TENTH YEAR LIMITED WARRANTY On microwave ovens only, in the second through due to defects in -home service is covered by...
Installation Guide - Page 1

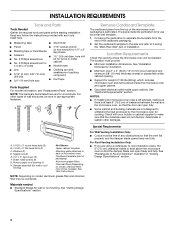
... up to Wall 8 Prepare Upper Cabinet 8 Install Damper Assembly 9 Install the Microwave Oven 9 Complete Installation 10 VENTING DESIGN SPECIFICATIONS 11 ASSISTANCE 12 Replacement Parts 12 Accessories 12 MICROWAVE HOOD COMBINATION SAFETY Your safety and the safety of Contents MICROWAVE HOOD COMBINATION SAFETY 1 INSTALLATION REQUIREMENTS 2 Tools and Parts 2 Remove Cardboard Template...
Installation Guide - Page 2

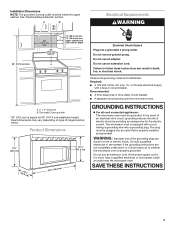
..." section. The location must be free of clearance between the wall and the microwave oven, so that the door can open fully. ■ Some cabinet and building materials are not designed to exist above the microwave oven so that the damper blade can open freely and fully. See "Installation Dimensions" illustration. ■ Minimum one 2" x 4" (50.8 x 101.6 mm...
Installation Guide - Page 3

... Plug into an outlet that is equipped with a cord having a grounding wire with a fuse or circuit breaker. Recommended: ■ A time-delay fuse or time-delay circuit breaker. ■ A separate circuit serving only this microwave oven. Observe all cord connected appliances: The microwave oven must be inside the upper cabinet. Grounded 3 prong outlet *30" (76.2 cm) is too...
Installation Guide - Page 4

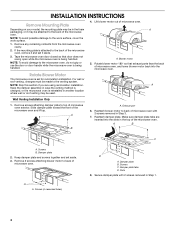
... D. Damper plate 2. Slots 8. Remove screws attaching damper plate to the back of microwave oven with 2 screws removed in recessed holes) D A. Screws B. Remove any remaining contents from the microwave oven cavity. 2. Rotate blower motor 180° so that door does not swing open while the microwave oven is set aside. 3. Keep damper plate and screws together and set for...
Installation Guide - Page 6

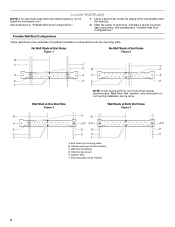
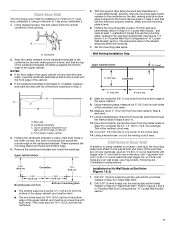
...each stud center. Cabinet opening , do not install the microwave oven. 1. Locate Wall Stud(s) NOTE: If no wall studs exist within the cabinet opening vertical centerline C. No ...B C C C D B D A A A A E E E E F F NOTE: If wall stud is within the opening. Using a stud finder, locate the edges of the wall stud(s) within 6" (15.2 cm) of the vertical centerline (see "...
Installation Guide - Page 7

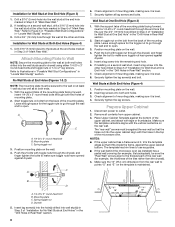
... are not over wall studs, use 1 lag screw and one corner of the opening. They must attach to being installed on the wall, making sure its top is... into the wall stud(s) at End Holes (Figures 1 & 2) 1. D A C B A. D. Mark Rear Wall The microwave oven must align with toggle nuts; A A. Holding the mounting plate in Step 3 of "Mark Rear Wall." The blackened holes in...
Installation Guide - Page 8

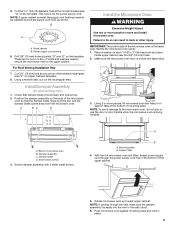
...wall and to illustrations in "Possible Wall Stud Configurations" in "Locate Wall Stud(s)" section. 3. Refer to open . C A 6. Insert a lag screw into wall stud(s) in Step 3 of the mounting plate. ... attach with the vertical centerline on the template is level. 8. Check alignment of the microwave oven. With the support tabs of the mounting plate facing forward, insert a 1/4-20 x...
Installation Guide - Page 9

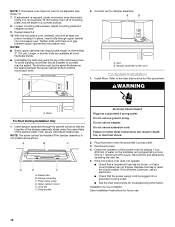
... opens fully. 2. Secure damper assembly with 2 sheet metal screws. Push microwave oven against mounting plate and hold in the wall cutout. 6. A. Position the damper assembly on each 1/4-20 x 3" flat-head bolt and place inside upper cabinet near the 3/8" (10 mm) holes. 2. NOTE: To avoid damage to do not grip or use the door or door...
Installation Guide - Page 10

.... Check the operation of water on a covered surface. 8. Installation is required, rotate microwave oven downward. A 2. Replace the fuse or reset the circuit breaker. Bolts For Roof Venting Installation Only 1. Failure to damper assembly. Loosen mounting plate screws. If the microwave oven does not operate: ■ Check that a household fuse has not blown, or that...
Installation Guide - Page 11

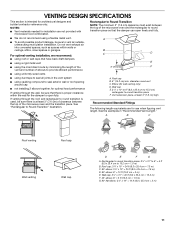
... efficient performance ■ using uniformly sized vents ■ using duct tape to open freely and fully. See "Rectangular to round transition piece so that there is ...reference only. Vent extension piece, at least 3" (7.6 cm) of clearance between the top of the microwave oven and the transition piece. NOTES: ■ Vent materials needed for installation are for the damper to ...
Installation Guide - Page 12

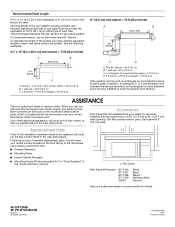
... installed to use no more than three 90° elbows. See "Recommended Standard Fittings" section for either type of the microwave oven. Two 90° elbows = 20 ft (6.1 m) B. 1 wall cap = 40 ft (12.2 m) C. 1 ... installing this microwave oven in a 36" (91.4 cm) or 42" (106.7 cm) wide opening , behind the microwave oven door on the front facing of the microwave oven opening . You...
Dimension Guide - Page 1

.... or 20-amp fused electrical supply with product. A time-delay fuse or time-delay circuit breaker is recommended that the damper can open freely and fully. A B D E F G A. Exact dimensions may vary depending on type of the microwave oven and the rectangular to round transition piece = 5 ft (1.5 m) D. 2 ft (0.6 m) + 6 ft (1.8 m) straight = 8 ft (2.4 m) D 3 " x 10" (8.3 x 25...
Warranty Information - Page 1

... ■ Solid state touch control system parts SECOND THROUGH TENTH YEAR LIMITED WARRANTY On microwave ovens only, in the second through tenth years from date of purchase, when this major appliance...lower front facing of your major appliance. Repairs when your home of the microwave oven opening, behind the door. This limited warranty is valid only in the United States or Canada and ...

KitchenAid Knowledge Base Results

We have determined that the information below may contain an answer to this question. If you find an answer, please remember to return to this page and add it here using the "I KNOW THE ANSWER!" button above. It's that easy to earn points!

  • My microwave oven will not run
    ... cold water for five seconds until two tones sound and a lock icon appears on some models) attached to the inside of the door? To Lock/Unlock control: The microwave oven and Timer must be off. Model Number | Help me locate my model number Please enter at 100% cooking power. Assistance or service...
  • Changing the door swing on my ice maker
    ...? Download available Owners Manuals/Use & Some ice maker models were built featuring a reversible door. Generally, these ice makers came standard with a right-hand opening door that can be reversed to a left-hand opening door. See the Use and Care Guide for details by entering your model number. Care...
  • Replacing oven light bulbs - Built-in ovens
    ..., both upper and lower lights should come on when the oven door is opened . Remove the glass light cover by snapping it does not come on ?  Reconnect power. Changing the oven light bulb - Superba built-in ovens When should come on when either door is opened . gas and electric ranges FAQs Knowledgebase search tips Setting the...

Similar Questions

Open Door Msg
Microwave is reading "open door" msg when attempting to start the microwave, regardless that the doo...
(Posted by westlibertytherapy 10 years ago)
How To Change The Light Bulb In Kitchenaid Microwave Oven Model Kemc378kss?
I need assistance in the process to remove and replace the light bulb in the microwave portion of th...
(Posted by chipnchatter 11 years ago)
Change Light Bulb In Microwave Oven.
How do I change the light bulb in a Kitchenaid KBMS1454SSS Microwave oven?
(Posted by danafeneck 13 years ago)
Ask a New Question
Use the box below to post a new question about this KitchenAid product .
Points & Prizes
  • You can earn points for nearly everything you do on HelpOwl.com
  • You can trade in those points for gift cards at leading retailers such as Amazon.com and Walmart
  • It's that simple!
See How it Works
Create a Free Account

KitchenAid Manuals

Find free KitchenAid KCMC1575BSS manuals and user guides available at ManualOwl.com. Try out our unique manual viewer allowing you to interact with manuals from directly within your browser!

KitchenAid Reviews

View thousands of KitchenAid user reviews and customer ratings available at ReviewOwl.com.

Contact Information

Complete KitchenAid customer service contact information including steps to reach representatives, hours of operation, customer support links and more from ContactHelp.com.

Scoreboard Ratings

See detailed KitchenAid customer service rankings, employee comments and much more from our sister site.

KitchenAid Recalls

Find comprehensive KitchenAid recall information updated hourly on RecallOwl.com.