
Hunter 28665 Support Question
Hunter 28665 Support Question
Find answers below for this question about Hunter 28665.Need a Hunter 28665 manual? We have 4 online manuals for this item!
Question posted by gesuelli on June 24th, 2012
Installed fan without light
Followed the wiring directions fan will not spin. Power is on line. Had similar problem with similar fan had to return to store and get replacement. Is theer an issue with this fan? Why will it not work?
Current Answers
Related Hunter 28665 Manual Pages
Installation Guide - Page 1

... follows:
3-1. Attach the fan supply line to recess the bottom of the outlet box a minimum of 1/16" into the ceiling. You have no larger than the minor diameter of the wood screws (5/64") through the inner holes of lead wires extend from any hardware store or electrical supply house.
5-4. Fan Support System
Fan Support System
Suitable Existing Fan...
Owner's Manual - Page 1
Date Purchased
Where Purchased
Type 2 Models
Owner's Guide and Installation Manual
English
Español
Form# 45065-01 20110307 ©2011 Hunter Fan Co. Model Name
Model No.
For Your Records and Warranty Assistance For reference, also attach your receipt or a copy of your receipt to the manual.
Owner's Manual - Page 2

... Hunter replacement parts. • To reduce the risk of personal injury, attach the fan directly to the outlet box and associated wall switch location.
If you complete instructions for installing and operating your fan, disconnect the power by turning off position, securely fasten a prominent warning device, such as a tag, to the service panel. • All wiring must...
Owner's Manual - Page 3

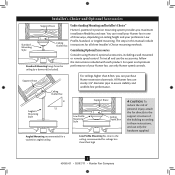
... or posts, within 30 inches of the fan blade tips.
• e fan is directly below the joist or support brace. Fan Support System
Fan Support System
Suitable Existing Fan Site
Wiring
Outlet Box
3 45065-01 • 03/07/11 • Hunter Fan Company Choose the Fan Site
Proper ceiling fan location and attachment to Section 2 • Installing the Hanger Bracket.
Owner's Manual - Page 4
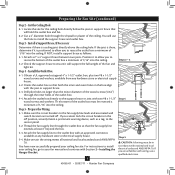
... wiring, use the hole to the service panel.
5-2. read the fan supply line through the outlet box so that the fan supply line extends at any hardware store or electrical supply house.
4-2. Step 3 - Attach a 2" x 4" support brace between two joists. Position it to allow you are turned off position, securely fasten a prominent warning device, such as follows...
Owner's Manual - Page 5
... Box
For ceilings higher than 8 feet high
CAUTION: To reduce the risk of personal injury, attach the fan directly to the ceiling, recommended for ceilings less than 8 feet, you maximum installation flexibility and ease. To install and use only Hunter speed controls. You can purchase Hunter extension downrods.
Considering Optional Accessories
Consider using Hunter...
Owner's Manual - Page 6

... will need help installing the fan, your Hunter fan dealer can do the following tools for and install wood screws. • Identify and connect electrical wires. • Lift 40 pounds. Check for any parts are installing more than one fan, keep the fan blades and blade irons (if applicable) in ceiling. • Drill holes for installing the fan: • Electric drill...
Owner's Manual - Page 7
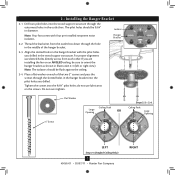
... pilot holes you are installing the fan on the screws. Thread the lead wires from each of the hanger bracket.
2-3. Align the slotted holes in the outlet box. do not use slotted holes directly across from the outlet box down through the outermost holes in the hanger bracket with four pre-installed neoprene noise isolators...
Owner's Manual - Page 8

... fan until you hear the notch pop into the hanger bracket. 3-5. Note: When the pipe and ball assembly is normal. 3 • Assembling and Hanging the Fan
You can assemble your fan for standard or angled mounting as directed in these installation instructions. For low profile mounting (ceilings less than 8 feet high), go to 4 • Wiring the Fan...
Owner's Manual - Page 9

... from the hanger ball bracket. 3-7. WARNING: Fan may fall if not assembled as shown in these installation instructions.
Assemble securely with the holes in the rim of the
fan assembly. 3-9. 3 • Assembling and Hanging the Fan (Low Profile Only)
You can assemble your fan for standard or angled mounting as directed in steps 3-1 - 3-3 on this page...
Owner's Manual - Page 10

... side of the outlet box and the ungrounded wires on the low profile washer.
4-4. Before attempting installation, make sure the power is still off.
4-2. Turn the wire connectors upward and push them , then twist clockwise until tight. Wall switches are visible after making connections.
4-6. 4 •Wiring the Fan
All wiring must be in accordance with national and...
Owner's Manual - Page 11

... follow these steps:
1. Raise the canopy over the hanger bracket. Steps 5-1 - 5-2 Canopy
Should you need to secure the canopy. 5 • Installing the...Fan Company
Twist canopy trim ring counter clockwise until it releases from canopy. Partially install two canopy screws (about 2 full turns) in canopy.
5-3. Align partially installed screws with key slots in the hanger bracket.
5-2. Install...
Owner's Manual - Page 12

.... Attach each blade, insert one blade mounting screw through the blade iron, and attach lightly to the fan).
6-1. If you used grommets, the blades may include blade grommets. This is normal.... blades.
6-2. Your fan may appear slightly loose after screws are installed in the motor to clean the blades.
For each blade to attract dust and dirt.
If your fan has grommets, insert them...
Owner's Manual - Page 13

....
The steps below direct you whether or not you need to the switch housing mounting plate. WARNING: Use only the light fixture supplied with the housing assembly screws.
7-4. Align the keyhole slots in the housing with this fan model.
7-1.
7 • Completing Your Installation With or Without a Bowl Light Fixture
Your Hunter fan comes with step 7-6 now...
Owner's Manual - Page 14

....
7-7. Steps 7-6 - 7-7
Lower Switch Housing
Plug Connector
Plug Connector Detail
Housing Assembly Screw
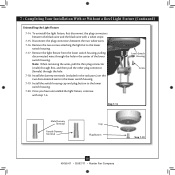
14 45065-01 • 03/07/11 • Hunter Fan Company 7 • Completing Your Installation With or Without a Bowl Light Fixture (Continued)
7-6. Incorrect connection could cause improper operation and damage to the upper switch housing with three housing assembly screws. Align...
Owner's Manual - Page 15

... center of the cover plate.
7-10. Exceeding the wattage limit marked on the MAX wattage sticker affixed to the light and fan pull chains using the breakaway connector. 7 • Completing Your Installation With or Without a Bowl Light Fixture (Continued)
Installing the Glass Bowl
7-8. Align the holes in the side of the glass bowl.
Thread the...
Owner's Manual - Page 16
...
Cap Plug Button
Step 7-19
16 45065-01 • 03/07/11 • Hunter Fan Company Disconnect the plug connectors between the black wire and the black wire with step 7‑6. Once you have uninstalled the light fixture, continue with a white stripe.
7-15. 7 • Completing Your Installation With or Without a Bowl Light Fixture (Continued)
Uninstalling the...
Owner's Manual - Page 17

.../11 • Hunter Fan Company
Restart fan.
The light pull chain controls power to prevent
scratching. A vacuum cleaner brush nozzle can remove heavier dust. Use a dry or slightly damp lint free cloth to a complete
stop. To Change Airflow Direction
Turn the fan off and let it come to clean the blades. Ceiling fans work best by blowing air...
Owner's Manual - Page 18

... attached to the blade irons according to the wiring the fan section. 3. 9 • Troubleshooting
Problem: Nothing happens; If so, replace all connections according to the blade assembly instructions provided. 2.
Problem: Noisy operation 1. Problem: Lights shut off at http://www.hunterfan.com. Turn the power to the fan. Check the plug connection in the switch housing...
Parts Guide - Page 1

...32 Wire Connector ...Light bulb / Bulb
Model # Asm.
Hardware (Drawn to Scale)
x 1 x 2 x 4 x 2 x 3
x 5 x 1 x 4
Balancing
x 1
Kit
Wire...Fan Parts
(Not Drawn to Scale)
PARTS GUIDE
Using this Parts Guide, make sure all parts are missing, DO NOT RETURN THIS ITEM TO THE STORE, call 888-830-1326 for assistance. Dwg. #
Finish Qnty
1
28665...77646-04
77646-04
Hunter Fan Company • 7130 ...
Similar Questions

Fan Works Ok, Lights Blink, 2 Different Fans.
fan works OK, lights blink, 2 different fans.
fan works OK, lights blink, 2 different fans.
(Posted by Andrew7285 4 years ago)

Installed It And Fan Works But The Lights Don't.
I connected the wires the way I thought they are supposed to go. The lights don't work and I'm certa...
I connected the wires the way I thought they are supposed to go. The lights don't work and I'm certa...
(Posted by Anonymous-152344 8 years ago)

How Can I Get A Spanish Translation Manual For Hunter Fan #28665
(Posted by landonod 11 years ago)

Where Do I Get A Replacement Light Fixture Bowl For This Fan?
(Posted by Kellydorr 11 years ago)