Hoover UH70210 Support Question
Hoover UH70210 Support Question
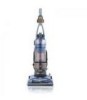
Find answers below for this question about Hoover UH70210 - WindTunnel T-Series Pet Rewind.Need a Hoover UH70210 manual? We have 1 online manual for this item!
Question posted by hoanskitzl on February 4th, 2014
Hoover Windtunnel T Series Hepa Filter Troubleshooting Will Not Turn On
The person who posted this question about this Hoover product did not include a detailed explanation. Please use the "Request More Information" button to the right if more details would help you to answer this question.
Current Answers
Related Hoover UH70210 Manual Pages
Manual - Page 1
página E1
www.hoover.com
IMPORTANT: READ CAREFULLY BEFORE ASSEMBLY AND USE. All Rights Reserved. #961006035 ID100685-R1 Questions or concerns? THIS PRODUCT IS INTENDED FOR HOUSEHOLD USE ONLY.
...
Manual - Page 2
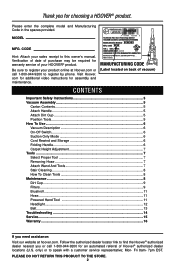
... To Use...6 Vacuum Description 6 On-Off Switch 6 Suction Only Mode 6 Cord Rewind and Storage 6 Folding Handle 6 Carpet Height Adjustment 7 Tools ...7 Select Proper Tool 7 Removing Hose 7 Attach Wand And Tools 7 Stair Cleaning 8 How To Clean Tools 8 Maintenance...8 Dirt Cup...9 Filters...9 Brushroll...11 Hose...11 Powered Hand Tool 11 Headlight...12 Belt...13 Troubleshooting 14 Service...
Manual - Page 3
..."Suction Only Mode" (Available on select models only). • Turn off all parts of body away from heated surfaces. • ...operating. • Operate vacuum only at bottom of California to be present. • Hold plug when rewinding onto cord reel. Do...servicing. • Do not use without Dirt Cup and/or Filters in . IMPORTANT SAFETY INSTRUCTIONS
SAVE THESE INSTRUCTIONS
When using an ...
Manual - Page 4

... shock, this product, as they may cause damage. • Store in "Suction Only Mode" (Available on select models only) during tool use sharp objects to turn while product is turned on furniture, fringed area rugs, or carpeted stairs during tool use. • Do not use .
Manual - Page 5
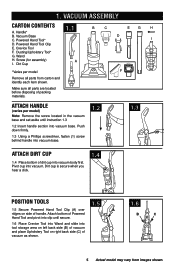
... disposing of handle. Push down firmly.
1.3 Using a Phillips screwdriver, fasten (1) screw behind handle into vacuum base.
1.2
1.3
Attach dirt cup
1.4 Place bottom of Powered
Hand Tool and pivot into clip until ...Insert handle section into tool storage area on left back side (B) of vacuum and place Upholstery Tool on side of packing materials. Handle* B. Powered Hand Tool* D. Make ...
Manual - Page 6
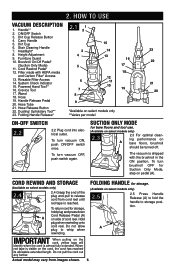
... Rewind Pedal* 12. System Check Indicator 15. Crevice Tool 17. To turn vacuum OFF, push switch again. Do not allow plug to release cord from images shown. 6
Dirt Cup 6. ON/OFF Switch 3. Filter made with the brushroll in the ON position. Hose 19.
Hose Tube 21. To turn brushroll OFF for storage, hold plug and...
Manual - Page 7
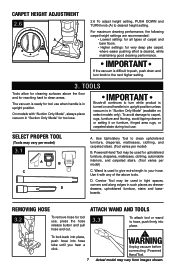
... Tool may vary per model)
C. Use it with "Suction Only Mode", always place vacuum in upright position.
To lock back into place, push hose into place.
!
Use ...WARNING
Unplug vacuum before connecting Powered Hand Tool.
IMPORTANT
If the vacuum is difficult to push, push down and turn while product is turned on and handle is in upright position unless vacuum is desired...
Manual - Page 8
...vacuum by stepping on the "Suction Only Mode" pedal (available on select models only) as follows:
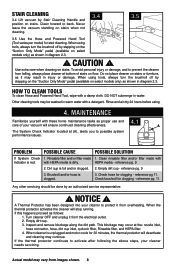
1. Other cleaning tools may occur at the: nozzle inlet, hose connector, hose, dirt cup inlet, cyclonic filter, Rinsable filter, and HEPA filter. 4. Clean rinsable filter and/or filter...issues. Never leave the vacuum standing on stairs. When using tools, always turn the brushroll off by Stair...
Manual - Page 9
... to secure at (B) until it clicks as described in Fig. 4.3.
4.6 Pull up to remove excess water. When using the vacuum for Hoover® Part No.303173001.
9 Actual model may seal the filter and cause a reduction in Fig. 4.6.
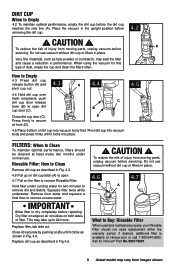
How to Empty
4.3 Press dirt cup release button (A) and pivot cup out.
4.3
A 4.4
4.4 Hold dirt cup over...
Manual - Page 10
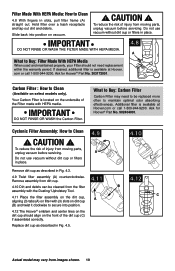
To reduce the risk of the Filter made with HEPA media. IMPORTANT
DO NOT RINSE OR WASH the Carbon Filter.
Additional filter is available at Hoover.
Do not use vacuum without dirt cup or filters in place.
4.9
A
4.10
Remove dirt cup as described in slots, pull filter frame (A) straight out. C
4.11 Place the filter assembly on the dirt cup,
A
aligning...
Manual - Page 11
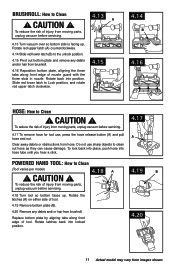
... plate, aligning the three tabs along front edge of injury from moving parts, unplug vacuum before servicing.
4.17 To remove hose for tool use sharp objects to Clean
(Tool...moving parts, unplug vacuum before servicing.
4.13 A
4.13 Turn vacuum over so bottom side is facing up . To reduce the risk of injury from moving parts, unplug vacuum before servicing.
4.18 Turn tool so bottom...
Manual - Page 12
...
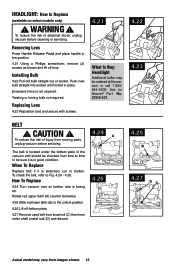
4.22 Pull old bulb straight out of the vacuum and should be checked from motor shaft (metal ...Hoover® Part No. 27313-107.
4.22 4.23
belt
! Push new bulb straight into socket until locked in low position. 4.21 Using a Phillips screwdriver, remove (2) screws as shown and lift off bottom plate.
4.27 Remove used belt from brushroll (C) then from time to time to replace
4.24 Turn vacuum...
Manual - Page 13
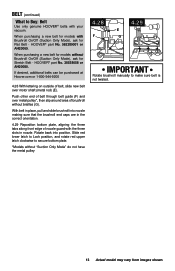
When purchasing a new belt for models with your vacuum. HOOVER® part No. 38528058 or AH20080.
Push other end of belt through belt guide...the correct orientation.
4.29 Reposition bottom plate, aligning the three tabs along front edge of brushroll without bristles (G). HOOVER® part No. 562289001 or AH20065.
Slide red lower latch to Lock position, and rotate red upper latch ...
Manual - Page 14
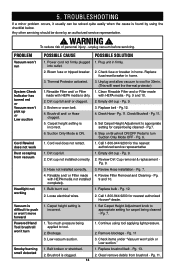
... Only Mode is incorrect.
5. Replace bulb -
Dirt cup full and/ or clogged. 2. PROBLEM
Vacuum won't run
System Check Indicator has turned red or Vacuum won 't pick or
Low suction." 1. Pg. 11. Check Brushroll - Thermal Protector activated.
3. Dirt cup full.
1. TROUBLESHOOTING
If a minor problem occurs, it usually can be done by using tool applying light...
Manual - Page 15

... with a customer service representative call 1-800-944-9200. 6. Do not send your vacuum by :
• Checking the Yellow Pages under "Vacuum Cleaners" or "Household". • Visit our website at hoover.com (U.S. If you . • For an automated referral of the vacuum.) PLEASE DO NOT RETURN THIS PRODUCT TO THE STORE.
15 Follow the service...
Manual - Page 16

... concerning this Warranty or the availability of purchase.
This warranty does not apply to a Hoover® Authorized Warranty
Service Dealer, cost of the product in the United States, U.S. OTHER...in a commercial operation (such as warranted, take or send the product to either a Hoover® Authorized Warranty Service Dealer along with the Owner's Manual, your product to products ...
Similar Questions

Hoover Windtunnel T Series Pet Rewind Turned Off While Vacuuming And Wont Turn
back on
back on
(Posted by DocfKazi 9 years ago)

Hoover Windtunnel T-series Pet Rewind Plus Upright Vacuum Bagless, How To
unclog
unclog
(Posted by egypzodi 9 years ago)

Help With Hoover Windtunnel T-series Pet Rewind Vacuum Wont Turn On
(Posted by mrbaz 10 years ago)

Wont Turn On Hoover Windtunnel T-series Pet Rewind Plus Upright Vacuum Bagless
uh70210
uh70210
(Posted by rerecjrot 10 years ago)

My Hoover Windtunnel T-series Pet Rewind Bagless Upright Vacuum Wont Turn On.
I cleaned out underneath and emptied it and it won't turn on. Plugged into different plugs and still...
I cleaned out underneath and emptied it and it won't turn on. Plugged into different plugs and still...
(Posted by megancorgan 11 years ago)