
Genie PowerLift Support Question
Genie PowerLift Support Question
Find answers below for this question about Genie PowerLift.Need a Genie PowerLift manual? We have 1 online manual for this item!
Question posted by tmski87 on April 6th, 2021
What Remote Do I Use For Powerlift Garage Door Opener Model Wr77 Serial No.08258
The person who posted this question about this Genie product did not include a detailed explanation. Please use the "Request More Information" button to the right if more details would help you to answer this question.
Current Answers
Answer #1: Posted by Vktech1 on April 8th, 2021 10:44 AM
Vktech1

Member since:
March 4th, 2021 Points: 106,910

Member since:
March 4th, 2021 Points: 106,910
Click on the link below to get the remote
https://store.geniecompany.com/products/powerlift-1-2-hp-screw-drive-garage-door-opener
Vasanth
Related Genie PowerLift Manual Pages
Owner's Manual - Page 1

... Control MUST be Properly Set to Operation of this Garage Door Operator. Extension Kit is available for Service 11 Garage Door Opener Installation 12 Accessories 22 Maintenance 25 Troubleshooting 26 Wiring Diagram 29 Warranty information 30
COMPLETE WITH INTELLICODE® REMOTE CONTROL AND SERIES II ELECTRONICS
For 7' 6" Doors. This Equipment meets or exceeds all Federal, State and...
Owner's Manual - Page 2

... to the wall button or console. SAFETY INFORMATION
Garage Doors are used for safer entries and exits. POTENTIAL HAZARD
EFFECT
PREVENTION
MOVING DOOR
WARNING: Can Cause Serious
Injury or Death
• Keep people clear of springs under tension, and electric opening equipment.
Force Guard® Control Used to set the minimum force required to be made...
Owner's Manual - Page 3

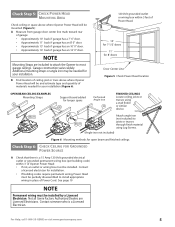
...Factory Authorized Dealer or dealer of garages and garage doors. More than slight movement
Figure 1 Checking door balance
means door is less than 2" thick, brace door or use shorter Door Bracket Lag Screws (1/4" x 11/4" -
A few additional parts and supplies may also be needed to 3' - 4' above ground and carefully let go. C A door opener reinforcement bracket may be needed ) before...
Owner's Manual - Page 4

... the top of Header Bracket will be installed here. Check Step 4: CHECK DOOR HEADER AREA
NOTE
The header is 7'-6" or less, continue with tape measure.
Bottom of the garage door opening.
A Find vertical center line of door and header: • Close door. • Measure door width at top. • Mark a point at 1-800-35-GENIE. NOTE
•...
Owner's Manual - Page 5
... above where Opener Power Head will be mounted (Figure 5): A Measure from garage door center line mark toward rear
of garage: • Approximately 10' back if garage has a 7' 6" door. • Approximately 11' back if garage has an 8' 0" door. • Approximately 13' back if garage has an 10' 0" door. • Approximately 14' back if garage has an 12' 0" door.
Garage construction varies...
Owner's Manual - Page 6

A If you open garage door from garage door (Figure 7). Emergency Release Kit lets you cannot mount Safe-T-Beam® Mounting Bracket to wood frame:
• Concrete screws and concrete anchors (not included) must be used to mount Brackets on masonry with attachment tabs facing away from outside if there is highly recommended to make installation easier:
•...
Owner's Manual - Page 7

...1
1/4"-20 Hex Head Bolt (blue bag)
2
2
Open Limit Switch Assembly (White)(green bag)
1
1
Close ...Remote Control (main carton) 3 Button Remote Control (main carton) Wireless Keypad (main carton) 2 Button Remote Control (main carton) Safety & Maintenance Guide (manual)(main carton)
4
4
varies/model varies/model
varies/model varies/model varies/model varies/model varies/model varies/model...
Owner's Manual - Page 9

... to Power Head
NOTE
If the Extension Assembly (GSXL8) is fully assembled.
B Attach Middle Rail Section to Opener Power Head.
Snap on a flat level surface. GARAGE DOOR OPENER ASSEMBLY
Assembly Step C1H: CONNECT RAIL TO POWER HEAD
OPEN BLUE PARTS BAG
A Turn Power Head upside down and place on Retaining Clip
10
Figure 11 Attach...
Owner's Manual - Page 11

... and secure with Wire Clips (Figure 14). D Attach Emergency Release Tag to Magnetic Carriage
Assembly Release Lever.
25
Emergency Release Tag
Assembly Step C8H: RECORD OPENER MODEL AND SERIAL NUMBER
Please note the following information so it is available if you need to Power Head Terminal Block (Figure 15): • Terminal...
Owner's Manual - Page 12

... Bracket with at mark above the door header to drywall, particle board, plaster, or other such material.
• It may be used depending on page 3).
OPEN ORANGE PARTS BAG
B Attach Header ... mounting plate for the Header Bracket. GARAGE DOOR OPENER INSTALLATION
NOTE
For lightweight garage doors, make sure you have sufficient support.
• If a door spring is in Figure 18. NOTE...
Owner's Manual - Page 13
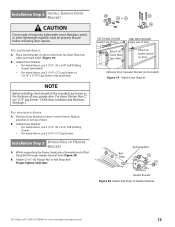
...-Drilling Screws (provided). • For wood doors, use 11/4" Lag Screws. For doors thinner than 2", use 3 (1/4" x 2") Lag Screws or 3 (1/4" x 11/4") Lag Screws (not provided).
Installation SteCpH2: INSTALL GARAGE DOOR BRACKET
CAUTION
Doors made of the included Lag Screws vs. For sectional doors:
A Place Door Bracket on door
Optional Door Operator Bracket (not included) Figure 19 Attach...
Owner's Manual - Page 16
... or wall. Blocks of Lens (Figure 27). may be placed further away from the door opening, where it now.
Determine which side of garage receives the most direct sunlight, and place Source (Red LED) on adjacent doors facing in the shadows.
• Slide the Safe-T-Beam® Source and Sensor onto the tongues of...
Owner's Manual - Page 18

... manual control of garage door. • At least 5' above with Entrapment Warning Label
18
For Help, call 1-800-35-GENIE or visit www.geniecompany.com
CAUTION
• Use of Wall Console, connect Striped Wire to terminal "B" and White Wire to only tap them in UNLOCKED position. D Wire Wall Console to Opener (Figure 32):
•...
Owner's Manual - Page 20

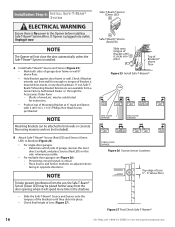
... Switch:
• Press Wall Console to close completely, measure distance from bottom of the Opener and the door. • Set the door Opener to use the minimum force needed
to open completely, move , check Safe-T-Beam® System. If door does not close garage door. - Close Limit Switch (door fully closed , slide Close Limit Switch until it runs, until the...
Owner's Manual - Page 21

... contact the 2" x 4" board before checking the contact reverse function (Figure 36). D Test Door Opener:
• Run door up and down a few times using Wall Console.
• Observe that door runs to Close Limit Switch. - If not, adjust Open Force Control slightly clockwise, close garage door, and open garage door, and close .
Do Not Unplug the Unit - NOTE
• To protect your...
Owner's Manual - Page 22
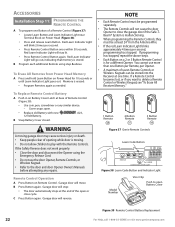
... Learn Indicator Light near Terminal Block on Power Head for a different Opener. Cover snaps open or close the garage door if the Safe-TBeam® System is erased: • Program Remotes again as needed. You cannot use the door Opener, Remote Controls, or
Wireless Keypad. • Refer to delete a Remote Control or Wireless Keypad, see "To Erase All Receiver Memory."
Owner's Manual - Page 23

... stays on your PIN and press
.
- To keep the door from moving .
• Rapid Blinking of doors (total) you have picked for 30 seconds after the door starts moving , close the door and disconnect it from the Wireless Keypad.
(continued on Opener)
Learn Code Button
will use door Opener, Remote Controls, or Wireless Keypad.
3 Refer to 8 characters).
• Press...
Owner's Manual - Page 26
... • Wire to adjust the Opener properly may cause severe injury or death. 6 When possible use the Emergency Release only when the door is completely closed . WARNING
Use the Wall Console included with a 1-1/2" high object (or a 2" x 4" board laid flat)
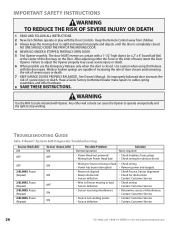
at the center of severe injury or death. 7 KEEP GARAGE DOORS PROPERLY BALANCED. TROUBLESHOOTING GUIDE
Safe-T-Beam...
Owner's Manual - Page 27

...• The status LED Indicator Light is equipped with an automatic garage door balance detection system.
Reset Opener -
Check for further assistance. See Door Safety Guide
1. Reference
2 BLINKS, Pause (Repeat)
3 BLINKS,...; The Remote Controls and Wireless Keypad will run at Power Head and Wall Console.
Contact Customer Service for further service. Check door condition....
Owner's Manual - Page 28

...Stapes can be obtained, disconnect Wall Console and use only Remote Controls or Wireless Keypad to Connectors on page 18). If power is completely open Lights will not turn off
• Check... as needed . • Check that all Remote Control codes from Remote Control
1. Adjust as needed . • Check garage door for binding.
• Check Open Limit Switch for a short circuit and for ...
Similar Questions

Garage Door Height
I have a Powerlift Model WR827. It opens all the wat to the top of the door, then falls back about 3...
I have a Powerlift Model WR827. It opens all the wat to the top of the door, then falls back about 3...
(Posted by jachfo25 5 years ago)

Where To Buy Rmote
where can i buy the remot for the garage door openermonroe township nj 08831
where can i buy the remot for the garage door openermonroe township nj 08831
(Posted by kishchowhan 8 years ago)

Garage Door Opener Not Working
Green light and red light are on the safety"eye" When pushing wall, remote or key pad the screw driv...
Green light and red light are on the safety"eye" When pushing wall, remote or key pad the screw driv...
(Posted by scanty5 9 years ago)

Can I Get A Extension For A Sd9000 Genie Garage Door Opener To Lift A 16x8
(Posted by dlfabes 10 years ago)

Where Is The Learn Code Button Situated On The 3060l-07 Genie Garage Door Opener
Where is the learn code button situated on the 3060L-07 Genie garage door opener. Trying to intregat...
Where is the learn code button situated on the 3060L-07 Genie garage door opener. Trying to intregat...
(Posted by katiaella 10 years ago)