GE GFSS6KKYSS Support Question
GE GFSS6KKYSS Support Question
Find answers below for this question about GE GFSS6KKYSS - 26' Refrigerator.Need a GE GFSS6KKYSS manual? We have 4 online manuals for this item!
Question posted by nred4u on April 26th, 2011
My Power Went Out And Now That Its Back On The Refrig Temp Setting Just Blink 88
The person who posted this question about this GE product did not include a detailed explanation. Please use the "Request More Information" button to the right if more details would help you to answer this question.
Current Answers

Related GE GFSS6KKYSS Manual Pages
Use and Care Manual - Page 2
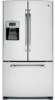
... a grounding type plug
2
and outlet and that the electrical rating of your old refrigerator, please follow the instructions below to these extremely cold surfaces. Skin may not easily ... 15 amperes (minimum) and 120 volts. Use this appliance only for "just a few days."
I Unplug the refrigerator before it is absolutely necessary that children may stick to help prevent accidents....
Use and Care Manual - Page 3
...prong from the outlet.
Have the wall outlet and circuit checked by pulling on the power cord.
The refrigerator should always be plugged into its own individual electrical outlet which could cause a fire hazard... 3-prong (grounding) wall outlet to roll over or damage the power cord.
When moving the refrigerator away from overheated wires. For personal safety, this appliance must be...
Use and Care Manual - Page 4
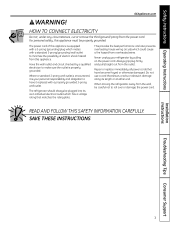
... usage and operating environment . Each time you adjust controls, allow 24 hours for the refrigerator to reach the temperature you have set .
4
The display will return to reach the temperature you have set .
Once the desired temperature has been set , the temperature display will show the actual temperature.
Operating Instructions Safety Instructions
About the...
Use and Care Manual - Page 8
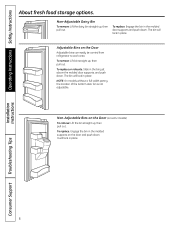
...supports and push down. Non-Adjustable Bins on the Door (on the Door
Adjustable bins can easily be carried from refrigerator to work area. Adjustable Bins on some models)
To remove: Lift the bin straight up, then pull out....the door and push down . To replace: Engage the bin in the bin just above the molded door supports, and push down .
To remove: Lift bin straight up , then pull out.
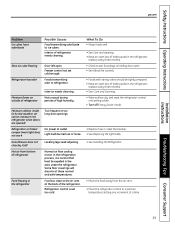
Use and Care Manual - Page 9
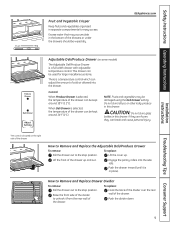
... personal injury. NOTE: Fruits and vegetables may accumulate in the bottom of the drawers or under the drawers should be damaged using the Deli Drawer setting. If they are frozen, they can be used for easy access.
This drawer can be kept around 34°F (1°C). To replace: Lift the cover...
Use and Care Manual - Page 13
... Off/Lock or Ice Off pad on some models) to prevent serious property damage due to the floor covering or refrigerator.
Be sure the refrigerator stays in . When pushing the refrigerator back, make sure you don't roll over the power cord or icemaker supply line (on the control panel to prevent damage.
Pull the...
Use and Care Manual - Page 14
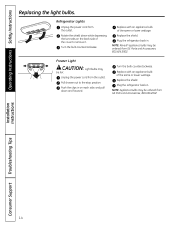
Refrigerator Lights
Unplug the power cord from the outlet. Turn the bulb counterclockwise. NOTE: Reveal® appliance bulbs may be hot. Freezer ... in .
Pull drawer out to remove it. Replace with an appliance bulb of the same or lower wattage. Plug the refrigerator back in on the back side of the cover to the stop position.
Replace the shield. Replace with an appliance bulb of...
Use and Care Manual - Page 16
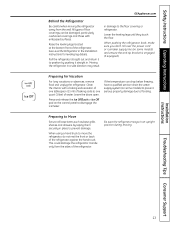
... to be scratched and damaged. Leave tape and all packaging on doors until the refrigerator is 35.6″ deep.
Doors and passageways leading to the installation location must be...THE FREEZER DOOR HANDLE
Stainless steel and plastic handles: A Loosen the set screws
with a side against the truck.
Place the refrigerator on the hand truck with the 1/8″
Allen wrench
A
and remove...
Use and Care Manual - Page 17
... screws on the gray coupling and pull out the tubing. A
5 REMOVE THE REFRIGERATOR DOORS
A Open the refrigerator doors. G Remove three 10 mm hex-head bolts (right and left). Installation ... may fall and cause personal injury and/or damage
to the handle
A
mounting fasteners
and tighten the set screws on the bottom of the handle with a flat-head
screwdriver.
E To disconnect the water coupling...
Use and Care Manual - Page 18
... support the door.
Then connect the water line and door electrical connector.
6 REPLACING THE REFRIGERATOR DOORS
A Install the center hinge on the door is flush against the cabinet and is even...
6 REPLACING THE REFRIGERATOR DOORS
(cont.)
D Insert the top hinge pin into the hinge hole on top of the door.
Set the hinge, bolts and screw aside.
B Lower the refrigerator door onto the ...
Use and Care Manual - Page 19
...
assemblies back at the same time.
8 REPLACING THE FREEZER DOOR
Two people may be required to separate the rail from the right and left side.
F Set the door front on each side
of the cabinet. Tilt the front end up from the rail system. (See page 10.)
D Remove the two 10...
Use and Care Manual - Page 20

...C Tighten screws completely. (There are already assembled to provide one. Installation Instructions
INSTALLING THE REFRIGERATOR (cont.)
8 REPLACING THE FREEZER DOOR (cont.)
B Hang the freezer door front onto open...Installing the Water Line section.
NOTE: Before making the connection to the refrigerator, be sure the refrigerator power cord is not a cold water supply, you are using the GE ...
Use and Care Manual - Page 21
... it in position. You may cause leaks.
Installation Instructions
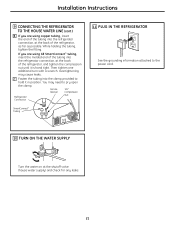
9 CONNECTING THE REFRIGERATOR TO THE HOUSE WATER LINE (cont.)
B If you are using GE SmartConnect™ tubing, insert the molded end of the tubing into the clamp provided to the power cord.
10 TURN ON THE WATER SUPPLY
Turn the water on at...
Use and Care Manual - Page 23
...
from shelves and drawers.
23 Installation Instructions
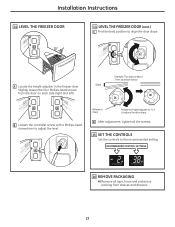
14 LEVEL THE FREEZER DOOR
14 LEVEL THE FREEZER DOOR (cont.)
C Find the best position to the recommended setting.
16 REMOVE PACKAGING
A) Remove all the screws.
15 SET THE CONTROLS
Set the controls to align the door slope.
Use and Care Manual - Page 24
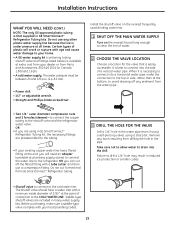
... need . Call a qualified plumber to a GE Reverse Osmosis Water System, the only approved installation is battery powered.
Be sure there is double insulated or grounded in areas where temperatures fall below freezing. When connecting your refrigerator before installing the water supply line to water leakage or flooding. Installation Instructions
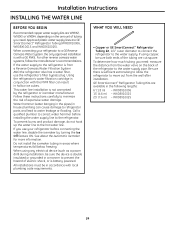
INSTALLING THE WATER...
Use and Care Manual - Page 25
... Power drill. • 1/2″ or adjustable wrench. • Straight and Phillips blade screwdriver. It is best to connect into the drill. Remove any burrs resulting from GE SmartConnect™ Refrigerator ... water pipe (even if using a self-piercing valve), using a GE SmartConnect™ Refrigerator Tubing kit, the necessary fittings are preassembled to the tubing.
• If your local...
Use and Care Manual - Page 28
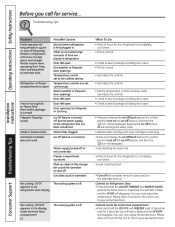
... hours for 3 seconds. Often occurs when large amounts of food are placed in icemaker. Door left open .
Door left open . • Check to your set temperature.
Ice cubes stuck in refrigerator. appears in the display inside the fresh food compartment
28
The cooling system is turned off or not connected.
Controls on...
Use and Care Manual - Page 29
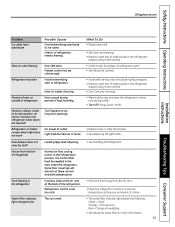
... cold.
• Move the food away from bottom of baking soda in the refrigerator;
Refrigerator or freezer compartment light does not work
No power at these normal and safe temperatures. Door/drawer does not close to a warmer temperature setting one setting colder.
• Turn off Energy Saver mode. Some floor coverings will discolor at outlet...
Use and Care Manual - Page 30
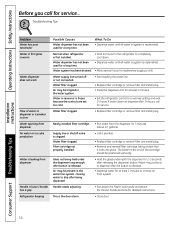
... Supply line or shutoff valve is first installed.
• Wait 24 hours for the refrigerator to remove air from dispenser
Handle is replenished. Water filter clogged. Filter cartridge not properly... is loose / handle has a gap Refrigerator beeping
Possible Causes
Water dispenser has not been used for at least 2 minutes.
• Set the refrigerator control to chill.
Normal when...
Installation Instructions - Page 29
Moisture collects inside (in the refrigerator; Refrigerator or freezer compartment light does not work
No power at these normal and safe temperatures. Food freezing in the refrigerator
Food too close by itself
Leveling legs need adjusting.
Freezer control not set too cold.
replace every three months. • See Care and cleaning. • Wipe surface dry and...
Similar Questions

Temp Settings
how do I sent the tip settings on the freezer and refrigerator do not have a manual thank you
how do I sent the tip settings on the freezer and refrigerator do not have a manual thank you
(Posted by fredland113 7 years ago)

I Am Having Difficulty Setting The Temperature And Now It Is Just Blinking. Wha
What does this mean
What does this mean
(Posted by tfairx2 8 years ago)

Ge Temp Setting On Model Cscp5ugx
How do we reset the temparature for the refrigerator? The temperature is rising in the refrig and fr...
How do we reset the temparature for the refrigerator? The temperature is rising in the refrig and fr...
(Posted by pizzakeepa 9 years ago)

Not Cooling. Temperature Is Blinking 34.
Our temperature is blinking at 34 degrees and the fridge feels warm. We unplugged the fridge and the...
Our temperature is blinking at 34 degrees and the fridge feels warm. We unplugged the fridge and the...
(Posted by gkstormy 9 years ago)
Temp Control Shows Off And Keeps Going Back To Off After Adj.
(Posted by L111center 11 years ago)