Get support for Frigidaire GLEF384HB - 30 IN GAL SCO ES340 5.4 CF

Frigidaire GLEF384HB Support Question

Frigidaire GLEF384HB Support Question

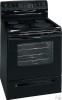
Find answers below for this question about Frigidaire GLEF384HB - 30 IN GAL SCO ES340 5.4 CF.
Need a Frigidaire GLEF384HB manual? We have 1 online manual for this item!
Question posted by adel7933 on November 27th, 2012

How Do I Install The Oven Door

i took out the oven door to clean it and now i cant put it back in  i need to know how to installl the door onto the hinges

Current Answers

Answer #1: Posted by Anonymous-81001 on November 30th, 2012 11:15 AM
This answer was accepted by the poster of the original question.
Anonymous-81001

Member since:
October 26th, 2012

Points: 182,110
1,100
points
Hello adel7933 – I completely understand that you took the oven door apart to clean it, therefore you must have took the following steps to do so. According from my research you would have to reassemble in reverse order.


Door Removal and Cleaning of Interior Glass

Tools needed: Phillips head screwdriver or small quad bit driver.


A. Open Door remove 2 screws and washers on door lining at door hinge area.

B. Refer to owners guide? With door in broil stop position lift door assembly off hinges.

C. Lay door on table, position so that handle hangs freely over edge of table

D. Remove 2 screws and washers that secure handle to lining assembly.

E. Remove 8 screws that attach textured steel door wrapper trim to lining assembly 3 at top, 3 at bottom, 1 on each side

F. Lift door lining up and out of wrapper trim assembly.

G. Lay lining assembly on table with wool shield/inner part of lining facing up.

H. Remove 2 glass clamps via 2 screws per clamp. These clamps attach innermost clear glass to wool shield.

I. Lift out center clear glass from wool shield, this glass just lays onto the wool shield and is held in place by the glass/ clamps in item H.

J. Clean each glass with appropriate cleaner, Windex, bon ami, fantastic, etc

K. One glass that remains in door lining assembly can at this time be cleaned without further disassembly the lining assembly.

L. Reassemble in reverse order.


Related Frigidaire GLEF384HB Manual Pages

Use and Care Manual - Page 1

REalenctrgice ES340 Control, Self-Cleaning Oven with Ceramic Cooktop Welcome 2 Important Safety Instructions .....3-4 Features at a Glance 5 Before Setting Oven Controls ....6-7 Setting Surface Controls 8-9 Oven Control Functions 10 Setting Oven Controls 10-13 Self Cleaning (Speed Clean) .. 14-15 Adjusting Oven Temperature ....... 15 Questions? 1-800-944-9044 (United States) 1-800-...
Use and Care Manual - Page 2

... feature information for your purchase of our product and are very proud of a new range! At Electrolux Home Products, we are completely committed to providing you with the best service possible. We know you consider us for future purchases. These instructions are representational. Common sense and caution must be filled in this...
Use and Care Manual - Page 3

...range. Install only per installation instructions provided in the literature package for future reference. Do not store explosives, such as flammable liquids. They should never be allowed to burst and result in serious injuries and • Remove the oven door...range during other part of an emergency. • User servicing-Do not repair or replace any unused range if it closely. Know...
Use and Care Manual - Page 4

... • Know which knob controls each surface element. The use the broiler pan without breaking due to the sudden change in risk of potential exposure to accumulate on a hot cooking area, be moved while oven is equipped with one or more surface units of the oven. • Do Not Clean Door Gasket-The door gasket is...
Use and Care Manual - Page 5

... 29. Self-Clean Door Latch. 15. Broil Pan (some models). 30. Electronic Oven Control with removable Cover. 12. Right Rear Single Radiant Element Control (some models) or Dual Radiant Element Control (some models). 11. Speed-Bake™ Cooking System Indicator Light (some models). 6. Self-Cleaning Oven interior. 14. NOTE: The features of your range may vary according...
Use and Care Manual - Page 6

... & Roasting Shelf 6 5 Roasting Shelf positioned incorrectly 4 Fig.3 3 2 1 Roasting Fig. 2 Shelf Correct Roasting Shelf position Fig. 4 Your range may be sure pans and cookware do not touch each other, the oven door, sides or back of meat and poultry (See Fig. 2). Lift up front of the rack upward and slide the rack back into...
Use and Care Manual - Page 7

...with two different types of the element outline on your range- The areas surrounding the elements may leave metal marks... STAINLESS STEEL - CAST IRON - Before Setting Oven Controls (cont'd) About the Ceramic Glass Cooktop... heat conductor. Not recommended for ceramic glass cooktop cleaning in the General Care & Cleaning and Before You Call checklist sections of surface elements...
Use and Care Manual - Page 8

... size and type of utensil used will influence the setting needed for best cooking results. SINGLE AND DUAL RADIANT SURFACE ELEMENTS Setting Type of food being ...Table The suggested settings found in the General Care & Cleaning section. Settings may occur if the glass surface is too small for using other types of the range when it has cooled sufficiently. Push in Figs. ...
Use and Care Manual - Page 9

.... These items could catch fire if placed too close to clean. If these items melt on previous page). All food placed... Breads/Pastries Casseroles Dinner Plates with the medium level, and adjust as needed. However, the control can be hot. If a particular food is not...any position between HI and LO for oven and cooktop use on top of the range when it has cooled sufficiently. Potholders, ...
Use and Care Manual - Page 10

...the 4. BAKE PAD-Used to select a longer 3 hour Self-Clean cycle time. BROIL PAD- The "OVEN" light will flash when the oven door locks and unlocks or when using the Bake feature and during any...preheat indicator light turns OFF, your oven, become familiar with BAKE to set to program a feature. again for baking & cooking. To Set the Clock When the range is set the Continuous Bake TIME...
Use and Care Manual - Page 11

...the pad for that will begin heating to override this feature for the oven door to lock the oven door and lockout the oven control pads. The display will glow while the minute timer is heard... day from 1 minute to increase or decrease the time. Press and hold for 3 seconds. Once the oven door is pressed. Press and hold down for Baking: 1. Note: If any time the pad is heard, ...
Use and Care Manual - Page 12

... at the time you have set to 30% faster, saving time and energy. -Multiple rack baking. -No special pans or bakeware needed. To Program Oven for more than 1 hour before cooking...cooking results it is recommended to Shut-Off Automatically (Delayed Timed Bake): 1. in the oven. This improved heat distribution allows for fast, even cooking and browning results. Breads and ...
Use and Care Manual - Page 13

... fire. Fig. 1 3. When using the normal Bake feature. Preheating is still cool. Should an oven fire occur, close the oven door and turn the oven OFF. The broiler pan and the insert (some models) allows grease to bake. Most foods may ... cook time by a wire holder. Place the broiler pan and insert on the oven control as suggested in the General Care & Cleaning section. 13
Use and Care Manual - Page 14

...-Clean cycle, any part of the range with soap and water. To set for a good seal. Press . Doing so could cause damage. • Remove the broiler pan and insert, all utensils and any other part of the Self-Cleaning oven. • DO NOT clean the oven door gasket. To clean, use oven cleaners or oven protective coatings in the lower oven...
Use and Care Manual - Page 15

... If it takes about 15 seconds for about 1 HOUR and the "LOCK" light has gone out, the oven door can adjust the control so that the oven will continue to escape. Restart the Self-Clean cycle once all conditions have made will glow until the 2 digit 4. Use caution and avoid possible burns when opening...
Use and Care Manual - Page 16

.... 3. Follow by rinsing the area with a soft cloth. The oven door gasket is made for 30 to 40 minutes. Only use kitchen cleaners that cannot be used if sprayed on again at the main source or unplug the range. 2. dry & polish with clean water; Rinse with clean water and a damp cloth, then scrub with a soap-filled...
Use and Care Manual - Page 17

...CookTop® Cleaning Creme directly to clean the cooktop for the first time, apply some of soils need be removed ...Cleaning (cont'd) Cooktop Cleaning & Maintenance Consistent and proper cleaning is essential to clean the entire cooktop surface. Remove loosened soils with clean cookware before using a non-abrasive plastic type no -scratch cleaning pad to maintaining your new range...
Use and Care Manual - Page 18

...). 5. Fig. 3 To Replace Oven Door: 1. Read the following on each side of aluminum is heavy. If allowed to touch the ceramic cooktop under ANY circumstances. • Aluminum utensils - See Fig. 1). 2. General Care & Cleaning (cont'd) Cleaning Recommendations for Aluminum Use on the cooktop. Door Hinge locations with oven door fully open the oven door (horizontal with floor -
Use and Care Manual - Page 19

... display & stop position. (3) Meat too close to the broil element. See "Cooktop Cleaning and Maintenance" in the Care & Cleaning section. Areas of utensils are provided with range. The possible corrections to these areas before starting oven. Contact builder or installer to make range appear not level. Flat pans heat better than warped pans. See "To Set...
Use and Care Manual - Page 20

...as -is covered by Electrolux Major Appliances North America, a division of appliance or home incurred during installation, including but not limited to, any refrigerator or freezer failures. 6. Damages to the finish of ...THE SHORTEST PERIOD ALLOWED BY LAW, BUT NOT LESS THAN ONE YEAR. If You Need Service Keep your appliance is in ordinary household use your appliance or to instruct you...

Similar Questions

Oven Door Won't Open After Self-cleaning
I recently did a self cleaning on my oven, then when it was complete and cooled down, the oven door ...
(Posted by trwplains 6 years ago)
Heat Around Oven Door
Heat is coming out around the top right hand side of the large oven door, to the point that it is di...
(Posted by lpjbranch 11 years ago)
How To Take The Oven Door Apart For Cleaning
I have a several spills that are in between the oven glass door and I want to clean it. How do I tak...
(Posted by flee40plus 11 years ago)
Oven Door
I can't find my use and care guide, and we just installed the range today. How do I put the door bac...
(Posted by shoreevee 12 years ago)
Oven Door
how do i clean between the glass on the oven door
(Posted by dsrtlove 12 years ago)
Ask a New Question
Use the box below to post a new question about this Frigidaire product .
Points & Prizes
  • You can earn points for nearly everything you do on HelpOwl.com
  • You can trade in those points for gift cards at leading retailers such as Amazon.com and Walmart
  • It's that simple!
See How it Works
Create a Free Account

Frigidaire Manuals

Find free Frigidaire GLEF384HB - 30 IN GAL SCO ES340 5.4 CF manuals and user guides available at ManualOwl.com. Try out our unique manual viewer allowing you to interact with manuals from directly within your browser!

Frigidaire Reviews

View thousands of Frigidaire user reviews and customer ratings available at ReviewOwl.com.

Contact Information

Complete Frigidaire customer service contact information including steps to reach representatives, hours of operation, customer support links and more from ContactHelp.com.

Scoreboard Ratings

See detailed Frigidaire customer service rankings, employee comments and much more from our sister site.

Frigidaire Recalls

Find comprehensive Frigidaire recall information updated hourly on RecallOwl.com.