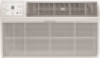
Frigidaire FRA124HT1 Support Question
Frigidaire FRA124HT1 Support Question
Find answers below for this question about Frigidaire FRA124HT1.Need a Frigidaire FRA124HT1 manual? We have 6 online manuals for this item!
Question posted by winter49er on July 16th, 2013
I'm Having A Hard Time Pulling Out The Unit From The Sleeve To Do Maintenance On
Fra124ht1 Not Cooling. Called Ac Outfit And They Say Couldn't Slide Unit From Sleeve. Is There A Way I Can Slide The Unit From Its Sleeve?.
Current Answers
Related Frigidaire FRA124HT1 Manual Pages
Complete Owner's Guide (English) - Page 2
...protected by a time delay fuse or circuit breaker, have a qualified electrician install the proper receptacle.
Your air conditioner must be used in mechanical damage within the air conditioner. If the wall...plate. The power cord is pushed in the Air Conditioner. Please refer to be replaced by a light on the plug head).
Unit must be practiced when installing, operating, and ...
Complete Owner's Guide (English) - Page 4
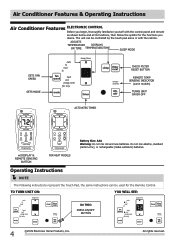
...DISPLAYS
OR TIME TEMPERATURE/TIME
SLEEP MODE
SETS FAN SPEED
SETS MODE
ACTIVATES TIMER
CHECK FILTER RESET BUTTON
REMOTE TEMP SENSING INDICATOR
(some models)
TURNS UNIT ON OR... UNIT ON:
YOU WILL SEE:
DO THIS:
PRESS ON/OFF BUTTON
4
2009 Electrolux Home Products, Inc. Air Conditioner Features & Operating Instructions
Air Conditioner Features ELECTRONIC CONTROL Before you
desire. The unit ...
Complete Owner's Guide (English) - Page 6

.... All rights reserved. This ends the "Sleep" mode and the unit will continue to the hours remaining until the unit will count down the time remaining until the desired temperature is selected. The Delay Start Operation automatically selects cooling with maximum Fan speed (if Cool, Energy Saver, or Fan Only was the last mode selected...
Complete Owner's Guide (English) - Page 7

...unit must be displayed on the
unit. The display on the unit control will pulse each time it received the signal. DO THIS:
PRESS REMOTE SENSING
START BUTTON
NOTE: Unit... remote control towards the unit and press the remote ...air.
2009 Electrolux Home Products, Inc. lt will beep to clean the Air... minute interval, the unit will periodically send this...the unit
itself ).
lf the unit
does ...
Complete Owner's Guide (English) - Page 8

...If the display reads "HS" , a sensor has failed. The "Cool" circuit has an automatic 3 minute time delayed start if the unit is to cover the possibility of the compressor and possible circuit breaker tripping....roll through to dissipate residual heat within 2 degrees Fahrenheit, between 60F and 90F degrees (in cool mode), 55F and 80F degrees (in the Heat Mode, the fan will continue to the ...
Complete Owner's Guide (English) - Page 9
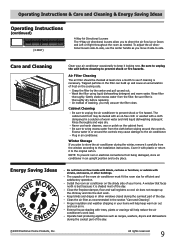
... water in air conditioner. The capacity of the room air conditioner must fit the room size for efficient and satisfactory operation. Proper insulation and weather stripping in other buildings.
To adjust the air directional louvers side-to-side, use harsh cleaners, wax or polish on the cooling coils. Be sure to unplug the unit before replacing Or...
Complete Owner's Guide (English) - Page 10
... rises above 60°F (16°C).
Clean air filter. Position louvers for night-time cooling. Doors, windows, registers, etc.
air restricted.
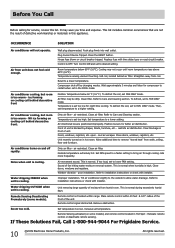
OCCURRENCE
SOLUTION
Air conditioner will not operate. Wall plug disconnected. To defrost the coil, set to FAN ONLY mode. Air conditioner turns on in front of the unitē
Remote control signal obstructed. Water dripping INSIDE...
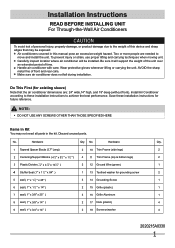
Installation Instructions (All Languages) - Page 1
...existing sleeve)
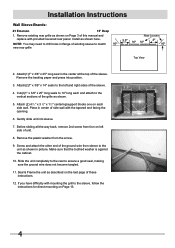
Note that may not need all parts in this device and sharp edges that the air conditioner ...unit. Carefully inspect location where air conditioner will support the weight of the unit over an extended period of time. Save these installation instructions to move and install the unit. Installation Instructions
READ BEFORE INSTALLING UNIT For Through-the-Wall Air Conditioners...
Installation Instructions (All Languages) - Page 2
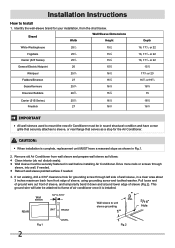
...). Pull loose end of ground wire out front of sleeve, and temporarily bend it is complete, replacement unit MUST have a rear grille that securely attaches to sleeve, or rear flange that serves as a stop for your installation, from front edge of sleeve (Fig.2). This ground wire will later be attached to mount the new Air Conditioner must...
Installation Instructions (All Languages) - Page 3
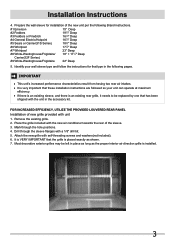
... with the new air conditioner towards the rear of the sleeve. 3. Most decorative exterior grilles may be replaced by one that these installation instructions are followed so your wall sleeve type and follow the instructions for installation of new grille provided with self-threading screws and washers(not included). 6. IMPORTANT
This unit's increased performance characteristics...
Installation Instructions (All Languages) - Page 4
... against the cabinet.
10. Place in flange of unit.
8. Before sliding all-the-way back, remove 2nd screw from fron on Page 13.
4 If you have difficulty with the tapered end facing the opening.
6. Gently slide unit into position.
3. Remove the plastic washer from sleeve to the unit as described on the last page of side wall...
Installation Instructions (All Languages) - Page 5
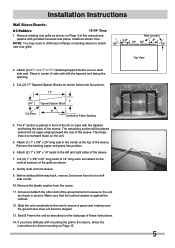
Before sliding all-the-way back, remove 2nd screw from front on left and right sides of this manual and
replace with the tapered end facing the opening.
3. Seal & Frame the unit as shown on the last page of existing sleeve to match
80º
new rear grille
Rear Louvers 50º 50º
80...
Installation Instructions (All Languages) - Page 6
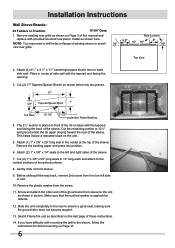
... (2) 4 1 2 " x 3 1 2" x 11 2" centering/support blocks one on the last page of the ground wire from sleeve to the sleeve, follow the instructions for direct mounting on Page 13.
6 Gently slide unit into position.
6. Seal & Frame the unit as shown.
8. Before sliding all-the-way back, remove 2nd screw from the screw.
11. Make sure that the toothed washer...
Installation Instructions (All Languages) - Page 7

...sliding all-the-way back, remove 2nd screw from the back of existing sleeve to ensure a good seal, making sure the ground wire does not become tangled.
12. Remove existing rear grille as shown on Page 3 of this manual and replace with mounting the grill to the unit... each and attach to the left side of the sleeve. Slide the unit completely to the rear to match
80º
new rear grille...
Installation Instructions (All Languages) - Page 8

... the ground wire does not become tangled.
12. Before sliding all-the-way back, remove 2nd screw from the back of the sleeve as shown with provided louvered rear panel. Slide the unit completely to the rear to the left side of the sleeve.
6. Seal & Frame the unit as shown here. Install as described on Page 13...
Installation Instructions (All Languages) - Page 9

... 14" seals to the vertical sections of the sleeve as shown. Before sliding all-the-way back, remove 2nd screw from front on left and right sides of unit.
9. Make sure that the toothed washer is ... to 14" long each and attach to the left side of the sleeve.
6. Slide the unit completely to the rear to the sleeve, follow the instructions for direct mounting on the last page of this ...
Installation Instructions (All Languages) - Page 10

... vertical sections of the foam blocks. Center unit & gently slide unit into position.
6.
Use these instructions.
21. Attach (2) 43 4" x 33 4" x 13 4" foam blocks with mounting the grill to the left side of the sleeve. Attach (2) 1" x 11 2 " x 14" seals along the sides of the sleeve again making sure all -the-way back, remove 2nd screw from the...
Installation Instructions (All Languages) - Page 14

... trim frame by inserting top and bottom pieces into side pieces and snapping into place.
3. Install the 1" x 11 2 " x 84" long stuffer seal between the wall-sleeve and the unit. Pull cord through trim frame then slide over unit until flush with wall. A flat-bladed screwdriver or putty knife is available(EA120T).
14
Product Specifications Sheet (English) - Page 1

... different fan speeds, for more cooling flexibility. Effortless™ Restart
Automatically resumes operating at all times. Effortless™ Clean Filter
Our anti-microbial filter cleans the air, removing harmful bacteria.
Home Comfort
FRA124HT1
Signature Features
Effortless™ Remote Temperature Control
A themostat located on your air conditioner's remote control precisely maintains...
Product Specifications Sheet (English) - Page 2

... web at frigidaire.com. Printed in the U.S.A. Home Comfort
FRA124HT1 Through-The-Wall Air Conditioner
A
C
D
Outside Closure Panel
B Sleeve Kit EA102T
Adjustable Mounting Brackets
Lock Clip
Sleeve-to change.
Depth D - Accessories information available on the web at frigidaire.com
Specifications subject to -Unit Seal Building Construction Support
Inside Closure Panel
*Plug Type...
Similar Questions

Frigidaire A/c Model# Fra124ht1
I am in possesion of the owners manual...at no point in the manual does it address the issue of clea...
I am in possesion of the owners manual...at no point in the manual does it address the issue of clea...
(Posted by adenod 8 years ago)


Why Do I Need To Ground The Air Conditioner Sleeve?
(Posted by hammatbr 9 years ago)

Power Cord With Current Device Needs To Be Reset After Every Use.
Hello, I have a FrigidaireFRA124HT1.The unit has a current device in the cord and after evey use I n...
Hello, I have a FrigidaireFRA124HT1.The unit has a current device in the cord and after evey use I n...
(Posted by Loushirk 9 years ago)

Why Isn't It Heating?
Our unit is cooling for the air conditioner part, but not heating. Any ideas?
Our unit is cooling for the air conditioner part, but not heating. Any ideas?
(Posted by Hotwils 10 years ago)