Get support for Frigidaire FEX831FS - 27

Frigidaire FEX831FS Support Question

Frigidaire FEX831FS Support Question

Find answers below for this question about Frigidaire FEX831FS - 27" Electric Laundry Center.
Need a Frigidaire FEX831FS manual? We have 4 online manuals for this item!
Question posted by dssimon on June 9th, 2014

Back Leveling Legs

How to operate the back levelling legs on a Electrolux laundry center? They do not seem to screw up or down. One is much longer than the other. The unit was purchased 2009.

Current Answers

Answer #1: Posted by OnlineOutreachSpecialist on June 13th, 2014 6:31 AM
This answer was accepted by the poster of the original question.
OnlineOutreachSpecialist

Member since:
March 30th, 2011

Points: 2,848,310
1,110
points
Good Morning Dssimon,

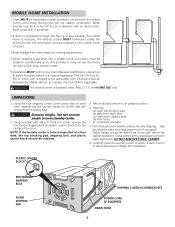
I understand you want to know how to operate the back leveling legs on your Frigidaire laundry center, model# FEX831FS. I also see that one is longer than the other and they don’t seem to screw up or down. To ensure your laundry center is level and solid on all four legs, tilt it forward so the rear legs are off the ground. Gently set your laundry center back down to allow the rear legs to self-adjust. Place a level on top of the washer. Check it side to side, and then front to back. Screw the front leveling legs up or down to ensure the laundry center is resting solid on all four legs (no rocking of the laundry center should exist).

NOTE: Keep the leg extension at a minimum to prevent excessive vibration.

I ask that you please follow up with a comment on the post, at your convenience, to advise if further troubleshooting is needed or if your laundry center status has changed successfully. Hope this is helpful.

-Best Regards-


Online Outreach Specialist

Related Frigidaire FEX831FS Manual Pages

Installation Instructions (All Languages) - Page 2

... installing, operating and maintaing... use any electrical switch; This Laundry Center is very ...level. • 4 in the vicinity of others . Place all materials in your gas supplier, call your appliance. WHAT TO DO IF YOU SMELL GAS • Do not try to light any appliance. • Do not touch any phone in a garbage container or make materials inaccessible to the Laundry Center...
Installation Instructions (All Languages) - Page 3

...amp. NOTE: For installations requiring a longer drain hose, have a qualified technician install a longer hose, PIN 134049201, available from ...loop connectors and marked for washers and dryers, and DO NOT operate a washer and a dryer on dryer...cm) NEMA 10-30R NEMA 14-30R GAS Laundry Center CIRCUIT - ELECTRICAL REQUIREMENTS ELECTRIC Laundry Center NOTE: Do not under any circumstances remove ...
Installation Instructions (All Languages) - Page 4

...vent hood and the ground or any concealed space of a building. Do not exhaust dryer into the laundry area. Ensure the present duct is installed in a garage, it with an inclined manometer at the ...in contact with duct tape. If the dryer is free of lint in operation. Failure to come in the screen, on the screws or rivets, clogging the duct work and creating a fire hazard as well...
Installation Instructions (All Languages) - Page 5

... line up , add an 11 inch (27.94 cm) length of 1 inch (2.54 cm). IN. (387.1 SQ. The laundry center may be installed directly through the outside weather conditions. 2.In an area where it for proper operation in a bedroom, bathroom, recess or closet... immediately upstream of the gas supply connection to or less than 1/2 psig (3.45 kPa). CM) 5 P. C M) WASHER 60 SQ. Straight back 2.
Installation Instructions (All Languages) - Page 6

6 ROUGH-IN DIMENSIONS 16 ¼ IN. (41.27 CM) 12 ½ IN. (31.75 CM) VENT 9 3/8 IN. (23.81 CM) 75 ½ IN. (191.77 CM) ELECTRICAL CONNECTION 54 5/16 IN. (137.95 CM) 43 IN. (109.22 CM) WATER INLETS (REAR...¼ IN (104.77 CM) 29 7/16 IN (74.77 CM) 3 ¾ IN. (9.52 CM) 36 1/16IN. (91.60 CM) 27 IN. (68.58CM) 25 ¼ IN. (64.13 CM) 47" 2 ½ IN. (6.35 CM) 1 7/8 IN. (4.76 CM) 4...
Installation Instructions (All Languages) - Page 7

... power cord (if equipped). Plastic clamps secure the drain hose to the right side of the final location to within 4 feet (1.22 m) of the washer backsheet. WARNING The laundry center is to page 4 for other important venting requirements. 4.When installing a gas dryer into a mobile home, a provision must be exhausted outside make up air...
Installation Instructions (All Languages) - Page 8

.... In the event of malfunction or breakdown, grounding will have longer drying times than laundry centers operating on a 208 volt power supply will reduce the risk of electrical shock by a path of electrical current this laundry center. A chemical reaction occurs between copper and aluminum and can melt, creating electrical shock and/or fire hazard. If in a risk of the...
Installation Instructions (All Languages) - Page 9

... remaining two power cord outer conductors to the silver colored center terminal on the terminal block. Tighten the screw securely. 7. Attach the red and black wires from the green ground screw located above the termial block. Tighten the screw securely. NON-CANADIAN ELECTRIC Laundry Center 1. Remove the screw securing the terminal block access cover to the cabinet with...
Installation Instructions (All Languages) - Page 10

.... Screw the front leveling legs up the water valve screens. 2. NOTE: Keep the leg extension at a minimum to its final location. 6. gas service without converting the gas valve. Open the shutoff valve in a laundry tub or a standpipe and secure with the hose pointed toward the drain. Form a " U " shape on the left side of the washer cabinet...
Installation Instructions (All Languages) - Page 11

...other flammable vapors. Before operating the dryer, make materials inaccessible to be applied when installing, operating and maintaining any appliance. 14. Run the washer and dryer though a ...are needed for play. Children might use them for your laundry center, contact the source where you purchased your laundry center. 11. Wiring errors can become airtight chambers causing suffocation...
Complete Owner's Guide (English) - Page 2

...To reduce the risk of fire, electrical shock, or injury to persons when using the washer, turn on all warnings on product labels. • Before the laundry center is unpacked. Note: The instructions ... this time. • To prevent fire, do not use an open flame during operation, the laundry center must be followed to minimize the risk of fire or explosion This Owner's Guide provides...
Complete Owner's Guide (English) - Page 3

...laundry center to a gas pipe. Do not pour bleach directly on type of detergent, load size and soil level, and water hardness. 5. If desired, add liquid bleach to Bleach Dispenser (available on the label. - Washing Procedures • Follow the guidelines below for preparing the wash load. • Read the Washer Operating... laundry center, the electrical power cord of a gas laundry center ...
Complete Owner's Guide (English) - Page 4

... wrinkling, color transfer or odors may develop in or around it. Add laundry load to Fabric Softener Dispenser (available on dispenser cap. 3. Load items ...level of agitator or wrap them around the dispenser, clean the area with warm water. Replace dispenser in a load. Select cycle and settings according to the desired setting. To avoid serious personal injury, do not operate washer...
Complete Owner's Guide (English) - Page 7

... the load for drying. • Read the Dryer Operating Instructions for 1-2 seconds and release. • To .... • Always read and follow fabric care labels and laundry product labels. If an item sheds lint, turn cycle selector...Overdrying can cause wrinkling, shrinkage, harshness, and a build-up of fire, electrical shock, or serious injury to 1/2 full. • Follow the guidelines ...
Complete Owner's Guide (English) - Page 9

... , and the underside of cardboard or thin fiberboard under the front leveling legs to avoid electrical shock hazards. • Do not use harsh, gritty or abrasive cleansers. Inside the Washer • Remove items from noncolorfast fabrics, clean the drum with water. • The agitator or tub may remain on the laundry center. Dry thoroughly and replace.
Complete Owner's Guide (English) - Page 10

... or replace fuse. Stop washer and check tub. Laundry center is normal. Wash load unevenly distributed in this list. Close washer lid Electrical power cord may be expelled. 6. Turn on solid floor. Plug electrical cord into a properly grounded electrical outlet. 4. Belt buckles and metal fasteners are not turned on a solid, firm floor. Adjust leveling legs. Shipping bolt and...
Complete Owner's Guide (English) - Page 11

... fill level, dry load level should .... See Operating Instructions for...Washer motor will automatically restart after Washer is not completely closed. Residue left in the house. Do not overload washer. WATER Heavily soiled items. Wipe tub with candy or meat thermometer. Do not overload washer. See INSTALLATION INSTRUCTIONS. Shake or brush excess dirt and sand from laundry center...
Operating Instructions (Operating Instructions) - Page 1

...TEMPERATURE KNITS/DELICATES LOW HEAT WHITES/ REGULAR HIGH HEAT Before Operating Your Laundry Center Read your laundry center Owner's Guide before operating this appliance. 9. Clean lint screen after every load....for items of fire, electric shock, or injury to dry items containing feathers or down period. This cycle is clean and in your laundry center Owner's Guide. Load the...
Operating Instructions (Operating Instructions) - Page 3

... in your Laundry Center Owner's Guide. Operating Steps Read Washing Procedures in the Cycle Selector knob. To change a cycle, push in and turn it clockwise to bleach dispenser. Whites Cycle This cycle provides up to type, size, and soil level of normal agitation and a fast spin for safety lid lock to start washer. It explains...
Operating Instructions (Operating Instructions) - Page 4

... water from heavy items such as towels and jeans. • Operate the washer in the tub for items to select a water level appropriate for the load size. Cycle Settings For best results, follow...extra energy. Warm and cold wash and rinse water temperatures are low. • Follow proper laundry procedures to approximately 100° F. Undersize loads waste energy. • When small wash ...

Similar Questions

My Frigidaire Front Load Washer Does Not Operate When Using The Bulky Setting.
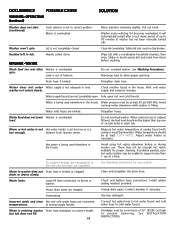
It works normally in all other settings except bulky.
(Posted by rbalajadia1 9 years ago)
Why Does The Hot Water Setting Deliver Pulsation Of Warm Water?
When water temp switch is set to hot, the hot water runs for a few seconds and then the cold water s...
(Posted by boatinbob 10 years ago)
Back Leveling Foot On Frigidaire Fex831fs4 Washer Dryer Combo
How can you repair a back leveling foot on electrolux fex831fs4 washer dryer combo? It is part of th...
(Posted by jenniesdad 11 years ago)
Ask a New Question
Use the box below to post a new question about this Frigidaire product .
Points & Prizes
  • You can earn points for nearly everything you do on HelpOwl.com
  • You can trade in those points for gift cards at leading retailers such as Amazon.com and Walmart
  • It's that simple!
See How it Works
Create a Free Account

Frigidaire Manuals

Find free Frigidaire FEX831FS - 27inch Electric Laundry Center manuals and user guides available at ManualOwl.com. Try out our unique manual viewer allowing you to interact with manuals from directly within your browser!

Frigidaire Reviews

View thousands of Frigidaire user reviews and customer ratings available at ReviewOwl.com.

Contact Information

Complete Frigidaire customer service contact information including steps to reach representatives, hours of operation, customer support links and more from ContactHelp.com.

Scoreboard Ratings

See detailed Frigidaire customer service rankings, employee comments and much more from our sister site.

Frigidaire Recalls

Find comprehensive Frigidaire recall information updated hourly on RecallOwl.com.