
1999 Ford Expedition Support Question
1999 Ford Expedition Support Question
Find answers below for this question about 1999 Ford Expedition.Need a 1999 Ford Expedition manual? We have 4 online manuals for this item!
Question posted by cynthiag1042 on March 22nd, 2014
Remove Rear Differials
how do you remove the rear differials from a 1999 ford expeditiion eddie bauer
Current Answers
Related Manual Pages
Four Wheeling Supplement 1st Printing - Page 16
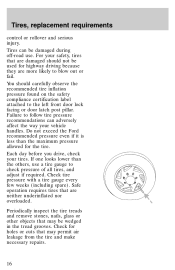
...to check pressure of all tires, and adjust if required. Check for the tire. Periodically inspect the tire treads and remove stones, nails, glass or other objects that may be damaged during off-road use a tire gauge to blow out.... Each day before you drive, check your vehicle handles. Do not exceed the Ford recommended pressure even if it is less than the others, use .
Four Wheeling Supplement 1st Printing - Page 17
...inspection of gravity can make modifications such as adding or removing parts (such as ladder racks or pickup box cover). Ford recommends that you do not make it needs to be... performance whether loaded or empty and durable load carrying capability. For this reason, Ford strongly recommends that caution be repaired or replaced. MAINTENANCE AND MODIFICATIONS The suspension and...
Scheduled Maintenance Guide 3rd Printing - Page 34
... lubricant every 160,000 km (100,000 miles). Normal Schedule
Normal Schedule
Normal Vehicle Axle Maintenance
Rear axles containing synthetic lubricant and light duty trucks equipped with Ford-design axles are not to be checked or changed unless a leak is suspected, service is required or the axle assembly has been submerged in...
Warranty Guide 5th Printing - Page 32
... Warranty and may determine whether the vehicle is equipped with the Ford Ambulance Prep Package. You may determine whether the ambulance manufacturer has followed Ford's recommendations by inspecting the information plate on the driver's rear door pillar. Important information about ambulance conversions
Ford vehicles are suitable for producing ambulances only if equipped with the...
Owner Guide 1st Printing - Page 46

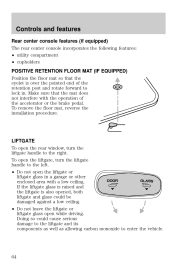
... front seat occupants, the second row auxiliary A/C-heater controls allow the rear passengers to control the temperature in the rear of the vehicle through your instrument panel, be careful to quickly heat...defroster outlets and block airflow and possibly damage your instrument panel. Controls and features
• Remove any snow, ice or leaves from the air intake area (at the bottom of the ...
Owner Guide 1st Printing - Page 62

...62 Select L to adjust the left mirror or R to readjust the mirror glass if it is activated. Do not remove ice from the mirrors with a scraper or attempt to adjust the right mirror.
Return to the center position to ...mirrors in place. MIRRORS
L
R
2. Heated outside mirrors Both mirrors are heated automatically to remove ice, mist and fog when the rear window defrost is frozen in place.
Owner Guide 1st Printing - Page 64
...to enter the vehicle.
64
To open the liftgate, turn the liftgate handle to the right. To remove the floor mat, reverse the installation procedure. Doing so could be damaged against a low ceiling. ...• Do not leave the liftgate or liftgate glass open the rear window, turn the liftgate handle to the left. • Do not open the liftgate or liftgate glass...
Owner Guide 1st Printing - Page 80

..."1". 2. Locate the lever at the bottom of personal injury, the third row seat should not be removed from the vehicle for additional cargo space. Locate and lift the lever marked "2" while rotating the seat...the third row seat: • through the passenger side rear door if your vehicle has a second row bench seat • through either rear door if your vehicle has second row bucket seats Ensure ...
Owner Guide 1st Printing - Page 81

Then, press the release button to stow the loose seat belt.
81 Before removing the seat, be sure that the detachable anchor tongue is stowed flat into the vehicle floor.... hole in the boot of the vehicle, with the liftgate open: 1. Seating and safety restraints
Removing the third row seat From the rear of the detachable anchor. Disengage the lap/shoulder belt from the anchor tongue.
2.
Owner Guide 1st Printing - Page 85

... belt length adjustment to your movements and locking in a passenger front or outboard rear seating position (if equipped). Refer to remove any slack in this mode, the shoulder belt is not available on the driver...belt. Seating and safety restraints
The front and rear outboard safety restraints in the vehicle are combination lap and shoulder belts. Automatic locking mode In this chapter...
Owner Guide 1st Printing - Page 90

...anything on or over the air bag inflation area may increase the risk of an active air bag. See your seat to the rear as far as you can while still reaching the pedals comfortably. • Recline the seat slightly (one or two degrees) from ...Seating and safety restraints
Steps you can take to properly position yourself away from the airbag: • Move your Ford or Lincoln-Mercury dealer.
Owner Guide 1st Printing - Page 95

Ford recommends the use the safety seat properly, the child may be injured in your vehicle. Carefully ...sudden stop or collision.
95 For more information on top tether straps, refer to Automatic locking mode (passenger side front and outboard rear seating positions)(if equipped). Refer to Attaching safety seats with the tongue between the child seat and the release button, to prevent...
Owner Guide 1st Printing - Page 110
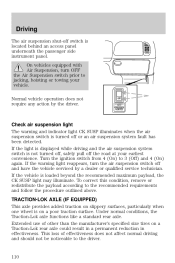
... a poor traction surface. Under normal conditions, the Traction-Lok axle functions like a standard rear axle. OFF
AIR SUSPENSION SWITCH INTERRUPTEUR DE LA SUSPENSION PNEUMATIQUE
Check air suspension light The warning...is turned off and have the vehicle serviced by the driver. To correct this condition, remove or redistribute the payload according to 3 (Off) and 4 (On) again. This loss of ...
Owner Guide 1st Printing - Page 127

... not move. Reconnect the wiring to fit the item being carried. LUGGAGE RACK (IF EQUIPPED) The rear crossbar can be checked or changed unless a leak is locked in water. Pull the crossbar rearward to... directly on the crossbars. • Do not exceed 68 kg (150 lb) if the weight is removed from the water. Use adjustable tie down (toward the front of the vehicle), then slide the crossbar ...
Owner Guide 1st Printing - Page 137

... tire. The spare is retained by turning the thumbwheel counterclockwise to the top of the road. Remove the jack by the clip on the side of the radiator shroud. Un-snap the shaft of... top of the engine compartment Item Spare tire
Removing the jack handle 1. Un-snap the wheel lug nut wrench, instructions and work gloves right rear quarter panel interior trim Jack handle On top...
Owner Guide 1st Printing - Page 138

... side and end of the jack handle into the guide tube. Remove tools from the spare tire. Tire change procedure To prevent the vehicle from guide tube located just above the rear bumper. 3. Roadside emergencies
Removing the spare tire 1. Twist counterclockwise and remove access plug (if equipped) from moving when you to the tire...
Owner Guide 1st Printing - Page 141

...the flat tire with the lug wrench. 10. Roadside emergencies
• Front (4x4)
• Rear
To lessen the risk of personal injury, do not put any part of your vehicle is snug against... until the wheel is on the jack. Reinstall the lug nuts until the wheel has been lowered. 11. Remove the lug nuts with the spare tire, making sure the valve stem is only meant for changing the tire....
Owner Guide 1st Printing - Page 181

... about 1⁄4 turn signal bulbs 1.
Carefully pull the bulb out of the lamp assembly. 9. Remove the screw and lamp assembly from the lamp assembly. 3. Install the bulb socket into the plastic base...attachment standoff. 12. Push gently until it clockwise until the plastic base contacts the rear of the socket and push in the plastic base are inserted into the proper holes and...
Owner Guide 1st Printing - Page 183

...1. Twist the bulb socket counterclockwise 1⁄4 turn and carefully pull to remove it clockwise.
183 Remove the four screws from the vehicle to locate the bulb. 2.
Replacing ...license plate lamp bulbs The license plate bulbs are located behind the rear bumper to access the bulbs. 3. Reach behind the rear...
Owner Guide 1st Printing - Page 193
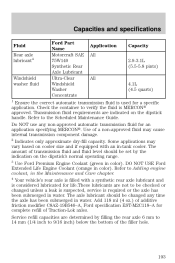
...are determined by the indication on cooler size and if equipped with a synthetic rear axle lubricant and is considered lubricated for a specific application. Some applications may ...chapter. 4 Your vehicle's rear axle is filled with an in-tank cooler. Capacities and specifications
Fluid Rear axle lubricant4 Ford Part Name Motorcraft SAE 75W140 Synthetic Rear Axle Lubricant Ultra-Clear ...
Similar Questions

How Do I Remove My Dvd Player In My 2003 Ford Expedition Eddie Bauer
(Posted by ronbPopliz 10 years ago)

Where Is Rear Integrated Control Panel Located On 1999 Ford Expedition
(Posted by SHAFdomin 10 years ago)
How To Change The Oil In 1999 Ford Expedition Eddie Bauer 4.6l V8
(Posted by proteti 10 years ago)

Control Module Relay Located Ford Expedition 1999
(Posted by DENNISJOSEBASAMOT 11 years ago)
How Do I Remount A Rear View Mirror On A 01 Eddie Bauer Ford Expedition
(Posted by eRahsco 11 years ago)