
1998 Ford Contour Support Question
1998 Ford Contour Support Question
Find answers below for this question about 1998 Ford Contour.Need a 1998 Ford Contour manual? We have 4 online manuals for this item!
Question posted by mikemxli on October 14th, 2015
Wires Colors Of Fuses 1,2,3 Contour 98
The person who posted this question about this Ford automobile did not include a detailed explanation. Please use the "Request More Information" button to the right if more details would help you to answer this question.
Current Answers
Answer #1: Posted by TechSupport101 on October 14th, 2015 10:42 AM
TechSupport101

Member since:
May 24th, 2013 Points: 12,171,305

Member since:
May 24th, 2013 Points: 12,171,305
See the "Fuses and relays in the Roadside emergencies chapter" of the Owners Manual here https://www.helpowl.com/a/Ford/1998-Contour/Manuals/2408 for the best account.
Related Manual Pages
Owner's Manual - Page 59

... in the front seat.
59 Children should always wear safety belts. Failure to service, repair, or modify the air bag Supplemental Restraint System or its fuses.
Seating and safety restraints
Do not place objects or mount equipment on safety restraints in this guide. Never install rear-facing child seats or rear...
Owner's Manual - Page 61

... diagnostic module monitors its own internal circuits and the supplemental air bag electrical system readiness (including the impact sensors), the system wiring, the air bag system readiness light, the air bag back up power and the air bag ignitors.
61 If the air... • one or more impact and safing sensors, • a readiness light and tone, • and the electrical wiring and components.
Owner's Manual - Page 72

... the lap portion of the crotch safety belt buckle (it to retract and fit snugly. Seating and safety restraints
6. The color green must appear in place on each tongue when buckled. The color green must appear in the buckle, do not latch in the indicator window when fastened. 8. Fasten both belt tongues...
Owner's Manual - Page 91
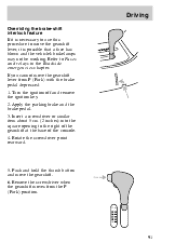
... Insert a screwdriver or similar item about 5 cm (2 inches) into the square opening to Fuses and relays in the Roadside emergencies chapter. Push and hold the thumb button and move the gearshift lever, it... is possible that a fuse has blown and the vehicle's brakelamps may not be working. Remove the screwdriver when the gearshift...
Owner's Manual - Page 98
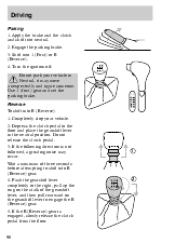
... neutral.
2. Turn the ignition off.
Do not release the clutch pedal. 3. If the following direction is engaged, slowly release the clutch pedal from the floor. 2 1
98 Wait a miminum of the gearshift lever, and then pull rearward on the stalk of three seconds before attempting to shift into 1 (First) or R (Reverse). 4. Shift...
Owner's Manual - Page 106
... change weight on the tongue. Follow the instructions of the trailer is on the hitch.
Do not hook the trailer lamps directly into the vehicle's wiring system. Using trailer lamps See your local trailer retailer or rental agency for proper instructions and equipment for hooking up trailer lamps. Driving
Using a hitch...
Owner's Manual - Page 112
... cause of the engine compartment. Always replace a fuse with higher amperage rating can cause severe wire damage and could start a fire. Even after a fuse is not identified and corrected. They contain the main fuses and the main relays. Blown fuses are identified by numbers on the passenger compartment fuse panel and inside the cover on the...
Owner's Manual - Page 113
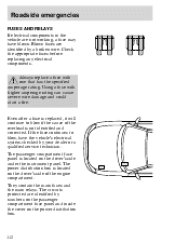
... of the power distribution box in case of the fuse box in the engine compartment by a break in the wire. Roadside emergencies
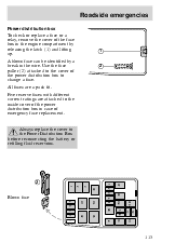
Power distribution box To check or replace a fuse or a relay, remove the cover of emergency fuse replacement.
1 2
Always replace the cover to change a fuse. A blown fuse can be identified by releasing the latch (1) and...
Owner's Manual - Page 114

Roadside emergencies
Power distribution box (engine compartment) Ampere Color Fuse Circuits protected rating 1* 2* 3* 4 5 6 7 8 9 10 11 12 13 14 15 16 17 18 80 60 60 20 15 - 20 - 20 20 3... - (passenger's side) Low beam headlamp - (driver's side) High beam headlamp - (passenger's side) High beam headlamp - (driver's side)
* Have these fuses replaced by your dealer or qualified technician.
114
Owner's Manual - Page 115
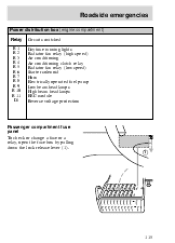
... Radiator fan relay (low speed) Starter solenoid Horn Electrically operated fuel pump Low beam headlamps High beam headlamps EEC module Reverse voltage protection
Passenger compartment fuse panel To check or change a fuse or a relay, open the fuse box by pulling down the lock release lever (1). 1
115
Owner's Manual - Page 116
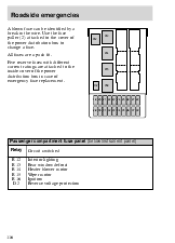
...the cover of the power distribution box to the inside cover of emergency fuse replacement.
All fuses are attached to change a fuse. Five reserve fuses with different current ratings are a push fit. D2
R13 R12
R14
R15...21 22 23 24 25 26 27 28
29 30 31 32 33 34 35 36 37 38
Passenger compartment fuse panel (below instrument panel) Relay R 12 R 13 R 14 R 15 R 16 D2 Circuit switched ...
Owner's Manual - Page 117
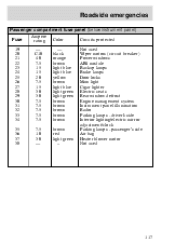
...window defrost Engine management system Instrument panel illumination Radio Parking lamps - Roadside emergencies
Passenger compartment fuse panel (below instrument panel) Fuse 19 20 21 22 23 24 25 26 27 28 29 30 31 32 33 34... 35 36 37 38 Ampere rating - C10 40 7.5 15 15 20 7.5 15 30 30 7.5 7.5 7.5 7.5 7.5 7.5 10 30 - Color - black...
Owner's Manual - Page 118
Roadside emergencies
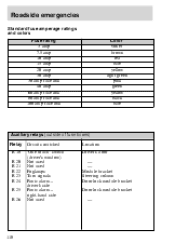
Standard fuse amperage ratings and colors Fuse rating 3 amp 7.5 amp 10 amp 15 amp 20 amp 30 amp 30 amp fuse link 40 amp 60 amp fuse link 80 amp fuse link 100 amp fuse link Color violet brown red blue yellow light green pink green yellow black blue
Auxiliary relays (outside of fuse boxes) Relay Circuits switched...
Owner's Manual - Page 132

...check to drop into the catch for the last 20 - 30 cm (8 - 12 inches). Hold the support at the yellow colored insulation section. Maintenance and care
Opening the hood • Pull the handle (1) located under the instrument panel.
4 5 6 7...it is fully engaged.
3
132 To close, replace the support strut in the yellow colored retainer, ensuring it to ensure that the hood lock is secure.
Owner's Manual - Page 146

...
Pb
146 Reinstall the cables when you see any corrosion on the battery cables or terminals, remove the cables from the terminal(s) and clean with a wire brush. The Motorcraft maintenance-free battery normally does not require additional water during its life of the battery clean and dry. However, for severe service...
Owner's Manual - Page 158
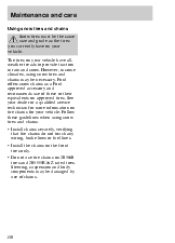
... allweather treads to provide traction in some climates, using snow tires and chains: • Install chains securely, verifying that the chains do not touch any wiring, brake lines or fuel lines. • Install the chains on the front tires only. • Do not use of chains.
158 Maintenance and care
Using...
Owner's Manual - Page 193
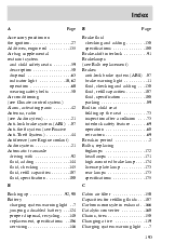
... coolant) Audio system ...21 Automatic transaxle driving with ...92 fluid, adding ...144 fluid, checking ...145 fluid, refill capacities ...187 fluid, specification ...188 B Backing up ...92, 98 Battery charging system warning light . .7 jumping a disabled battery ...124 proper disposal, recycling ...148 replacement, specifications . .186 servicing ...146
Brake fluid checking and adding ...138...
Owner's Manual - Page 197
... Page P Page
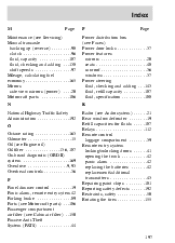
Maintenance (see Servicing) Manual transaxle backing up (reverse) ...98 clutch ...96 fluid, capacity ...187 fluid, checking and adding ...138 shift...air filter (see Cabin air filter) . .150 Passive Anti-Theft System (PATS) ...44
Power distribution box (see Fuses) Power door locks ...37 Power features mirrors ...20 seats ...48 sunroof ...36 windows ...37 Power steering fluid, checking ...
SVT Supplement 1st Printing - Page 11
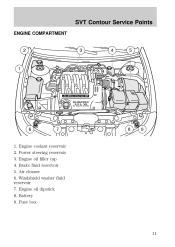
Engine oil filler cap 4. Windshield washer fluid reservoir 7. Engine oil dipstick 8. Engine coolant reservoir 2. SVT Contour Service Points
ENGINE COMPARTMENT
2
3
4
5
1
6
7
8
9
1. Power steering reservoir 3. Air cleaner 6. Battery 9. Brake fluid reservoir 5. Fuse box
11
SVT Supplement 1st Printing - Page 12

SVT Contour Specifications
ENGINE Transversely mounted, 60-degree V6, cast aluminum block and heads, iron cylinder liners, fully counterweighted...off at 7,000 rpm) 77 HP per litre Dual overhead chain-driven cams, roller finger followers with hydraulic lash adjustment, ovate-wire valve springs, four valves per cylinder. 2 per cylinder, 32 mm head diameter 2 per cylinder, 26 mm head diameter ...
Similar Questions

What Color Is The Fuel Pump Fuse In 2000 Ford Contour
(Posted by pacwi 10 years ago)

What Color Wire Is The Oil Pressure Sender At Instrument Cluster Ford Contour
(Posted by sk5je 10 years ago)

Where Are Hazard Lights Located In Ford Contour 98
(Posted by dikecek19 10 years ago)

Contour 98 Gl Radio Dash Surrounding
Please help, the surrounding dash plate of my radio and around the A/C and heater control area is cr...
Please help, the surrounding dash plate of my radio and around the A/C and heater control area is cr...
(Posted by kyguy1995 10 years ago)