1989 Ford Bronco Support Question
1989 Ford Bronco Support Question
Find answers below for this question about 1989 Ford Bronco.Need a 1989 Ford Bronco manual? We have 1 online manual for this item!
Question posted by clking on August 29th, 2016
Replacing The Front Grill Emblem
How do I remove the two 10mm bolts on the back of the emblem without breaking off the plastic pegs?
Current Answers
Answer #1: Posted by waelsaidani1 on September 7th, 2016 12:17 AM
waelsaidani1

Member since:
May 12th, 2013 Points: 19,501,797

Member since:
May 12th, 2013 Points: 19,501,797
Related Manual Pages
Owner's Manual - Page 57
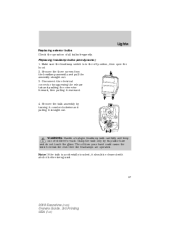
...break the next time the headlamps are operated. Replacing headlamp bulbs (aerodynamic) 1. Remove the bulb assembly by turning it counterclockwise and pulling it rearward.
4. Disconnect the electrical connector by its plastic...a halogen headlamp bulb carefully and keep out of all bulbs frequently. Lights
Replacing exterior bulbs Check the operation of children's reach. The oil from the ...
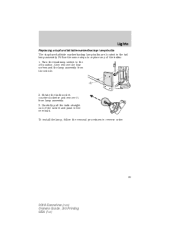
Owner's Manual - Page 58
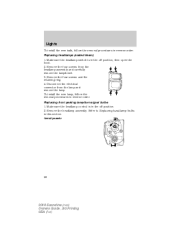
... is in the off position, then open the hood. 2. Refer to Replacing headlamp bulbs in reverse order. Remove the four screws from the lamp and remove the lamp. Lights
To install the new bulb, follow the removal procedures in the off position. 2. Remove the headlamp assembly. Disconnect the electrical connector from the headlamp assembly and...
Owner's Manual - Page 59

... in reverse order. Rotate the bulb socket counterclockwise and remove. 59
2010 Econoline (eco) Owners Guide, 3rd Printing USA (fus) Carefully pull the bulb straight out of the socket. Rotate the bulb socket counterclockwise and remove. 4. Refer to Replacing headlamp bulbs in this section. Aerodynamic
Sealed beam
3. Remove the headlamp assembly. Lights
Sealed beam
3.
Owner's Manual - Page 60
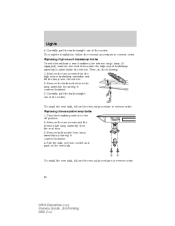
... switch to the off position. 2. To install the new bulb, follow the removal procedure in the new bulb. Replacing high-mount brakelamp bulbs On vehicles without a rear headliner, the interior cargo lamp (if equipped) must be removed from the rear door. 3.
Remove the two screws and the license plate lamp assembly from under the...
Owner's Manual - Page 61
... bulbs are located in reverse order.
61
2010 Econoline (eco) Owners Guide, 3rd Printing USA (fus) Follow the same steps to the off position, then remove the four screws and the lamp assembly from lamp assembly. 3. Turn the headlamp switch to replace any of the socket and push in the new bulb.
Owner's Manual - Page 80
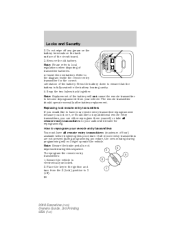
Remove the old battery. Replacing lost one, or would like to buy additional remote entry transmitters, you ...your authorized dealer for the correct orientation of the circuit board. 3. The remote transmitter should operate normally after battery replacement. How to the diagram inside the remote entry transmitter for reprogramming. Ensure the vehicle is fully seated in the ignition...
Owner's Manual - Page 83
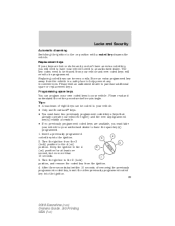
...Econoline (eco) Owners Guide, 3rd Printing USA (fus) Turn the ignition to an authorized dealer. Replacement keys If your keys are available, you must have two previously programmed coded keys (keys that already...• You must take your vehicle to your vehicle towed to the 2 (lock) position, and remove the coded key from the vehicle in the 4 2 (on ) position. Turn the ignition from ...
Owner's Manual - Page 140
...Tire/Wheel Information section for description): Store and maintain at 60 psi (4.15 bar). Remove the cap from the valve on one tire, then firmly press the tire gauge onto.../mini-spare tires (see Dissimilar Spare Tire/Wheel Information section for each tire, including the spare. Replace the valve cap. 5. Visually inspect the tires to reach the recommended air pressure. Tires, Wheels ...
Owner's Manual - Page 141
..., during any procedure involving tire inflation, the technician or individual must be performed by personnel trained, supervised and equipped according to tires or replace tires or wheels without first removing the tire from the wheel assembly for inspection. Do not attempt to add air to Federal Occupational Safety and Health Administration (OSHA...
Owner's Manual - Page 142
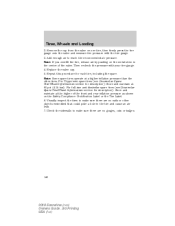
... tire and valve stems for holes, cracks, or cuts that may permit air leakage and repair or replace the tire and replace the valve stem. Inspect the tire sidewalls for uneven or excessive wear and remove objects such as indicated in the illustration.
TIRE CARE Inspecting your safety, tires that are more likely...
Owner's Manual - Page 146
... your tires at over curbs or hit the tire against a curb when parking WARNING: If your vehicle is under-inflated or damaged, deflate it, remove wheel and replace it with your vehicle) will help your vehicle seems to pull to one side when you cannot detect a cause, have the vehicle towed to...
Owner's Manual - Page 190

...control may shut off automatically when you tow When towing a trailer: • To ensure proper break-in transmission cooling. Therefore, if these systems are towing on most towed vehicles. Reactivation of the... ignition from OFF to misuse or customer installation. • Do not attempt removal of the TBC due to ON will awaken the TBC module. • The TBC is...
Owner's Manual - Page 192
Replace the rear axle lubricant ...and Loading
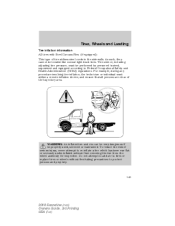
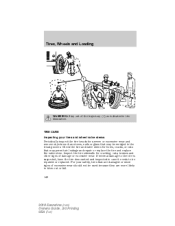
Launching or retrieving a boat Disconnect the wiring to the trailer after the trailer is removed from the water. Exceeding these guidelines if you have a need for recreational (RV) towing. ... as vehicle or transmission damage may allow waves to break higher than 6 in the Roadside Emergencies chapter.
192
2010 Econoline (eco) Owners Guide, 3rd ...
Owner's Manual - Page 233

.... If your vehicle is equipped with an auxiliary battery, disconnecting the primary under-hood battery DOES NOT remove power from all circuits. If the battery has been disconnected and reconnected, refer to the Battery section of electrical shock, always replace the cover to the Power Distribution Box before servicing high current fuses.
Owner's Manual - Page 242
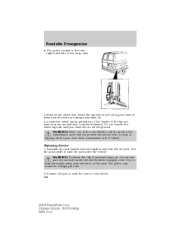
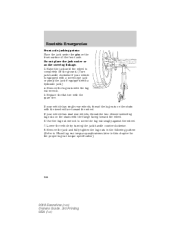
... (eco) Owners Guide, 3rd Printing USA (fus) WARNING: When one -half turn (counterclockwise). Remove any part of your vehicle is located in P (Park). WARNING: To lessen the risk of personal... jack under the vehicle while changing a tire. Replacing the tire 1. Assemble the jack handle sections together and lock into the jack. Do not remove the wheel lug nuts until you raise the tire...
Owner's Manual - Page 244
Replace the flat tire with the lug nut wrench. 5. Use the lug nut wrench to Wheel lug nut torque specifications later in the following pattern (Refer to screw the lug nut snugly against the wheel. 7. Remove...lug nut torque specification):
244
2010 Econoline (eco) Owners Guide, 3rd Printing USA (fus) Remove the lug nuts with the spare tire. If your vehicle has single rear wheels, thread ...
Owner's Manual - Page 246

...piece 140 190 lug nut * Torque specifications are for nut and bolt threads free of the tire. 5. Repeat this tightness check procedure..., 3rd Printing USA (fus) Use only Ford recommended replacement fasteners. On vehicles equipped with dual rear wheels, retighten...any wheel disturbance (tire rotation, changing a flat tire, wheel removal, etc.). Loosen and retighten, if necessary. On all two-...
Owner's Manual - Page 248
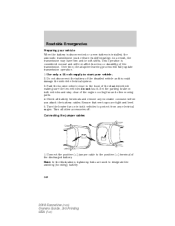
... positive (+) terminal of the disabled vehicle making sure the two vehicles do not touch. Turn all battery terminals and remove any electrical surges. Connecting the jumper cables
1. Note: In the illustrations, lightning bolts are tight and level. 5. Set the parking brake on in both vehicles and stay clear of the engine cooling...
Owner's Manual - Page 251
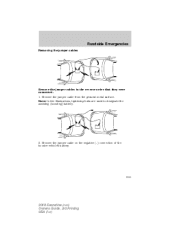
... jumper cable on the negative (-) connection of the booster vehicle's battery.
2010 Econoline (eco) Owners Guide, 3rd Printing USA (fus)
-
-
-
-
+ +
+ +
251 Roadside Emergencies
Removing the jumper cables
Remove the jumper cables in the reverse order that they were connected. 1. Note: In the illustrations, lightning bolts are used to designate the assisting (boosting) battery.
2.
Owner's Manual - Page 266
...-PAINTED) EXTERIOR PARTS Use only approved products to replace wiper blades when they appear worn or do not wipe properly, substances on the wiper blade and windshield from automated car wash facilities. These may cause scratches. • Do not use Motorcraft Bug and Tar Remover (ZC-42). Be sure to clean plastic parts.
Similar Questions

Temp Gauge Quit, How To Replace? Connections Are Good
(Posted by joespeace 10 years ago)

How To Replace The Reservoir System On 96 Ford Bronco
(Posted by pauMisa 10 years ago)


I Have A 89 Bronco 5.0l That Has No Spark Replaced Coiland Distributor
(Posted by fatrat1123 10 years ago)
Can I Remove The Catalitic Converter From My 1989 Bronco Ii
(Posted by eclipse1315 11 years ago)