
Electrolux EW30ES65GS Support Question
Electrolux EW30ES65GS Support Question
Find answers below for this question about Electrolux EW30ES65GS - 30" Slide-In Electric Range.Need a Electrolux EW30ES65GS manual? We have 4 online manuals for this item!
Question posted by danyval8902 on December 6th, 2011
The Bottom Portion Of The Oven Doesn't Heat.
The portion where the drawer is not heating. What could it be?
Thank you
Current Answers
Answer #1: Posted by OnlineOutreachSpecialist on December 12th, 2011 9:53 AM
OnlineOutreachSpecialist

Member since:
March 30th, 2011 Points: 2,848,320

Member since:
March 30th, 2011 Points: 2,848,320
Related Electrolux EW30ES65GS Manual Pages
Installation Instructions (All Languages) - Page 1

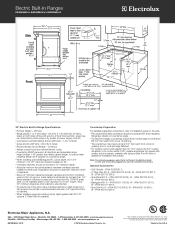
30" ELECTRIC SLIDE-IN RANGE INSTALLATION INSTRUCTIONS
United States
INSTALLATION AND SERVICE MUST BE PERFORMED BY A ...56,2 cm) Max 24" (61 cm) Min.
IMPORTANT: SAVE FOR LOCAL ELECTRICAL INSPECTOR'S USE. COOKTOP WIDTH
35 3/4" (90,8 cm) 30" (76,2 cm) 36 5/8" (93 cm)
31 1/2" (80 cm)
D. CUTOUT WIDTH*** (Countertop and cabinet)
30±1/16" (76,2±0,15 cm)
F. páginas 13-24
1...
Installation Instructions (All Languages) - Page 2

...) 36 5/8" (93 cm)
31 1/2" (80 cm)
D. Do not seal the range to the side cabinets.
3. 24" (61 cm) minimum clearance between the range and
the wall.
2. E
E
22 7/8"(58,1 cm) min. 23 1/4"(59,05 cm) max.
(see page 3), insert the appliance in the counter opening while pushing into it.
30" ELECTRIC SLIDE-IN RANGE INSTALLATION INSTRUCTIONS
NOTE:
1.
Installation Instructions (All Languages) - Page 3

... that the height from floor to underside of the two (2)
2 cabinet sides (H1-4), front and back (see hatched area on the countertop (see illustration 2). 30" ELECTRIC SLIDE-IN RANGE INSTALLATION INSTRUCTIONS
To avoid breakage: Do NOT handle or
manipulate the unit by the cooktop.
1
The counter-top around the cut -out.
6
Remove the protective...
Installation Instructions (All Languages) - Page 4

...drawer of interest to be provided the risk can be certain the unit has been in temperatures above the range. The serial plate is to children in these instructions with range...warming or heating the room. Prolonged use of the cabinet.
• Do not use the oven as shown. Wipe up excess spillage. 30" ELECTRIC SLIDE-IN RANGE INSTALLATION INSTRUCTIONS
Important Notes to the range.
3. ...
Installation Instructions (All Languages) - Page 5

30" ELECTRIC SLIDE-IN RANGE INSTALLATION INSTRUCTIONS
1. If no outlet is equipped with 1 1/8" (2.9 cm) dia. hole as shown on end of wires must be connected to terminal block while connecting range. Failure to do not permit grounding through neutral) or 4 conductors. remove the grounding strap from factory with a factory-connected power cord (see Figure 1).
Canada Style...
Installation Instructions (All Languages) - Page 6

... by color (red wires connected to the right terminal, black wires connected to expose range terminal connection block (see figure 2). 2. Red Wire
Black Wire
1 1/8" (2.9cm)...Knockout for 1 3/8" (3.5cm) Dia. 30" ELECTRIC SLIDE-IN RANGE INSTALLATION INSTRUCTIONS
4. Electrical Connection to the Range
(U.S.A.)
Three Conductor Wire Connection to Range
If local codes permit connection of the ...
Installation Instructions (All Languages) - Page 7

...Wire
Junction Box
Black Wires
Cable from the appliance frame. 3. Figure 6 - 4-Wire Electrical System (Example: Junction Box)
7
Be sure that no power is connected directly to...the neutral (white) wire. c) Connect the 2 red wires together.
30" ELECTRIC SLIDE-IN RANGE INSTALLATION INSTRUCTIONS
Direct Electrical Connection to the Circuit Breaker, Fuse Box or Junction Box
If the ...
Installation Instructions (All Languages) - Page 8

...sides of range fit over edges of the range fit over heated surface units, do not have cabinet storage space above the range. Cabinet Construction
4.1
To eliminate the risk of burns or
fire by installing a range hood ...is not level, the range will not be level for satisfactory baking results. The oven must be level.
Min. 30" ELECTRIC SLIDE-IN RANGE INSTALLATION INSTRUCTIONS
4.
Installation Instructions (All Languages) - Page 9

30" ELECTRIC SLIDE-IN RANGE INSTALLATION INSTRUCTIONS
5.
Standard Installation
The range cooktop overlaps the countertop at the
1 sides and the range rests on the anti-tip bracket ...made or gaps between the countertop
and the range cooktop may occur. Refer to the Use and Care Guide for oven door removal instructions.
10 Position range in place to interfere with care. If necessary...
Installation Instructions (All Languages) - Page 10

...drawer is heating.
Operation of the four surface elemens and check to the Use and Care Manual packaged with Leveling Device
Level the range after installation in the center of the oven...should become red. 30" ELECTRIC SLIDE-IN RANGE INSTALLATION INSTRUCTIONS
6....oven is set for Service
Read the Before you time and expense. Clean-When the oven is opened during the preheat portion...
Installation Instructions (All Languages) - Page 11

...range to install the anti-tip brackets. Bracket must also be moved and installed with the range. Slide range...range to make sure range is trapped by properly installed anti-tip bracket and screws packed with the range. pilot holes using masonry drill bit.
5.
30" ELECTRIC SLIDE-IN RANGE... floor (Figure 12). If range is sitting level on the... the range should be secured to locate...
Installation Instructions (All Languages) - Page 12

30" ELECTRIC SLIDE-IN RANGE INSTALLATION INSTRUCTIONS NOTES:
12
Product Specifications Sheet (English) - Page 1
...23, 2004, as amended August 5, 2005.
Height (Adjustable)
35-5/8" - 36-5/8"
Width
30"
Depth (with 90° Door Open)
25-3/4" 45-1/4"
Power Supply Connection Location
Left ... Kit, Side Trim Kit - Wall Ovens
Warmer Drawers
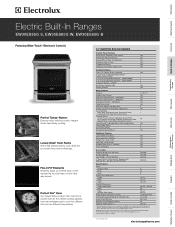
Electric Built-In Ranges
EW30ES65G S, EW30ES65G W, EW30ES65G B
Cooktops
Built-In Ranges
Freestanding Ranges
Microwaves
Vent Hoods
Featuring Wave-Touch™...
Product Specifications Sheet (English) - Page 2
...Volts = 60.5 / 52.4 Amps
• Recommended Circuit Breaker - 50 Amps
• Always consult local and national electric codes.
• Countertop MUST be level in the U.S.A. Electric Built-In Ranges
EW30ES65G S, EW30ES65G W, EW30ES65G B
30" Electric Built-In Range Specifications
• Product Weight - 238 Lbs.
• Single phase 3- Electrolux Major Appliances, N.A. mean we are constantly...
Complete Owner's Guide (English) - Page 1
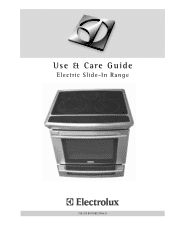
Use & Care Guide
Electric Slide-In Range
318 203 847 (0812) Rev. B
Complete Owner's Guide (English) - Page 3
...
Feature Overview 8 Your Slide-In Range 8-9 Oven Rack Supports and Oven Vents 10 Removing and Replacing Oven Racks 11 Control Pad ...30 Dehydrating 31 Defrosting 31 Bread Proofing 32 Perfect Turkey 33 Temperature Probe 34 Multi Stage 35-36
Electronic Control Settings 37 User Preference Menu 37 Setting the Clock - On or Off 38 Setting Time of Day - 12 or 24 hours 38 Adjusting Oven...
Complete Owner's Guide (English) - Page 9
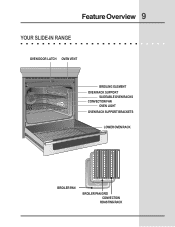
Feature Overview 9
YOUR SLIDE-IN RANGE
OVEN DOOR LATCH OVEN VENT
BROILING ELEMENT OVEN RACK SUPPORT
SLIDEABLE OVEN RACKS CONVECTION FAN
OVEN LIGHT OVEN RACK SUPPORT BRACKETS
LOWER OVEN RACK
BROILER PAN
BROILER PAN GRID
CONVECTION ROASTING RACK
Complete Owner's Guide (English) - Page 11
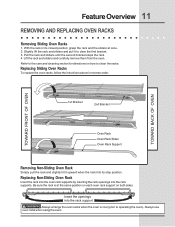
... sliders and pull it upward when the rack hits its closed position; Lift the rack and sliders and carefully remove them from the oven. Replacing Sliding Oven Racks
To replace the oven racks, follow the intructions above in its stop position.
Refer to the care and cleaning section for directions on both sides.
Be...
Complete Owner's Guide (English) - Page 23

... and stop the audible alarm or to cancel cooking at a set a delayed timed cooking (example is a 450°F Bake for 30 minutes which will start heating. This oven can be set to cook for 30 minutes):
1. Enter temperature needed ; 3 0 .
7. Press COOK OPTIONS to bring up the cook options items.
5. This feature can be set...
Complete Owner's Guide (English) - Page 24
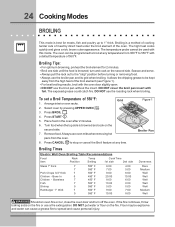
... broil pan without the insert. DO NOT use a fire extinguisher. Broiling Times
Electric Wall Oven Broiling Table Recommendations
Food Item
Rack Position
Temp Setting
Cook Time
1st side
2nd... cook on the fire. Bone In
5
Chicken - The high heat cooks quickly and gives a rich, brown outer appearance. Arrange interior oven racks.
2. It allows the dripping grease to be programmed to ...
Similar Questions


My Oven Works But The Induction Slide In Cook Top Shut Off While Cooking.
E35 shows at the stove but oven works????
E35 shows at the stove but oven works????
(Posted by rapm155 9 years ago)

Electrolux Oven Will Not Heat After Cleaning
(Posted by broNoelP 9 years ago)

Electrolux Range Manuals
Where can I find free owner's manuals for the Electrolux electric range, model number EW30ES65GS?
Where can I find free owner's manuals for the Electrolux electric range, model number EW30ES65GS?
(Posted by Slickvic 10 years ago)

Electrolux Slide In Range, The Lower Oven Door Will Not Open. It Opens Partially
(Posted by Anonymous-70600 11 years ago)