2004 Dodge Stratus Support Question
2004 Dodge Stratus Support Question
Find answers below for this question about 2004 Dodge Stratus.Need a 2004 Dodge Stratus manual? We have 2 online manuals for this item!
Question posted by mooseam on September 24th, 2013
How Do You Install For 2004 Stratus License Plates Wire And Socket
The person who posted this question about this Dodge automobile did not include a detailed explanation. Please use the "Request More Information" button to the right if more details would help you to answer this question.
Current Answers
Related Manual Pages
Owner's Manual - Page 6
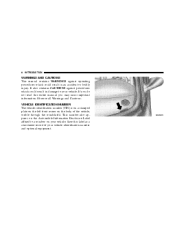
.... This number also appears on the Automobile Information Disclosure Label affixed to your vehicle. VEHICLE IDENTIFICATION NUMBER The vehicle identification number (VIN) is on a stamped plate on the left front corner on your vehicle identification number and optional equipment. It also contains CAUTIONS against operating procedures which could result in damage...
Owner's Manual - Page 27

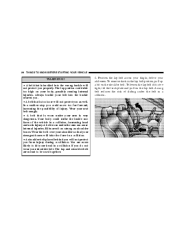
...your injuries in a collision much worse. Lap/Shoulder Belt Operating Instructions 1. Slide the latch plate up the webbing as far as necessary to keep your body and can crash into one another...!
• Wearing a seat belt incorrectly is above the back of your seat. Grasp the latch plate and pull out the belt. Sit back and adjust the front seat. 2. Wearing your body. People...
Owner's Manual - Page 28
... lap belt if it is worn under your head in a collision. Wear your seat belt snugly. • A belt that is too tight, tilt the latch plate and pull on the shoulder belt. A belt worn under the belt in a collision if you properly. Ribs aren't as strong as well. In a sudden stop...
Owner's Manual - Page 29
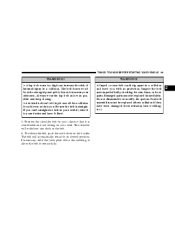
... it snug. • A twisted belt can increase the risk of internal injury in a collision and leave you with no protection. If necessary, slide the latch plate down the webbing to allow the belt to your abdomen. Inspect the belt system periodically, checking for cuts, frays, or loose parts. In a collision it...
Owner's Manual - Page 34
...or death to infants in that require permanent attachments (bolts or screws) for any accessory items installed which will alter the roof, including adding a sunroof to your vehicle is equipped with the...not add roof racks that position. Do not drill into the roof of the vehicle for installation on the vehicle roof. Airbags inflate in moderate to severe frontal collisions. The front airbags ...
Owner's Manual - Page 36
...• Passenger Airbag • Steering Wheel and Column • Instrument Panel • Interconnecting Wiring • Knee Impact Bolsters The window airbag system, on and will not detect rollover or ... Bags Above Side Windows • Left and Right Side Impact Sensors • Interconnection Wiring
How The Airbag System Work • The airbag control module determines if a frontal ...
Owner's Manual - Page 45

... to use a locking clip. WARNING! Follow the manufacturer's directions exactly when installing an infant or child restraint. The cinching latch plate will keep the belt tight, however, any seat belt system will tighten the... and on the shoulder portion of the lap/shoulder belt will loosen with cinching latch plates which are designed to keep the lap portion tight around the outboard side of the ...
Owner's Manual - Page 186

..., Turn Signal, Sidemarker Bulb Replacement ...224
▫ Fog Light Bulb Replacement ...225 ▫ Center Stoplight Bulb Replacement ...226 ▫ Rear Light Bulb Replacement ...226 ▫ License Plate Bulb Replacement ...227 ▫ Headlight Aiming ...227 Fluids And Capacities ...227 Recommended Fluids, Lubricants And Genuine Parts ...228 ▫ Engine ...228 ▫ Chassis ...229
Owner's Manual - Page 225

... the housing.
7
2. Remove the screw securing the light assembly to expose the bulb and socket assembly. 3. Turn the bulb and socket assembly counterclockwise to remove it from the bulb and socket assembly. 5. Install the new bulb and socket assembly, reattach the wiring connector, and reinstall the fog light assembly. MAINTAINING YOUR VEHICLE 225
Fog Light Bulb...
Owner's Manual - Page 226
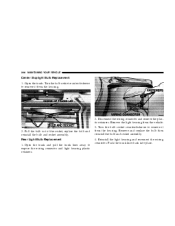
... the trunk liner away to remove it from the vehicle. 2. Turn the bulb socket counterclockwise to expose the wiring connector and light housing plastic retainers. 3. Reinstall the light housing and reconnect the wiring connector. Rear Light Bulb Replacement 1. Disconnect the wiring connector and remove the plastic retainers. Push the trunk liner back into place...
Owner's Manual - Page 227
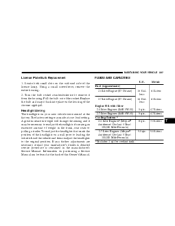
... Liters Turn the bulb socket counterclockwise to the original position...socket. Cooling System * 2.4 Liter Engines* (Mopar 8 qts. Fuel (Approximate) 2.4 Liter Engine (87 Octane) 2.7 Liter Engine (87 Octane) 16 Gallons 16 Gallons 61 Liters 61 Liters Metric
Engine Oil-with filter 2.4 Liter Engines (SAE 5W-30) 5 qts. 2.7 Liter Engines (SAE 5W-30) 5 qts. MAINTAINING YOUR VEHICLE 227
License Plate...
Owner's Manual - Page 267
... System ...Keys ...Knee Bolster ...Lap/Shoulder Belts ...LATCH (Lower Anchors and Tether for CHildren) . Latch Plate ...Leaks, Fluid ...Lights ...Airbag ...14 13 12 19 11 33
...26 ...44 ...27 ...50 ...... Switch ...63 High Beam Indicator ...86 Illuminated Entry ...15 Instrument Cluster ...63 Interior ...61 License ...227 Lights On Reminder ...64 Low Fuel ...90 Map Reading ...62 Oil Pressure ...89 ...
Owner Manual Coupe - Page 8
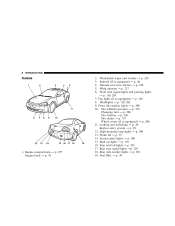
... 9. Tire inflation pressure → p. 332 Changing tires → p. 268 Tire rotation → p. 336 Tire chains → p. 337 Wheel covers (if so equipped) → p. 266 11. License plate lights → p. 300 15. Fog lights (if so equipped) → p. 120 8. Fuel filler → p. 39 8
INTRODUCTION
Outside
2. 3. 4. 5. 6.
1.
Owner Manual Coupe - Page 83

...in the rear seat only, whenever possible, although the front passenger seat belt can also be absolutely certain you insert the latch plate into the buckle. WARNING!
• Before placing an infant or child in a child restraint system, be the converted to ... the rear seating position as shown in a collision, seriously injuring the child or other occupants.
3
G18C0540
2. Installation: 1.
Owner Manual Coupe - Page 120
This feature will stay on - All lights off . Parking, tail, front and rear side marker, license plate and instrument panel lights on . 120
INSTRUMENTS AND CONTROLS
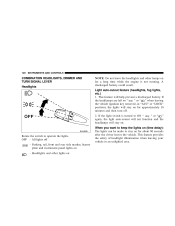
COMBINATION HEADLIGHTS, DIMMER AND TURN SIGNAL LEVER Headlights
NOTE: Do not leave the headlights and other ...
Owner Manual Coupe - Page 173

...conditions. Driving on uneven road surfaces.
5 During stops where ABS is equipped with tire chains installed. • Driving on worn brake pads can result in front of the brake pedal may be...of you need to prevent wheel lock when driving over manholes, steel roadwork plates, road markings, or any uneven road surface. 3. General driving hints (standard/anti-lock brakes) 1. STARTING...
Owner Manual Coupe - Page 262
262
EMERGENCIES
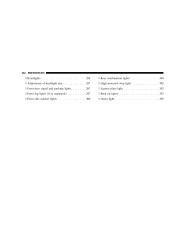
▫ Headlights ...294 ▫ Adjustment of headlight aim...297 ▫ Front turn signal and parking lights...297 ▫ Front fog lights (if so equipped) ...297 ▫ Front side marker lights ...300
▫ Rear combination lights ...300 ▫ High-mounted stop light ...302 ▫ License plate light ...302 ▫ Back up lights ...303 ▫ Dome light ...305
Owner Manual Coupe - Page 288

...-
- Cigarette lighter
- - Always use a fuse of the instrument panel (driver's side). Accessory socket Door lock Rear window wiper -
Symbol Electrical system Engine Control 17 18 19 20 21 22 23 ... 3 4 5 6 7 8 9 10 11 12 13 14 15 16
R/C MIR SOCKET
No. SOCKET
¼ Some fuses may not be installed on your vehicles, depending on the vehicle model or specifications. ¼ The table above ...
Owner Manual Coupe - Page 293
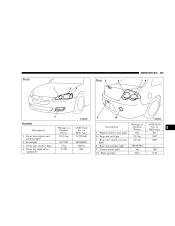
... No. Headlight 3 - High-mounted stop light 6 - EMERGENCIES
293
N10B2820
N10B2830
Outside
Description 1 - or Bulb type 3157NAK 9007(HB5) 194NA 896 Description 5 - Rear side marker light 9 - License plate light 10 - or Bulb type 921 2057 2057 - 168 1156
8 Front turn signal and tail light 8 -
Owner Manual Coupe - Page 302
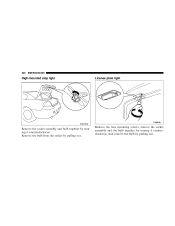
Remove the bulb from the socket by pulling out. And remove the bulb by pulling out. 302
EMERGENCIES
High-mounted stop light
License plate light
N10J0310 N10V0710
Remove the socket assembly and bulb together by turning it counterclockwise. Remove the lens mounting screws, remove the socket assembly and the bulb together by turning it counterclockwise.
Similar Questions

How To Install Spare Tire Tools In A 2004 Stratus
(Posted by zba85sea 10 years ago)

2004 Stratus Shorted Visor Wires Lost Radio Horn What Fuse
(Posted by sumijoh 10 years ago)

2004 Stratus Unlock All Doors When Driver Door Is Opened
(Posted by keradannm 10 years ago)

Where Is The License Plate Light Fuse For 2004 Dodge Stratus
(Posted by acefub 10 years ago)

I Just Replaced The Plugs And Wires On My 2004 Stratus R/t 3.0 Idle Is At 200rpm
The idle when i start it is around 600-650 and when i put it in drive it goes down to about 200rpm a...
The idle when i start it is around 600-650 and when i put it in drive it goes down to about 200rpm a...
(Posted by ajhanus 11 years ago)