Dewalt D55168 Support Question
Dewalt D55168 Support Question
Find answers below for this question about Dewalt D55168.Need a Dewalt D55168 manual? We have 4 online manuals for this item!
Question posted by hipockets247 on June 10th, 2023
Replacing The Power Plug Is Green The Ground Wire Black, White Are Power Lines?
The person who posted this question about this Dewalt product did not include a detailed explanation. Please use the "Request More Information" button to the right if more details would help you to answer this question.
Current Answers
Answer #1: Posted by SonuKumar on June 10th, 2023 11:01 PM
SonuKumar

Member since:
May 9th, 2021 Points: 16,627,790

Member since:
May 9th, 2021 Points: 16,627,790
When replacing the power plug on the DeWalt D55168 air compressor, it's important to follow proper electrical safety procedures and adhere to the standard color coding for wires. Typically, in a power cord, the color coding is as follows:
- Green or Green/Yellow: This wire is the ground wire, which is responsible for providing a safe path for electrical current to ground in case of a fault or electrical surge. It is usually connected to the grounding terminal or screw on the power plug.
- Black: The black wire is typically the live or hot wire, carrying the current from the power source to the device. This wire should be connected to the brass or black terminal on the power plug.
- White: The white wire is usually the neutral wire, completing the circuit and carrying the current back to the power source. It should be connected to the silver or white terminal on the power plug.
To replace the power plug on the DeWalt D55168 air compressor, ensure that you have a compatible plug and follow these general steps:
- Cut off the old plug: Cut the power cord near the old plug, leaving enough length to work with.
- Strip the wires: Strip off approximately 3/4 inch of insulation from each wire using wire strippers, exposing the copper conductors.
- Prepare the new plug: Open the cover of the new plug and loosen the terminals or screws.
- Connect the wires: Connect the wires to the appropriate terminals on the new plug, following the color coding mentioned above. The green wire should go to the grounding terminal, the black wire to the live or hot terminal, and the white wire to the neutral terminal.
- Tighten the terminals: Ensure that all connections are secure by tightening the terminals or screws on the new plug.
- Close the plug: Close the cover of the plug, making sure it is properly secured.
Remember, if you are unsure about performing electrical work or if you have any doubts, it's always best to consult a qualified electrician for assistance.
Please respond to my effort to provide you with the best possible solution by using the "Acceptable Solution" and/or the "Helpful" buttons when the answer has proven to be helpful.
Regards,
Sonu
Your search handyman for all e-support needs!!
Related Dewalt D55168 Manual Pages
Instruction Manual - Page 2

... WIDTH LENGTH AIR TANK CAPACITY (GALLONS) APPROX CUT-IN PRESSURE APPROX. Check Valve G. Air Tank Drain Valve
I A G
D E
F
H CUT-OUT PRESSURE SCFM @ 90 PSI (620.5 kPa)
D55168 88 lbs. (39.92 kg) 41.75" (1060.5mm) 19.0" (482.6 mm) 21.25 (539.8 mm) 15 Gallon (56.8 liters) 160 PSI (1103.2 kPa) 200...
Instruction Manual - Page 3

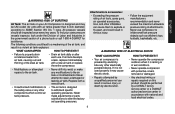
...wear OSHA/MSHA/NIOSH approved, properly fitting face mask or respirator when using air tools, basic safety precautions should always be followed to reduce the risk of of personal ... defects or other reproductive harm.
Wash hands after handling.
WARNING: Some dust created by power sanding, sawing, grinding, drilling, and other construction activities contains chemicals known (to the ...
Instruction Manual - Page 4

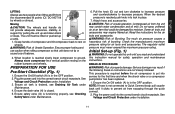
... unit when not in use air produced by this product could cause fire.
• Unattended operation of this compressor for breathing, suitable filters and in-line safety equipment must be required.
• Store flammable materials in a secure location away from compressor.
• Never place objects against or on the label or...
Instruction Manual - Page 5
...powered by a DEWALT factory service center or a DEWALT authorized service center in serious injury.
• Follow the equipment manufacturers recommendation and never exceed the maximum allowable pressure rating of air tools...leak, replace it may be inspected once every two years. Like any other electrically powered device....
• Any electrical wiring or repairs required on your...
Instruction Manual - Page 6

...off and bleed pressure from the air hose and air tank before attempting maintenance, attaching tools or accessories.
WARNING: RISK FROM MOVING PARTS
WHAT CAN HAPPEN
HOW TO PREVENT IT...high speed, resulting in moving parts.
• Air vents may cover moving parts.
See Grounding Instructions under Installation.
• Make certain that the electrical circuit to which are damaged or...
Instruction Manual - Page 8

...air into the air tank. reserve air pressure in the ON position to provide automatic power to the pressure switch and OFF to automatically release compressed air from this valve for this...The drain valve (H) is located at the air outlet.
air will protect against of Quick Connect plugs: Industrial, automotive, and ARO. FEATURES
REGULATOR
English
ON/OFF SWITCH
Place this fan to -connect...
Instruction Manual - Page 9

...
when installing or disconnecting to ON/AUTO position.
Do not modify the plug provided. Plug the power cord into the Quick Connect body (E). Set the On/Auto/Off lever... same configuration as to release Quick Connect plug on Quick Connect body back to whether the compressor is equipped with a cord having a
grounding wire with a grounded outlet
(K). Grasp the hose and pull...
Instruction Manual - Page 10

...with straps to the OFF position before removing the plug from a 20 amp circuit.
Do not place ...to a circuit protected by attaching another length of the power, it from the outlet. Place the air compressor ...feet • 12 gauge (AWG) or larger. (Wire size increases as needed. ber decreases. 10 AWG and ...the air hose by fuses, use an air line filter to allow for proper cooling. Instead of...
Instruction Manual - Page 11
.../motor has been replaced.
1. See
Voltage and Circuit Protection under Installation.
11 Compressed air from escaping through the quick connect.
2. Some air tools and accessories may ...pressure and counterclockwise to ground. When the desired pressure is functioning properly, see Draining Air Tank under Maintenance.
6. DO NOT lift
by moisture. Plug the power cord into the correct...
Instruction Manual - Page 12

... service center or a DEWALT authorized service center.
12 Some air operated tools or devices may contain water condensation and oil mist. See Regulator under ... turned off . WARNING: Risk of air tank rupture. 5. Remove air compressor plug from the unit may require filtered air. NOTE: All compressed air systems contain maintenance...replaced. OPERATING PROCEDURES
Start-up in air tank.
Instruction Manual - Page 13

...systems generate condensate that the safety valve operates freely. Move compressor into face. Grasp black lever on the safety valve to gradually bleed air from outlet of unsafe operation....kPa), rotate valve to
servicing.
1. Ensure ON/OFF switch (A) is loud when draining. Purchase replacement parts
from filter base. ..
5. Use safety glasses when draining as air flow noise is in...
Instruction Manual - Page 14

.... This warranty does not apply to faulty materials or workmanship.
FREE WARNING LABEL REPLACEMENT: If your warning labels become illegible or are missing, call 1-800-4-DEWALT. ACCESSORIES
Recommended accessories for one year from your tool, please contact DEWALT Industrial Tool Co., 701 East Joppa Road, Baltimore, MD 21286, call the local company or...
Instruction Manual - Page 17

...pressure switch.
Contact a DEWALT factory service center or a DEWALT authorized service center. Replace air hose. Replace. If valve still leaks, it will start automatically when tank pressure drops below ... for accessory
10
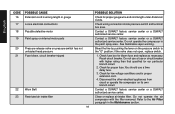
Hole in pressure
17
POSSIBLE SOLUTION
Air tank must be replaced. Remove, clean or replace.
Check the accessory air requirement. Do not repair the leak. WARNING: ...
Instruction Manual - Page 18
...a DEWALT authorized service center. Bleed the line by pushing the lever on its own branch circuit. if the valve does not open, replace switch.
1. Clean or replace air intake filter. Check fuse box for...removed. Do not operate the compressor in the Maintenance section. Check for proper gauge wire and cord length under Extension Cords. English
CODE POSSIBLE CAUSE
16
Extension cord is wrong...
Instruction Manual - Page 56
... surface of pyramids on the handgrip; the kit box configuration; DEWALT Industrial Tool Co., 701 Joppa Road, Baltimore, MD 21286 (AUG06) Form No. the array of the tool. the "D" shaped air intake grill; A18764 D55168 Copyright © 2006 DEWALT
The following are trademarks for one or more DEWALT power tools: the yellow and black color scheme;
Parts Diagram - Page 2

... 17 18 19 20 21 22 23 24 25 26 27
Part Number
Parts List for current parts information. Please visit www.dewaltservicenet.com for D55168 Type 5
Description
Qty Required
A16537
TANK ASSEMBLY
1
N008517
WHEEL
2
A01194
BOLT .375-16X2.38 UN
2
SSF-8111-ZN
NUT .375-16 HEX WHIZ
2
SST-5314...
Parts Diagram - Page 3

....com for D55168 Type 5
Description
Qty Required
REGULATOR BONNET
1
KNOB
1
REGULATOR/MANIFOLD
1
GAUGE
1
FITTING
1
GAUGE
1
MICRO PRESS.
SWITCH
1
SAFETY VALVE
1
BRACKET
1
COVER
1
SHROUD REAR
1
FILTER ASSY.
1
FILTER REPLACEMENT
1
DRAIN VALVE
1
GRILL
1
SCREW
1
HOSE
1
HOSE
1
CLAMP
2
LABEL
1
WARNING LABEL
1
LABEL
1
LABEL
1
LABEL POWER CORD TRI...
Parts Diagram - Page 4

....com for D55168 Type 5
Description
Qty Required
PLUG PIPE
2
...BODY QC .250 IND .25
1
BRUSH
2
BRUSH SPRING
2
BELT
1
FAN
1
SCREW
1
MOTOR PULLEY
1
FLYWHEEL
1
CONN ROD/PISTON ASSY
1
SCREW
1
IDLER PULLEY ASSY
1
SCREW
1
CYLINDER SLEEVE
1
VALVE PLATE ASSY
1
HEAD
1
SCREW .250-20X1.25 H
4
ORING P/L HEAD
1
O-RING
1
TENSION SCALE
1
KIT COMP RING REPLAC...
Similar Questions


What Is The Break In Procedure For A Model D55168 Dewalt Air Compressor???
(Posted by chuckspencer3461 2 years ago)

Wiring
I need a wiring diagram for the on off switch it wires to the regulator and motor and power cord
I need a wiring diagram for the on off switch it wires to the regulator and motor and power cord
(Posted by endlesslove4youstclair 3 years ago)

I Need To Replace Power Cord What Are The Bolts Holding The Case Tovether?...
torx or allen?what size?
torx or allen?what size?
(Posted by onemoorecar3322 6 years ago)

Replacing Power Cord.
I am trying to put a power cord on my Dewalt D55146 and not sure how. Can anyone please help.
I am trying to put a power cord on my Dewalt D55146 and not sure how. Can anyone please help.
(Posted by anthonysaboe 9 years ago)