Dell XPS 8500 Support Question
Dell XPS 8500 Support Question
Find answers below for this question about Dell XPS 8500.Need a Dell XPS 8500 manual? We have 2 online manuals for this item!
Question posted by taSewt on August 2nd, 2014
What Are The Versions Of The Pcie Slots On The Dell Xps 8500
The person who posted this question about this Dell product did not include a detailed explanation. Please use the "Request More Information" button to the right if more details would help you to answer this question.
Current Answers
Answer #1: Posted by DellJesse1 on August 5th, 2014 6:13 AM
DellJesse1

Member since:
April 19th, 2012 Points: 1,551,500

Member since:
April 19th, 2012 Points: 1,551,500
taSewt,
Below is the information that you are requesting.
One PCIe x16
Three PCIe x1
One Mini-PCIe Slot
Intel® Graphics Media Accelerator HD
PCI Express® x16 (Optional)
Thank You,
Dell-Jesse1
Dell Social Media and Communities
email:[email protected]
Dell Community Forum.
www.en.community.dell.com
Dell Twitter Support
@dellcares
Dell Facebook Support
www.facebook.com/dell
#iwork4dell
Related Dell XPS 8500 Manual Pages
Owner's Manual (PDF) - Page 2
... license. CAUTION: A CAUTION indicates either trademarks or registered trademarks of these materials in any proprietary interest in this text: Dell™, the DELL logo, and XPS™ are either potential damage to hardware or loss of your product. Information in this document is used in trademarks and trade names other countries. ...
Owner's Manual (PDF) - Page 13
...: To avoid damaging the computer, ensure that shipped with your personal safety.
After you are using a different operating system, see the Regulatory Compliance Homepage at dell.com/regulatory_compliance.
CAUTION: To avoid damaging the components and cards, handle them by their electrical outlets.
4 Disconnect all telephone cables, network cables, and attached devices...
Owner's Manual (PDF) - Page 14
... program available at the back of the components inside your computer, ground yourself by touching an unpainted metal surface, such as the metal at support.dell.com
14
Before you Begin
Owner's Manual (PDF) - Page 17
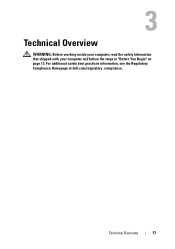
3
Technical Overview
WARNING: Before working inside your computer, read the safety information that shipped with your computer and follow the steps in "Before You Begin" on page 13. For additional safety best practices information, see the Regulatory Compliance Homepage at dell.com/regulatory_compliance. Technical Overview
17
Owner's Manual (PDF) - Page 19
... 4 USB 3.0 ports (2) 6 power button 8 headphone port 10 USB 2.0 port
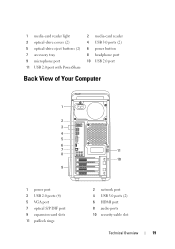
Back View of Your Computer
1
2 3 4 5 6 7 8
9
1 power port 3 USB 2.0 ports (4) 5 VGA port 7 optical S/P DIF port 9 expansion-card slots 11 padlock rings
11 10
2 network port 4 USB 3.0 ports (2) 6 HDMI port 8 audio ports 10 security-cable...
Owner's Manual (PDF) - Page 23
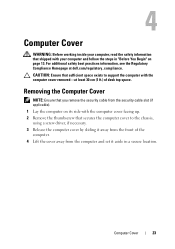
...Removing the Computer Cover
NOTE: Ensure that you remove the security cable from the security cable slot (if applicable). 1 Lay the computer on its side with the computer cover facing up...thumbscrew that secures the computer cover to support the computer with the computer cover removed-at dell.com/regulatory_compliance. 4
Computer Cover
WARNING: Before working inside your computer, read the safety...
Owner's Manual (PDF) - Page 25
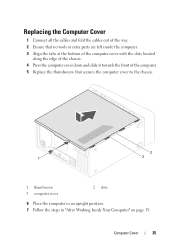
... left inside the computer. 3 Align the tabs at the bottom of the computer cover with the slots located
along the edge of the chassis. 4 Press the computer cover down and slide it towards ...that secures the computer cover to the chassis.
3
1
2
1 thumbscrew 3 computer cover
2 slots
6 Place the computer in an upright position. 7 Follow the steps in "After Working Inside Your Computer" on page ...
Owner's Manual (PDF) - Page 27
.... Prerequisites
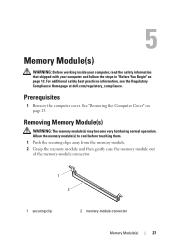
1 Remove the computer cover. See "Removing the Computer Cover" on page 13.
For additional safety best practices information, see the Regulatory Compliance Homepage at dell.com/regulatory_compliance. 5
Memory Module(s)
WARNING: Before working inside your computer, read the safety information that shipped with your computer and follow the steps in "Before...
Owner's Manual (PDF) - Page 28
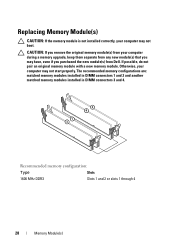
...you remove the original memory module(s) from your computer during a memory upgrade, keep them separate from Dell. The recommended memory configurations are: matched memory modules installed in DIMM connectors 1 and 2 and ... memory module with a new memory module. Recommended memory configuration:
Type
Slots
1600 MHz DDR3
Slots 1 and 2 or slots 1 through 4
28
Memory Module(s)
Owner's Manual (PDF) - Page 31
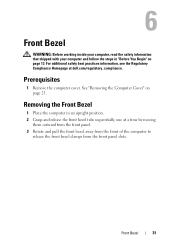
...with your computer and follow the steps in an upright position. 2 Grasp and release the front bezel tabs sequentially, one at dell.com/regulatory_compliance.
Prerequisites
1 Remove the computer cover. For additional safety best practices information, see the Regulatory Compliance Homepage at a ...away from the front of the computer to
release the front bezel clamps from the front panel slots.
Owner's Manual (PDF) - Page 33

Replacing the Front Bezel
1 Align and insert the front bezel clamps into the front panel slots. 2 Rotate the front bezel towards the computer until the front bezel tabs
snap into place.
1 front bezel 3 front panel slots (3) 5 front panel
1
2 3
4 5 2 front bezel tabs (4) 4 front bezel clamps (3)
Front Bezel
33
Owner's Manual (PDF) - Page 35
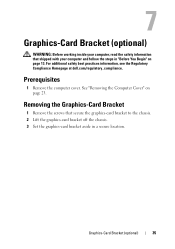
.... 3 Set the graphics-card bracket aside in "Before You Begin" on page 23. For additional safety best practices information, see the Regulatory Compliance Homepage at dell.com/regulatory_compliance.
Prerequisites
1 Remove the computer cover. Graphics-Card Bracket (optional)
35 7
Graphics-Card Bracket (optional)
WARNING: Before working inside your computer and follow the...
Owner's Manual (PDF) - Page 37
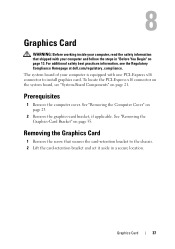
... in a secure location. Prerequisites
1 Remove the computer cover.
To locate the PCI-Express x16 connector on the system board, see the Regulatory Compliance Homepage at dell.com/regulatory_compliance. See "Removing the Graphics-Card Bracket" on page 23.
2 Remove the graphics-card bracket, if applicable. Graphics Card
37 8
Graphics Card
WARNING: Before...
Owner's Manual (PDF) - Page 39
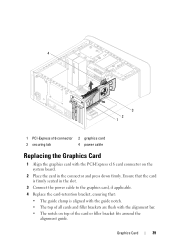
... top of all cards and filler brackets are flush with the alignment bar. • The notch on the system board.
2 Place the card in the slot.
3 Connect the power cable to the graphics card, if applicable.
4 Replace the card-retention bracket, ensuring that the card is aligned with the guide notch...
Owner's Manual (PDF) - Page 43
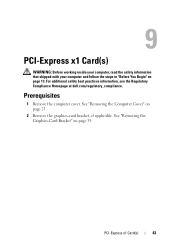
PCI-Express x1 Card(s)
43 For additional safety best practices information, see the Regulatory Compliance Homepage at dell.com/regulatory_compliance. 9
PCI-Express x1 Card(s)
WARNING: Before working inside your computer, read the safety information that shipped with your computer and follow the steps ...
Owner's Manual (PDF) - Page 45

3 Locate the PCI-Express x1 card on page 21.
4 Disconnect any cables connected to the card, if applicable.
5 Grasp the card by its top corners, and ease it out of its connector.
1 PCI-Express x1 card slot
2 1
2 PCI-Express x1 card
PCI-Express x1 Card(s)
45 See "System-Board Components" on the system board.
Owner's Manual (PDF) - Page 46

Ensure that the PCI-Express x1 card is fully seated in the slot on top of all cards and filler brackets are flush with the alignment bar. ...board and press down firmly. Replacing the PCI-Express x1 Card(s)
1 Place the PCI-Express x1 card in the slot.
2 1
1 PCI-Express x1 card slot
2 PCI-Express x1 card
2 Replace the card-retention bracket, ensuring that:
• The guide clamp is aligned...
Owner's Manual (PDF) - Page 49
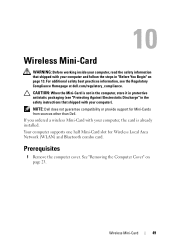
..." on page 13. Wireless Mini-Card
49
CAUTION: When the Mini-Card is already installed. NOTE: Dell does not guarantee compatibility or provide support for Wireless Local Area Network (WLAN) and Bluetooth combo card. ... (see the Regulatory Compliance Homepage at dell.com/regulatory_compliance.
Your computer supports one half Mini-Card slot for Mini-Cards from sources other than...
Owner's Manual (PDF) - Page 57
... Components" on the system board. For additional safety best practices information, see the Regulatory Compliance Homepage at dell.com/regulatory_compliance.
mSATA Drive
57
Prerequisites
1 Remove the computer cover. Removing the mSATA Drive
1 Locate the mSATA slot (MSATA1) on page 21.
2 Remove the screws that shipped with your computer and follow the steps...
Owner's Manual (PDF) - Page 77
...1 Remove the computer cover. For additional safety best practices information, see the Regulatory Compliance Homepage at dell.com/regulatory_compliance. Top Cover
77 16
Top Cover
WARNING: Before working inside your computer, read the... the top cover towards the front of the computer to release the top-cover tabs from the slots on the top panel.
2 Pull the top cover away from the top panel. 3 Set ...
Similar Questions


Xps 8500 Cd Drive
How do you open the cd drive on a XPS 8500 computer?
How do you open the cd drive on a XPS 8500 computer?
(Posted by pplus10 11 years ago)