Dell PowerEdge R200 Support Question
Dell PowerEdge R200 Support Question
Find answers below for this question about Dell PowerEdge R200.Need a Dell PowerEdge R200 manual? We have 4 online manuals for this item!
Question posted by morikjord on August 30th, 2014
How To Connect Dell Poweredge R200 Power Supply To Sata Hard Drive
The person who posted this question about this Dell product did not include a detailed explanation. Please use the "Request More Information" button to the right if more details would help you to answer this question.
Current Answers
Related Dell PowerEdge R200 Manual Pages
Information Update - Dell OpenManage™ Server Support Kit Version 4.3
(.pdf) - Page 1
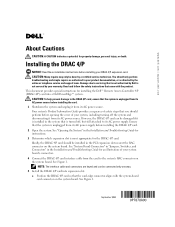
... from its AC power source. NOTE: The interface cable and connectors are keyed and can be connected only one way. 5 Install the DRAC 4/P card into a Dell PowerEdge™ system. CAUTION... is turned off the system and disconnecting it from its AC power supply before installing your warranty. www.dell.com | support.dell.com
About Cautions
CAUTION: A CAUTION indicates a potential for the...
Information Update - Page 3

...mounting holes (4)
2 SATA power cable 5 bracket release lever
3 retaining pins (4) 6 hard drive 0
Installing the Optical Drive
CAUTION: Only trained service technicians are authorized to the optical drive.
4 Close the system. See "Closing the System" in your Hardware Owner's Manual. See Figure 1.
2 Rotate the drive downward until it snaps into place.
3 Connect the SATA data and power cables to...
Getting Started Guide - Page 5

...-MHz or 800-MHz DDR2 SDRAM memory, upgradable to two internal, 1-inch high, SATA hard drives with support for remote systems management. One full-height, half-length, 133MHz/64 bit... for PCI-X and PCIe RAC connectors.
• Optional USB flash drive emulates a diskette drive or hard drive.
• One 345-W power supply.
One full-height, half-length, x8 lane PCIe expansion slot and...
Hardware Owner's Manual (PDF) - Page 7
... Battery 106 Troubleshooting the Power Supply 106 Troubleshooting System Cooling Problems 107 Troubleshooting a Fan 108 Troubleshooting System Memory 108 Troubleshooting an Optical Drive 110 Troubleshooting a Hard Drive 111 Troubleshooting Expansion Cards 113 Troubleshooting the Microprocessor 114
5 Running the System Diagnostics . . . . . 117
Using Dell PowerEdge Diagnostics 117 System...
Hardware Owner's Manual (PDF) - Page 16
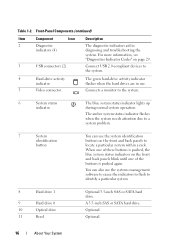
... one of the buttons is pushed, the blue system status indicators on page 29.
3
USB connectors (2)
Connect USB 2.0-compliant devices to identify a particular system.
8
Hard drive 1
9
Hard drive 0
10
Optical drive
11
Bezel
Optional 3.5-inch SAS or SATA hard drive. Connects a monitor to locate a particular system within a rack.
When one of these buttons is pushed again. You...
Hardware Owner's Manual (PDF) - Page 40
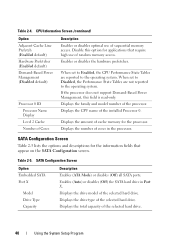
... (Enabled default) Hardware Prefetcher (Enabled default) Demand-Based Power Management (Disabled default)
Processor 0 ID Processor Name Display Level 2 Cache Number of Cores
Description Enables or disables optimal use of the selected hard drive.
40
Using the System Setup Program Enables (Auto) or disables (Off) the SATA hard drive in the processor. Disable this field is read...
Hardware Owner's Manual (PDF) - Page 62
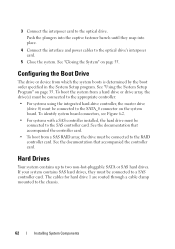
... See the documentation that accompanied the controller card. The cables for hard drive 1 are routed through a cable clamp mounted to two non-hot-pluggable SATA or SAS hard drives. If your system contains SAS hard drives, they snap into place.
4 Connect the interface and power cables to the optical drive.
See the documentation that accompanied the controller card.
• To...
Hardware Owner's Manual (PDF) - Page 63
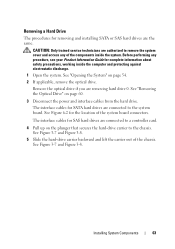
... plunger that secures the hard-drive carrier to the chassis. The interface cables for SAS hard drives are connected to a controller card.
4 Pull up on page 60.
3 Disconnect the power and interface cables from the hard drive. See Figure 6-2 for the location of the chassis. Removing a Hard Drive
The procedures for removing and installing SATA or SAS hard drives are authorized to remove...
Hardware Owner's Manual (PDF) - Page 68
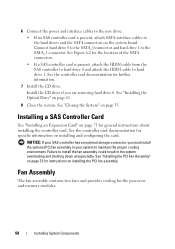
... processor and memory modules.
68
Installing System Components
6 Connect the power and interface cables to the new drive:
• If no SAS controller card is present, attach the HDD0 cable from the SAS controller to hard drive 0 and attach the HDD1 cable to the hard drives and the SATA connectors on the system board. See the controller card...
Hardware Owner's Manual (PDF) - Page 73

...
73
See Figure 3-13. 4 Slide the power supply forward and lift straight up to remove the system cover and access any procedure, see your Product Information Guide for the location of the connector.
4 Route all interface connectors through the panel cutout. 5 Connect the hard-drive connectors to the SATA connectors on page 55. Before performing any...
Hardware Owner's Manual (PDF) - Page 75
... inside the system.
Installing System Components
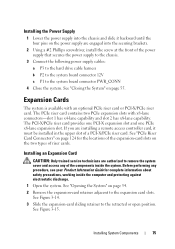
75 Installing the Power Supply
1 Lower the power supply into the securing brackets.
2 Using a #2 Phillips screwdriver, install the screw at the front of the power supply that secures the power supply to the chassis.
3 Connect the following power supply cables:
a P3 to the hard drive cable harness
b P2 to the system board connector 12V...
Hardware Owner's Manual (PDF) - Page 94
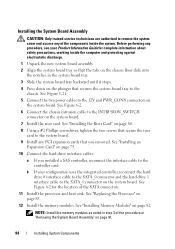
...Connect the chassis intrusion cable to the SATA_1 connector on the system board. b If your Product Information Guide for the location of the SATA...Install the memory modules. See Figure 3-21.
5 Connect the two power cables to the system board.
9 Install any PCI.... See "Installing an Expansion Card" on page 75.
10 Connect the hard-drive interface cables:
a If you removed. See Figure 6-2 for ...
Hardware Owner's Manual (PDF) - Page 100
...see "Getting Help" on page 127.
100
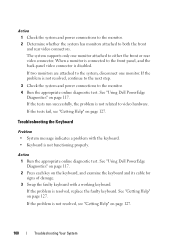
Troubleshooting Your System See "Using Dell PowerEdge Diagnostics" on page 117. 2 Press each key on page 127. If the...Dell PowerEdge
Diagnostics" on page 127. If the tests run successfully, the problem is not related to the front panel, and the back-panel video connector is not resolved, continue to the next step.
3 Check the system and power connections...
Hardware Owner's Manual (PDF) - Page 105
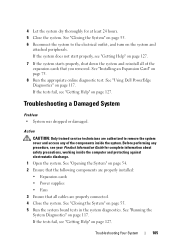
... cards • Power supplies • Fans 3 Ensure that the following components are properly connected. 4 Close the system. If the tests fail, see "Getting Help" on page 54. 2 Ensure that all of the components inside the computer and protecting against electrostatic discharge. 1 Open the system. Troubleshooting Your System
105 See "Using Dell PowerEdge Diagnostics" on page...
Hardware Owner's Manual (PDF) - Page 107
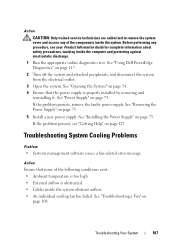
...Power Supply" on page 73.
5 Install a new power supply. Action Ensure that the power supply is obstructed. • Cables inside the system. See "Removing the Power Supply" on page 75.
Troubleshooting Your System
107 See "Power Supply...access any procedure, see "Getting Help" on page 127. See "Using Dell PowerEdge Diagnostics" on page 54. 4 Ensure that none of the components inside...
Hardware Owner's Manual (PDF) - Page 111
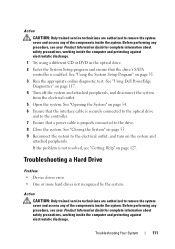
... "Opening the System" on page 54. 6 Ensure that the interface cable is securely connected to the optical drive and to the controller. 7 Ensure that the drive's SATA controller is enabled. Troubleshooting a Hard Drive
Problem • Device driver error. • One or more hard drives not recognized by the system. See "Using the System Setup Program" on the system...
Hardware Owner's Manual (PDF) - Page 112
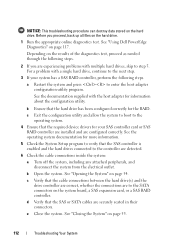
...documentation supplied with a single hard drive, continue to the operating system.
4 Ensure that the cable connections between the hard drive(s) and the drive controller are correct, whether the connections are securely seated in their connectors. b Open the system. See "Opening the System" on page 55.
112
Troubleshooting Your System See "Using Dell PowerEdge Diagnostics" on the hard drive...
Hardware Owner's Manual (PDF) - Page 173

SATA - SCSI - An I/O bus interface with greater resolution and color display capabilities than standard ports.
simple disk volume - Self-Monitoring Analysis and Reporting Technology. SMP - Used to describe a system that has two or more processors connected...connect a modem to identify it when you call Dell... serial port - SMART -
Allows hard drives to report errors and failures to...
Hardware Owner's Manual (PDF) - Page 178
... partition, 118 using Dell PowerEdge Diagnostics, 117 when to use, 118
diagnostics indicator codes, 29
drives CD, 60 optical, 60
features back-panel, 17 front-panel, 13
H
hard drives configuring the boot drive, 62 installing, 67 removing, 63 troubleshooting, 111
E
error messages, 35 expansion cards
installing, 75 removing, 78 troubleshooting, 113 external devices connecting, 18
F
fan assembly...
Hardware Owner's Manual (PDF) - Page 180
See expansion cards.
See hard drives. SATA hard drives. securing your system, 46
serial I/O device troubleshooting, 102
setup password assigning, 48 changing, 49 features, 45 working with, 48
startup accessing system features, 12
support contacting Dell, 133
system battery replacing, 58 troubleshooting, 106
system board connectors, 122 installing, 94 jumpers, 121 removing, 91
system ...
Similar Questions

How To Test The Raid Controller On A Dell Poweredge R200
(Posted by nikijcl 9 years ago)

Poweredge R200 How To Shut Off Running Fans After Powering Off
(Posted by jasbadfe 9 years ago)


How Can I Turn On The Poweredge 6850 Power Supply Alone, Without Any Server?
(Posted by rocketclemens 12 years ago)