Dell PowerEdge 4600 Support Question
Dell PowerEdge 4600 Support Question
Find answers below for this question about Dell PowerEdge 4600.Need a Dell PowerEdge 4600 manual? We have 11 online manuals for this item!
Question posted by CGoodwin on July 16th, 2012
Led Error Codes Power Edge 4600
I have some errors showing up on the LED screen and I don't know how to diagnose the problem(s). Please help.
E8212 - RAC VOLT BATT
E0212 - VOLT BATT
Current Answers
Answer #1: Posted by GeoffatDell on July 16th, 2012 6:47 AM
GeoffatDell

Member since:
June 25th, 2012 Points: 24,740

Member since:
June 25th, 2012 Points: 24,740
1. Replace the CMOS battery on the system board. Its a CR2032 found at most any store.
2.Remote access card is out of acceptable voltage range; faulty or improperly installed power supply or remote access card. Suggested course of action:
Ensure that power supplies are properly installed. If the problem persists, ensure that the remote access card is properly installed. If the problem persists, replace the remote access card.
Related Dell PowerEdge 4600 Manual Pages
Microprocessor
Upgrade Installation Guide - Page 2
... this document is subject to change without the written permission of your computer. Notes, Notices, and Cautions
NOTE: A NOTE indicates important information that helps you how to avoid the problem. NOTICE: A NOTICE indicates either the entities claiming the marks and names or their products. Trademarks used in this text: Dell and the...
Microprocessor
Upgrade Installation Guide - Page 3

...). NOTICE: Before you can add secondary microprocessors or replace microprocessors in your System Information document.
1 Turn off the system, including any peripherals, and disconnect the power cable from the electrical outlet.
2 Open the system doors, or remove the system cover (see your system. The following items are contained in a pin-grid...
Microprocessor
Upgrade Installation Guide - Page 4
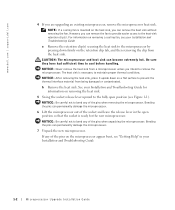
a Remove the retention clip(s) securing the heat sink to the microprocessor by pressing down on the microprocessor appear bent, see "Getting Help" in the open position (see your Installation and Troubleshooting Guide for the new microprocessor.
Bending the pins can permanently damage the microprocessor.
6 Lift the microprocessor ...
Microprocessor
Upgrade Installation Guide - Page 6
... fan is provided with your Installation and Troubleshooting Guide.
11 Hook the end of the clip without the release tab over the tab on the edge of the socket.
12 Press down on the release tab until the hole on the microprocessor.
www.dell.com | support.dell.com
9 Install the heat...
Microprocessor
Upgrade Installation Guide - Page 7
... processor and automatically changes the system configuration information in the system's nonvolatile random-access memory (NVRAM). For instructions about running the diagnostics and troubleshooting any problems that the microprocessor categories match the new system configuration.
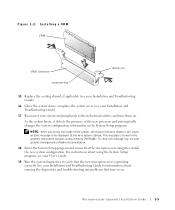
Installing a VRM VRM
VRM connector connector key
latches (2)
15 Replace the cooling shroud, if applicable...
Information
Update — 1-GB 512-Mb Memory Modules - Page 1
... are mixed within memory module banks in systems with identical memory modules (1 GB 256 Mb or 1 GB 512 Mb). To correct this error, ensure that have a no POST/no video error condition. Information Update - 1-GB 512-Mb Memory Modules
CAUTION: See your Installation and Troubleshooting Guide for complete information about safety precautions...
Rack
Installation Guide - Page 123
c
3
3
3
d
3
6-32 ×
e
12mm (0.5
)
f
6
a
(
and Troubleshooting Guide
)
b
supplies installed in the system ( Installation and Troubleshooting Guide
c
CTRL_PNL
d
LED
e
LED
f
10 Torx
g
h
i
6-32 × ¼
Installation (Remove all power )
4
T-
12 T-10 Torx
2
4-17
Rack
Installation Guide - Page 124
1
a
6i
b
(
)
2 6-32 × ¼
17 T-10 Torx ( 4-9 )
LED
c
LED
LED
d
CTRL_PNL
e
Guide
)
f
Guide
)
LED
( Installation and Troubleshooting
( Installation and Troubleshooting
4-18
Rack-to-Tower
Conversion Guide - Page 2
... claiming the marks and names or their products. All rights reserved. A00
Notes, Notices, and Cautions
NOTE: A NOTE indicates important information that helps you how to avoid the problem. Trademarks used in this text: Dell, the DELL logo, RapidRails, and VersaRails are trademarks of your computer.
Information in trademarks and trade names...
Rack-to-Tower
Conversion Guide - Page 4
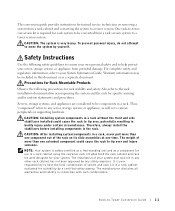
...for Rack-Mountable Products
Observe the following safety guidelines to ensure your own personal safety and to help protect your system. NOTE: Your system is required for each system to a tower version ... the customer rack kit when both the rack cabinet and rack kit were designed for your server, storage system, or appliance from a rack version system to be converted from potential damage....
Rack-to-Tower
Conversion Guide - Page 5
... rack.
• Use caution when pressing the component rail release latches and sliding a component into the rack.
• Do not overload the power supply branch circuit that provides power to the rack. If you install the kit in a rack. Install front and side stabilizers on a single rack or front stabilizers for joined...
Rack-to-Tower
Conversion Guide - Page 8
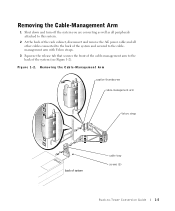
... system you are converting as well as all peripherals attached to this system.
2 At the back of the rack cabinet, disconnect and remove the AC power cable and all other cables connected to the back of the system and secured to the cablemanagement arm with Velcro straps.
3 Squeeze the release tab...
Rack-to-Tower
Conversion Guide - Page 9
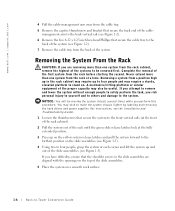
... lifting platform or similar equipment of the proper capacity may wish to make the system chassis lighter by labeling and removing the hard drives and power supplies (for instructions, see the Installation and Troubleshooting Guide).
1 Loosen the thumbscrews that secure the system to the front vertical rails (at the front of...
Rack-to-Tower
Conversion Guide - Page 12
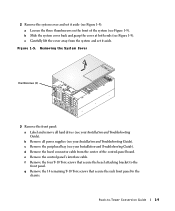
2 Remove the system cover and set it aside (see Figure 1-5). Figure 1-5. Removing the System Cover
thumbscrews (3)
3 Remove the front panel:
a Label and remove all power supplies (see Figure 1-5). f Remove the four T-10 Torx screws that secure the rack front panel to the
chassis. Rack-to the
front panel.
e Remove the ...
Rack-to-Tower
Conversion Guide - Page 15
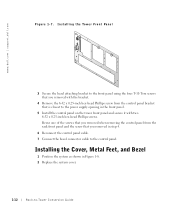
... front panel using the four T-10 Torx screws that you removed in step 4.
6 Reconnect the control panel cable. 7 Connect the bezel connector cable to the power supply opening in Figure 1-8. 2 Replace the system cover.
1-12
Rack-to-Tower Conversion Guide Installing the Cover, Metal Feet, and Bezel
1 Position the system as...
Rack-to-Tower
Conversion Guide - Page 16
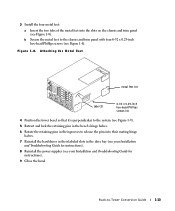
...-to the chassis and trim panel with four 6-32 x 0.25-inch hex-head Phillips screws (see your Installation and Troubleshooting Guide for instructions).
8 Reinstall the power supplies (see Figure 1-8). 3 Install the four metal feet:
a Insert the two tabs of the metal feet into their mating hinge halves.
7 Reinstall the hard drives...
1 x 2
Backplane Installation Guide - Page 43
For You and Your Computer
Safety
:
BIOS
ESM (Embedded Server Management)
Dell | Support Web 1
support.jp.dell.com
:
2 1x2 3
4
( Installation and Troubleshooting Guide )
( Installation and Troubleshooting Guide )
1 x 2
5-1 1 x 2
2
1
SCSI
1 x 2
• • 6-32 x 0.25 • 1x2
(Inter-...
Removing the Back Fan Assembly - Page 2
www.dell.com | support.dell.com
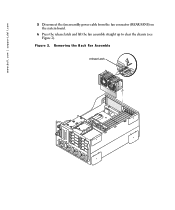
5 Disconnect the fan assembly power cable from the fan connector (REAR FANS) on the system board.
6 Press the release latch and lift the fan assembly straight up to clear the chassis (see Figure 2). Figure 2. Removing the Back Fan Assembly
release latch
Removing the Back Fan Assembly - Page 3
... the cooling shroud is strictly forbidden. Reproduction in any proprietary interest in the U.S.A.
a Lower the cooling shroud into position (see Figure 2).
2 Connect the fan assembly power cable to the system.
Similar Questions

Where I Can Get Power Consumption Details Of My Dell Power Edge R620 Server
Product detailsDell Power Edge R620 Server 4 Years oldHow much power my server consumption at high u...
Product detailsDell Power Edge R620 Server 4 Years oldHow much power my server consumption at high u...
(Posted by unnam 3 years ago)

How To Replace Power Switch On Dell Poweredge 4600 Server
(Posted by lweltable20 9 years ago)

I Have Some Errors Showing Up On The Led Screen And I Don't Know How To
diagnose the problem(s). Please help. E8212 - RAC VOLT BATT E0212 - VOLT BATT ----------------------...
diagnose the problem(s). Please help. E8212 - RAC VOLT BATT E0212 - VOLT BATT ----------------------...
(Posted by CGoodwin 11 years ago)

What Is The Voltage On The Power Edge T105? T100 & Poweredge 2900?
(Posted by Romeoland 12 years ago)

Poweredge 4600 Is Frequently Rebooting Without Warning.
No warning. Orange light on server is blinking. Replace battery light on UPS is lit.
No warning. Orange light on server is blinking. Replace battery light on UPS is lit.
(Posted by Anonymous-30352 12 years ago)