Dell M6700 Support Question
Dell M6700 Support Question
Find answers below for this question about Dell M6700.Need a Dell M6700 manual? We have 3 online manuals for this item!
Question posted by fodonbow on March 12th, 2014
How To Install A Second Hard Drive To M6700
The person who posted this question about this Dell product did not include a detailed explanation. Please use the "Request More Information" button to the right if more details would help you to answer this question.
Current Answers
Answer #1: Posted by prateekk007 on March 12th, 2014 3:12 PM
prateekk007

Member since:
December 5th, 2012 Points: 2,137,520

Member since:
December 5th, 2012 Points: 2,137,520
Hi fodonbow,
Please click on the link below and refer to page number 20 to get the instructions for installing the secondary hard drive:
Pease reply if you have further queries.
To know more about Dell Product Support, Drivers & Downloads, Order & Dispatch status -> choose your region US Customers; India Customers. For Here for Dell support videos.Thanks & Regards
Prateek K
Related Dell M6700 Manual Pages
User Manual - Page 1
...USB 3.0 connector 10. hard drive
12. device status lights 21. volume control buttons (3)
Regulatory Model: P21F, P22F Regulatory Type: P21F001, P22F001
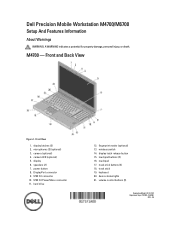
2012 - 06 M4700 - Front View
1. power button 8. USB 3.0 PowerShare connector 11. speakers (2) 7. track-stick buttons (3) 18. track stick 19. Dell Precision Mobile Workstation M4700/M6700
Setup And Features Information
About...
User Manual - Page 3
dock I/O port
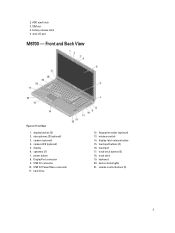
M6700 - display 6. speakers (2) 7. keyboard 20. Front and Back View
Figure 4. microphones (2) (optional) 3. power button ... 11. battery release latch 5. camera LED (optional) 5. volume control buttons (3)
3 HDD eject latch 3. hard drive
12. SIM slot 4. touchpad buttons (3) 16. wireless switch 14. track stick 19. device status lights 21.
User Manual - Page 4
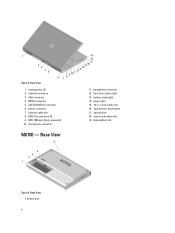
network connector 3. eSATA/USB 2.0 connector 6. microphone connector
M6700 - Base View 1. Back View
1. security cable slot 8. IEEE 1394 port (6-pin, powered) 10. hard-drive status light 13. optical drive 18. battery bay
4 HDMI connector 5. USB 2.0 connectors (2) 9. headphone connector 12. power light 15. 10-in-1 card reader slot 16. battery status light 14. ...
Owner's Manual - Page 3
... Card (Optional 16 Removing the Optical Drive...16 Installing the Optical Drive...17 Removing the Primary Hard Drive...18 Installing the Primary Hard Drive...19 Removing the Secondary Hard Drive...19 Installing the Secondary Hard Drive...20 Removing the Coin-Cell Battery...20 Installing the Coin-Cell Battery...21 Removing the Processor Fan...21 Installing the Processor Fan...22 Removing the Video...
Owner's Manual - Page 18
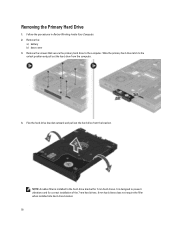
... screws that secure the primary hard drive to prevent vibrations and for 7 mm hard drives. It is installed to the unlock position and pull out the hard drive from the bracket. Slide the primary hard drive latch to the hard-drive bracket for correct installation of the 7 mm hard drives. 9 mm hard drives does not require the filler when installed into hard-drive bracket. 18
Remove the...
Owner's Manual - Page 19
... base cover 3. Remove the secondary hard drive from the computer.
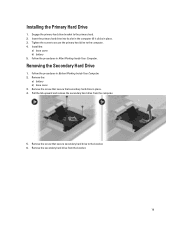
5. Installing the Primary Hard Drive
1. Engage the primary hard drive bracket to the computer. 4. Removing the Secondary Hard Drive
1. Pull the tab upward and remove the secondary hard drive from the bracket.
19 Tighten the screw to secure the primary hard drive to the primary hard . 2. Install the:
a) base cover...
Owner's Manual - Page 20
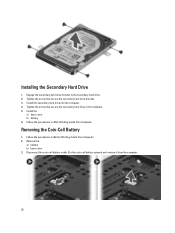
Removing the Coin-Cell Battery
1. Remove the:
a) battery b) base cover 3. Installing the Secondary Hard Drive
1. Engage the secondary hard drive bracket to the secondary hard drive. 2. Install the secondary hard drive into the computer. 4. Install the:
a) base cover b) battery 6. Follow the procedures in Before Working Inside Your Computer. 2.
Follow the procedures in After Working Inside ...
Owner's Manual - Page 34
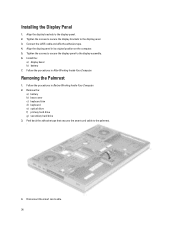
Align the display brackets to the palmrest.
4. Install the:
a) display bezel b) battery 7. Remove the:
a) battery b) base cover c) keyboard trim d) keyboard e) optical drive f) primary hard drive g) secondary hard drive 3. Disconnect the smart card cable.
34 Removing the Palmrest
1. Connect the LVDS cable and affix the adhesive tape. 4. Peel back the adhesive tape that secures ...
Owner's Manual - Page 39
... system board and the smart card.
39 Connect the smart card cable and affix the adhesive tape that secures it snaps in place.
2. Install the: a) secondary hard drive b) primary hard drive c) optical drive d) keyboard e) keyboard trim f) base cover g) battery 8. Follow the procedures in After Working Inside Your Computer. Connect the following cables:
a) bluetooth module b) power button...
Owner's Manual - Page 40
4. Install the:
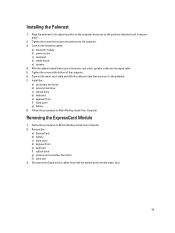
a) palm rest b) primary and secondary hard drive c) optical drive d) keyboard e) keyboard trim f) base cover g) battery h) ExpressCard 5. Follow the procedures in After Working Inside Your Computer. Insert the ... Tighten the screws to secure the ExpressCard module to the computer 3. Removing the Heat Sink
1.
Remove the:
40 Installing the ExpressCard Module
1.
Owner's Manual - Page 41
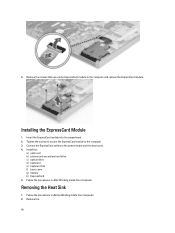
... the captive screws that secure the heat sink to the system board. 4.
Connect the camera cable to the computer.
4. Install the:
a) processor fan b) palm rest c) primary and secondary hard drive d) optical drive e) keyboard
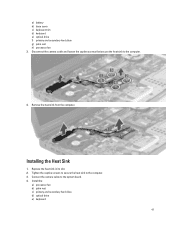
41 Installing the Heat Sink
1. Replace the heat sink in its slot. 2. Tighten the captive screws to secure the heat sink to...
Owner's Manual - Page 42
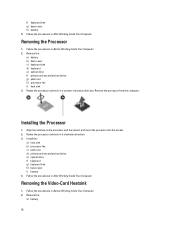
...the:
a) battery
42 Rotate the processor cam lock in a clockwise direction. 3. Rotate the processor cam lock in a counter-clockwise direction. Install the:
a) heat sink b) processor fan c) palm rest d) primary and secondary hard drive e) optical drive f) keyboard g) keyboard trim h) base cover i) battery 4. Follow the procedures in Before Working Inside Your Computer. 2. Follow the procedures in...
Owner's Manual - Page 43
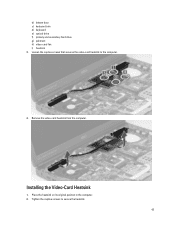
... the computer. 2. b) bottom door c) keyboard trim d) keyboard e) optical drive f) primary and secondary hard drive g) palmrest h) video-card fan i) heatsink 3.
Remove the video-card heatsink from the computer. Loosen the captive screws that secures the video-card heatsink to secure the heatsink.
43 Tighten the captive screws to the computer.
4. Installing the Video-Card Heatsink
1.
Owner's Manual - Page 44
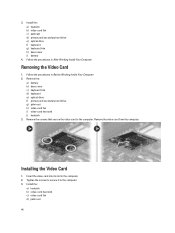
.... 2. Remove the screws that secure the video card to the computer. 3. Tighten the screws to secure it to the computer.
Install the: a) heatsink b) video-card fan c) palmrest d) primary and secondary hard drive e) optical drive f) keyboard g) keyboard trim h) base cover i) battery
4. Remove the video card from the computer. Follow the procedures in Before Working Inside...
Owner's Manual - Page 46
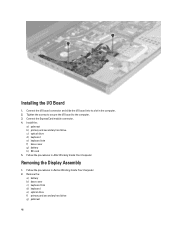
... 2. Remove the:
a) battery b) base cover c) keyboard trim d) keyboard e) optical drive f) primary and secondary hard drive g) palmrest
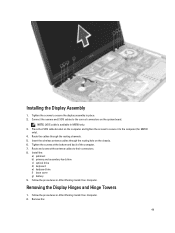
46 Installing the I /O board into its slot in the computer. 2. Removing the Display Assembly
1.
Install the:
a) palmrest b) primary and secondary hard drive c) optical drive d) keyboard e) keyboard trim f) base cover g) battery h) SD card 5. Connect the...
Owner's Manual - Page 49
... the cables through the routing hole on the system board. Install the:
a) palmrest b) primary and secondary hard drive c) optical drive d) keyboard e) keyboard trim f) base cover g) battery 9. Remove the:
49 NOTE: LVDS cable is available in After Working Inside Your Computer. Follow the procedures in M6700 only. 3. Tighten the screws to the correct connectors on the...
Owner's Manual - Page 50
....
4. a) battery b) base cover c) keyboard trim d) keyboard e) optical drive f) primary and secondary hard drive g) palmrest h) display assembly i) display bezel
3. Repeat steps 3 and 4 to the computer.
3.
Install the: a) display bezel b) display assembly c) palmrest d) primary and secondary hard drive e) optical drive f) keyboard g) keyboard trim h) base cover i) battery
5. Removing the...
Owner's Manual - Page 51

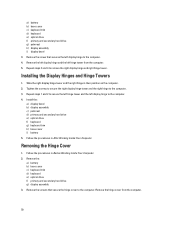
... Inside Your Computer. 2. Remove the:
a) SD card b) ExpressCard c) battery d) base cover e) keyboard trim f) keyboard g) optical drive h) primary and secondary hard drive i) primary memory j) secondary memory k) video-card fan l) palmrest m) heatsink n) processor o) video-card heatsink.
51 Installing the Hinge Cover
1. Place the hinge cover in its position on the computer. 2. Tighten the screws...
Owner's Manual - Page 55
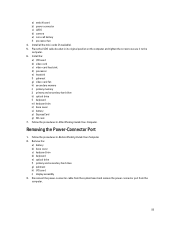
...battery p) ExpressCard q) SD card 7. Remove the:
a) battery b) base cover c) keyboard trim d) keyboard e) optical drive f) primary and secondary hard drive g) palmrest h) I /O board b) video card c) video-card heat sink. Install all the mini-cards (if available). 5. Install the: a) I /O board i) display assembly 3. a) switch board b) power connector c) LVDS d) camera e) coin-cell battery...
Owner's Manual - Page 79
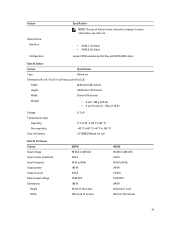
... A 50 Hz to 60 Hz 180 W 9.23 A 19.50 VDC 180 W 30 mm (1.18 inches) 155 mm (6.10 inches)
M6700 90 VAC to 264 VAC 3.50 A 50 Hz to 149 °F) 3 V CR2032 lithium ion cell
Table 29. Feature
Optical Drive: Interface Configuration
Specification NOTE: The size of the hard drive is bound to change.
Similar Questions


How To Install Hard Drive In Dell Insporin N5030
(Posted by sunistren 10 years ago)

Two 2560x1600 Monitors With Dell M6700
I need to attach two xternal 30" monitors to my new Dell m6700. Is this possible, and if so, how is ...
I need to attach two xternal 30" monitors to my new Dell m6700. Is this possible, and if so, how is ...
(Posted by stephenmarcus1 11 years ago)