Dell Latitude E6430 Support Question
Dell Latitude E6430 Support Question
Find answers below for this question about Dell Latitude E6430.Need a Dell Latitude E6430 manual? We have 5 online manuals for this item!
Question posted by davidTrout on October 19th, 2014
Does Latitude E6430 Require A Bluetooth Card
The person who posted this question about this Dell product did not include a detailed explanation. Please use the "Request More Information" button to the right if more details would help you to answer this question.
Current Answers
Answer #1: Posted by DellRajathN on October 19th, 2014 8:29 PM
DellRajathN

Member since:
April 21st, 2014 Points: 56,210

Member since:
April 21st, 2014 Points: 56,210
Related Dell Latitude E6430 Manual Pages
User Manual - Page 5
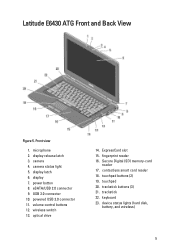
... 9. wireless switch 13. optical drive
14. Secure Digital (SD) memory-card
reader 17. trackstick 22. display latch 6. display 7. USB 3.0 connector ... 3.0 connector 11. camera status light 5. contactless smart card reader 18. trackstick buttons (3) 21. Front view
1. ExpressCard slot 15. keyboard 23. Latitude E6430 ATG Front and Back View
Figure 5. microphone 2. volume...
User Manual - Page 6
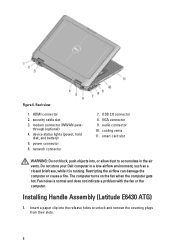
... card slot
WARNING: Do not block, push objects into the release holes to accumulate in a low-airflow environment, such as a closed briefcase, while it is normal and does not indicate a problem with the fan or the computer. Do not store your Dell computer in the air vents. Installing Handle Assembly (Latitude E6430 ATG...
User Manual - Page 9
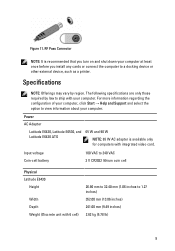
... and Latitude E6430 ATG
65 W and 90 W
NOTE: 65 W AC adapter is recommended that you turn on and shut down your computer at least once before you install any cards or ...computer.
The following specifications are only those required by region.
Input voltage Coin-cell battery
100 VAC to 240 VAC 3 V CR2032 lithium coin cell
Physical Latitude E6430
Height
Width Depth Weight (Discrete unit with ...
Owner's Manual - Page 4
... the Processor...26 Installing the Processor...26 Removing the Bluetooth Card...26 Installing the Bluetooth Card...28 Removing the Coin-Cell Battery...28 Installing the ...32 Removing the Power LED Board...33 Installing the Power LED Board...34 Removing the Modem Card...34 Installing the Modem Card...35 Removing the Modem Connector...35 Installing the Modem Connector...37 Removing the Input/Output ...
Owner's Manual - Page 26

....
4. Follow the procedures in Before Working Inside Your Computer. 2.
Remove:
a) battery b) hard drive
26
Install:
a) heat sink b) base cover c) battery 4. Removing the Processor
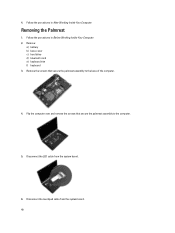
1. Removing the Bluetooth Card
1.
Owner's Manual - Page 27
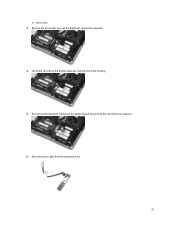
Lift up the card along the bottom edge and remove it from the computer. 6. Disconnect the bluetooth cable from the system board and remove the card from the housing. 5. Remove the screw that secures the bluetooth card to the computer. 4. Disconnect the cable from the bluetooth card.
27 c) base cover 3.
Owner's Manual - Page 28
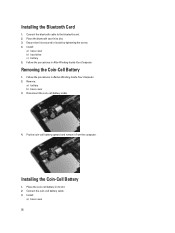
... slot by tightening the screw. 4.
Follow the procedures in its slot. 3. Installing the Coin-Cell Battery
1. Connect the bluetooth cable to the bluetooth card. 2. Install:
a) base cover
28 Ensure that it from the computer. Place the bluetooth card in Before Working Inside Your Computer. 2. Follow the procedures in its slot. 2. Remove:
a) battery b) base cover 3. Installing...
Owner's Manual - Page 29
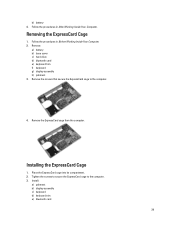
... that secure the ExpressCard cage to the computer. 3. Place the ExpressCard cage into its compartment. 2.
b) battery 4. Remove:
a) battery b) base cover c) hard drive d) bluetooth card e) keyboard trim f) keyboard g) display assembly h) palmrest 3. Removing the ExpressCard Cage
1. Remove the ExpressCard cage from the computer. Install:
a) palmrest b) display assembly c) keyboard...
Owner's Manual - Page 30
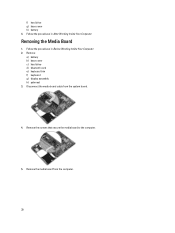
... the screws that secure the media board to the computer.
5. Follow the procedures in Before Working Inside Your Computer. 2.
Remove:
a) battery b) base cover c) hard drive d) bluetooth card e) keyboard trim f) keyboard g) display assembly h) palmrest 3.
Owner's Manual - Page 31
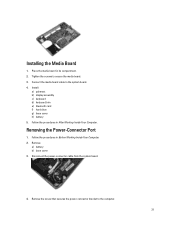
... Port
1. Remove:
a) battery b) base cover 3. Remove the screw that secures the power-connector bracket to the system board. 4. Install:
a) palmrest b) display assembly c) keyboard d) keyboard trim e) bluetooth card f) hard drive g) base cover h) battery 5. Installing the Media Board
1. Connect the media board cable to the computer.
31 Follow the procedures in Before Working Inside...
Owner's Manual - Page 35
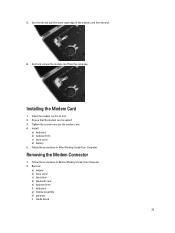
...a) keyboard b) keyboard trim c) base cover d) battery 5. Remove:
a) battery b) base cover c) hard drive d) bluetooth card e) keyboard trim f) keyboard g) display assembly h) palmrest i) media board
35 Hold and remove the modem card from the slot.
6. Installing the Modem Card
1. Ensure that the modem card is seated. 3. Follow the procedures in After Working Inside Your Computer. Removing...
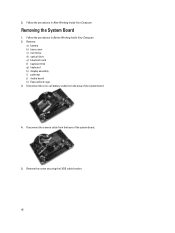
Owner's Manual - Page 37
... bracket. 4. Install:
a) system board b) ExpressCard cage c) media board d) palmrest e) display assembly f) keyboard g) keyboard trim h) bluetooth card i) hard drive j) base cover k) battery 7. Remove:
a) battery b) base cover c) hard drive d) optical drive e) bluetooth card f) keyboard trim g) keyboard h) display assembly i) palmrest j) media board k) ExpressCard cage l) system board
37
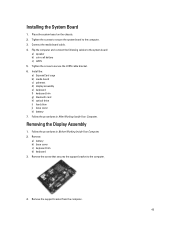
Owner's Manual - Page 38

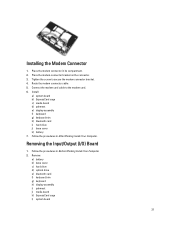
... screw that secures the I/O board to secure the I /O board from the computer. Install:
a) system board b) ExpressCard cage c) media board d) palmrest e) display assembly f) keyboard g) keyboard trim h) bluetooth card i) hard drive j) optical drive k) base cover l) battery 4.
Place the I /O) Board
1. Remove:
a) battery b) base cover
38 Remove the I /O board. 3.
Owner's Manual - Page 39
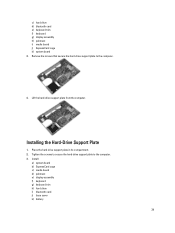
... to secure the hard-drive support plate to the computer.
4. Install:
a) system board b) ExpressCard cage c) media board d) palmrest e) display assembly f) keyboard g) keyboard trim h) hard drive i) bluetooth card j) base cover k) battery
39
Place the hard-drive support plate in its compartment. 2. Installing the Hard-Drive Support Plate
1. Lift the hard-drive support plate...
Owner's Manual - Page 40
Remove:
a) battery b) base cover c) hard drive d) bluetooth card e) keyboard trim f) keyboard 3. Remove the screws that secure the palmrest assembly to the base of the computer.
4. Disconnect the touchpad cable from the system board.
6. 4.
...
Owner's Manual - Page 42
... the procedures in After Working Inside Your Computer. Remove the screw securing the LVDS cable bracket.
42 Remove:
a) battery b) base cover c) hard drive d) optical drive e) bluetooth card f) keyboard trim g) keyboard h) display assembly i) palmrest j) media board k) ExpressCard cage 3.
Owner's Manual - Page 45
... following cables to the computer. 3. Remove the support bracket from the computer.
45 Install the: a) ExpressCard cage b) media board c) palmrest d) display assembly e) keyboard f) keyboard trim g) bluetooth card h) optical drive i) hard drive j) base cover k) battery 7. Tighten the screws to secure the system board to the system board:
a) speaker b) coin-cell battery c) LVDS 5.
Owner's Manual - Page 53
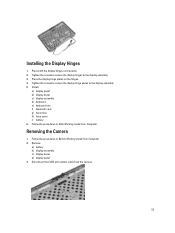
Place both the display hinges on the hinges. 4. Install:
a) display panel b) display bezel c) display assembly d) keyboard e) keyboard trim f) bluetooth card g) hard drive h) base cover i) battery 6. Follow the procedures in Before Working Inside Your Computer. 2. Tighten the screws to secure the display hinges to the display ...
Owner's Manual - Page 56
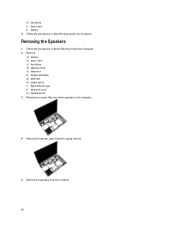
Remove:
a) battery b) base cover c) hard drive d) keyboard trim e) keyboard f) display assembly g) palmrest h) media board i) ExpressCard cage j) bluetooth card k) system board 3. Remove the speakers from the routing channel.
5.
Follow the procedures in Before Working Inside Your Computer. 2. Follow the procedures in After Working Inside ...
Statement of Volatility - Page 3
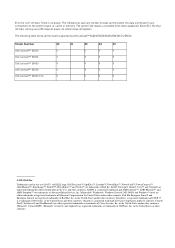
... require a complete boot when awakened. The system will remain in the United States and/or other countries. in the U.S. The OS does not save any component on which clears all the states supported by Dell Latitude™ E6230/E6330/E6430/E6430ATG/E6530
Model Number Dell Latitude™ E6230 Dell Latitude™ E6330 Dell Latitude™ E6430 Dell Latitude...
Similar Questions

How To Insert A Memory Card To Dell Latitude E6430
(Posted by suSUPER 9 years ago)


How To Remove Memory From Dell Laptop Latitude E6430
(Posted by kjcGBor 10 years ago)

How To Enable Bluetooth On Laptop Dell Latitude E5420
(Posted by kirni 10 years ago)

Dell Laptop Latitude E6430
Does the Dell Latitude E6430 have a built in microphone?
Does the Dell Latitude E6430 have a built in microphone?
(Posted by andy97319 11 years ago)