Dell Latitude E6330 Support Question
Dell Latitude E6330 Support Question
Find answers below for this question about Dell Latitude E6330.Need a Dell Latitude E6330 manual? We have 5 online manuals for this item!
Question posted by wielbig on June 5th, 2014
Dell E6330 How To Remove A Locked Optical Drive
The person who posted this question about this Dell product did not include a detailed explanation. Please use the "Request More Information" button to the right if more details would help you to answer this question.
Current Answers


Related Dell Latitude E6330 Manual Pages
User Manual - Page 3
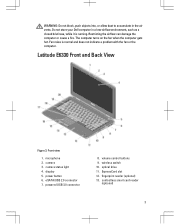
camera status light 4. optical drive 11. Latitude E6330 Front and Back View
Figure 3. eSATA/USB 2.0 connector 7. wireless switch 10. volume control buttons 9. Restricting the airflow can damage the computer... briefcase, while it is normal and does not indicate a problem with the fan or the computer. Do not store your Dell computer in the air vents. ExpressCard slot 12.
Owner's Manual - Page 3
...) card 13 Installing the SIM Card...14 Removing the Hard Drive...14 Installing the Hard Drive...15 Removing the Optical Drive...16 Installing the Optical Drive...17 Removing the Base Cover...18 Installing the Base Cover...18 Removing the Keyboard Trim...18 Installing the Keyboard Trim...19 Removing the Keyboard...19 Installing the Keyboard...21 Removing the Wireless Local Area Network (WLAN...
Owner's Manual - Page 16

Remove the drive latch from the optical drive.
16 Push in Before Working Inside Your Computer. 2. Remove the screw that secures the drive latch to release it.
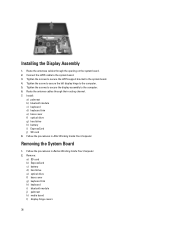
4. Removing the Optical Drive
1. Slide and remove the hard drive out of the computer.
5. Follow the procedures in the eject handle on the optical drive to the optical drive.
6. Remove the battery. 3.
Owner's Manual - Page 17

Pull and remove the drive caddy away from the optical drive.
9. Remove the drive-latch bracket from the optical drive. Secure the drive-latch bracket to the optical drive.
8. Remove the screws that secure the drive-latch bracket to the optical drive.
17 7.
Installing the Optical Drive
1. Secure the optical drive caddy to the optical drive. 2.
Owner's Manual - Page 18

... Keyboard Trim
1. Tighten the screw to secure the optical-drive latch to the computer.
4. Remove the battery. 3. Install the battery. 9. Follow the procedures in After Working Inside Your Computer. Remove the screws that secure the base cover to the optical drive. 4. Place the base cover to secure the optical drive. 8. Flip the computer, and push in the eject...
Owner's Manual - Page 26

Disconnect the touchpad cable from the system board.
6. e) optical drive f) base cover g) keyboard trim h) keyboard i) bluetooth module 3. Remove the screws that secure the palmrest assembly to the base of the computer.
5. Disconnect the LED-board cable from the system board.
26 Remove the screws that secure the palmrest assembly to the front of the computer.
4.
Owner's Manual - Page 28

... hard drive g) battery h) ExpressCard i) SD card 6. Remove:
a) SD card b) ExpressCard c) battery d) hard drive e) optical drive f) base cover g) keyboard trim h) keyboard i) bluetooth module j) palmrest 3. Disconnect the media-board cable from the computer.
28 Remove the media board from the system board.
4.
Follow the procedures in Before Working Inside Your Computer. 2. Remove the...
Owner's Manual - Page 29

... Inside Your Computer.
2. Follow the procedures in After Working Inside Your Computer. Connect the media-board cable to secure the media board.
3. Remove: a) SD card b) ExpressCard c) battery d) hard drive e) optical drive f) base cover g) keyboard trim h) keyboard i) bluetooth module j) palmrest
3. Place the media board in its compartment.
2. Installing the Media Board
1.
Tighten the...
Owner's Manual - Page 30

.... 2. Connect the ExpressCard cable to the computer. 3.
4. Installing the ExpressCard Cage
1. Install:
a) palmrest b) bluetooth module c) keyboard d) keyboard trim e) base cover f) optical drive g) hard drive h) battery i) ExpressCard 30 Tighten the screws to secure the ExpressCard cage to the system board. 4. Remove the screws that secure the ExpressCard cage to the computer.
5.
Owner's Manual - Page 31

... that secure the speakers to the computer.
31 Remove:
a) SD card b) ExpressCard c) battery d) hard drive e) optical drive f) base cover g) keyboard trim h) keyboard i) bluetooth module j) palmrest 3. Follow the procedures in After Working Inside Your Computer. Follow the procedures in Before Working Inside Your Computer. 2.
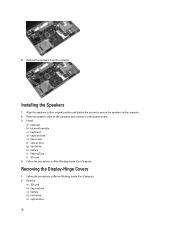
Removing the Speakers
1. Release the speaker cable from the...
Owner's Manual - Page 32
... secure the speakers to the system board. 3.
Follow the procedures in After Working Inside Your Computer. Remove:
a) SD card b) ExpressCard c) battery d) hard drive e) optical drive
32 Follow the procedures in Before Working Inside Your Computer. 2. Installing the Speakers
1. Removing the Display-Hinge Covers
1. Route the speaker cable on the computer and connect it to the...
Owner's Manual - Page 33

... procedures in After Working Inside Your Computer. Follow the procedures in Before Working Inside Your Computer. 2. Install:
a) palmrest b) bluetooth module c) keyboard d) keyboard trim e) base cover f) optical drive g) hard drive h) battery i) ExpressCard j) SD card 3. Installing the Display Hinge Covers
1. Remove the display-hinge covers from the computer.
Owner's Manual - Page 34

... their routing on the computer.
4. Remove the screws that secures the left display hinge to the computer.
5. a) SD card b) ExpressCard c) battery d) hard drive e) optical drive f) base cover g) keyboard trim h) keyboard i) bluetooth module j) palmrest 3. Remove the screw that secure the Low-Voltage Differential Signaling (LVDS) support bracket.
34 Remove the screws that secure the display...
Owner's Manual - Page 36
... h) battery i) ExpressCard j) SD card 8. Installing the Display Assembly
1. Follow the procedures in Before Working Inside Your Computer. 2. Remove:
a) SD card b) ExpressCard c) battery d) hard drive e) optical drive f) base cover g) keyboard trim h) keyboard i) bluetooth module j) palmrest k) media board l) display-hinge covers
36 Tighten the screws to secure the display assembly...
Owner's Manual - Page 39

... the heat sink cable from the system board.
4. Removing the Heat Sink
1. Follow the procedures in After Working Inside Your Computer. Follow the procedures in Before Working Inside Your Computer. 2.
Remove the screws that secure the heat sink to the system board.
39 g) keyboard trim h) base cover i) optical drive j) hard drive k) battery l) ExpressCard m) SD card 5.
Owner's Manual - Page 40

Install:
a) system board b) display assembly c) display hinge covers d) media board e) palmrest f) bluetooth module g) keyboard h) keyboard trim i) base cover j) optical drive k) hard drive l) battery m) ExpressCard n) SD card 5. Follow the procedures in After Working Inside Your Computer. Remove the heat sink from the system board. Place the heat sink into its original position on the system...
Owner's Manual - Page 42

... the Input/Output (I/O) Board
1. e) palmrest f) bluetooth module g) keyboard h) keyboard trim i) base cover j) optical drive k) hard drive l) battery m) ExpressCard n) SD card 5. Remove:
a) SD card b) ExpressCard c) battery d) hard drive e) optical drive f) base cover g) keyboard trim h) keyboard i) bluetooth module j) palmrest k) media board l) display hinge covers m) display assembly n) system...
Owner's Manual - Page 57

... access the System Setup screen.
NOTE: For most of the system setup options, changes that you make are :
• Removable Drive (if available) • STXXXX Drive NOTE: XXX denotes the SATA drive number. • Optical Drive • Diagnostics NOTE: Choosing Diagnostics, will display the ePSA diagnostics screen. Down arrow
Moves to the next field.
57 Navigation...
Specifications - Page 1
..., and a powder-coated base, the E6330 is designed for flexible data encryption across the E-family line, and easily share optical drives, hard drives and batteries between select laptops. Dell also offers KACE appliances to better deploy, configure, manage, and update those devices. All systems are the most environmentally-responsible Latitude laptops ever. Confidently safeguard data with...
Specifications - Page 2
... connector (RJ-45), USB 2.0 (1) - 1 USB/eSATA combo; Discover leading-edge laptops at Dell.com/Latitude
1. For more of system memory. 8.
EPEAT Silver (France, Germany, Sweden)
Intel&#... Options Chipset and Intel Responsiveness Technologies Graphics8 Options Display Storage9 Options
Optical Drive Options Multimedia Options Battery Options
Power Options Connectivity
Ports, Slots &...
Similar Questions

Num Lock Function On The Latitude E6330
Where is the num lock key on the dell latitude e6330 laptop ? it is on and I need to turn it off
Where is the num lock key on the dell latitude e6330 laptop ? it is on and I need to turn it off
(Posted by Melvadegiorgio87 9 years ago)


How Do You Remove The Optical Drive From A E6430
(Posted by agraynakigi 10 years ago)
Dell Latitude E5520 Optical Drives
Hello, I am looking at upgrading a Dell Latitude E5520 laptop DVD-ROM drive to a DVD-/+RW drive. Ho...
Hello, I am looking at upgrading a Dell Latitude E5520 laptop DVD-ROM drive to a DVD-/+RW drive. Ho...
(Posted by rexshaffer 11 years ago)