Dell Latitude E5430 Support Question
Dell Latitude E5430 Support Question
Find answers below for this question about Dell Latitude E5430.Need a Dell Latitude E5430 manual? We have 3 online manuals for this item!
Question posted by hernaroc on July 27th, 2014
How To Remove Bios Battery Fro My Lap Top Dell Latitiud E5430
The person who posted this question about this Dell product did not include a detailed explanation. Please use the "Request More Information" button to the right if more details would help you to answer this question.
Current Answers
Related Dell Latitude E5430 Manual Pages
User Manual - Page 2
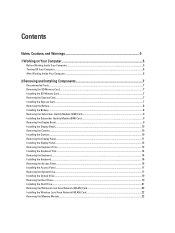
......5 Turning Off Your Computer...6 After Working Inside Your Computer...6
2 Removing and Installing Components 7
Recommended Tools...7 Removing the SD Memory Card...7 Installing the SD Memory Card...7 Removing the Express Card...7 Installing the Express Card...7 Removing the Battery...8 Installing the Battery...8 Removing the Subscriber Identity Module (SIM) Card 9 Installing the Subscriber...
User Manual - Page 3
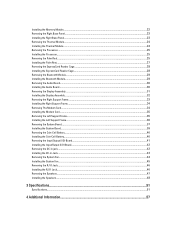
... Left Support Frame...35 Installing the Left Support Frame...36 Removing the System Board...37 Installing the System Board...39 Removing the Coin-Cell Battery...40 Installing the Coin-Cell Battery...40 Removing the Input/Output (I/O) Board...41 Installing the Input/Output (I/O) Board...42 Removing the DC-in jack...42 Installing the DC-in Jack...43...
User Manual - Page 5

...and certain components may only be replaced or--if purchased separately--installed by performing the removal procedure in on the locking tabs before you disconnect the cable. Disconnect all attached devices... shipped with your computer, read the safety information that is not authorized by Dell is unplugged to servicing that shipped with the product. Unless otherwise noted, each...
User Manual - Page 8
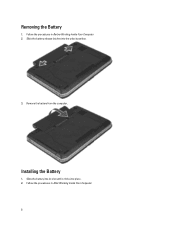
Installing the Battery
1. Follow the procedures in Before Working Inside Your Computer. 2. Slide the battery release latches into place. 2. Slide the battery into its slot until it clicks into the unlock position.
3. Remove the battery from the computer. Removing the Battery
1. Follow the procedures in After Working Inside Your Computer. 8
User Manual - Page 9
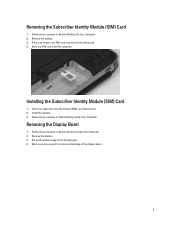
Installing the Subscriber Identity Module (SIM) Card
1.
Remove the battery. 3. Insert the subscriber identity module (SIM) card ...release the SIM card located on the battery wall. 4. Slide the SIM card from the computer. Removing the Display Bezel
1. Remove the battery. 3. Removing the Subscriber Identity Module (SIM) Card
1. Install the battery. 3. Follow the procedures in After...
User Manual - Page 10
....
Disconnect the camera cable. 4.
Install:
a) display bezel
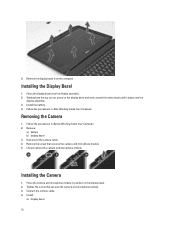
10 5. Place the display bezel onto the display assembly. 2. Install the battery. 4. Removing the Camera
1.
Installing the Display Bezel
1. Remove:
a) battery b) display bezel 3. Remove the screw that secures the camera and microphone module. 3. Starting from the computer . Follow the procedures in position on the...
User Manual - Page 11
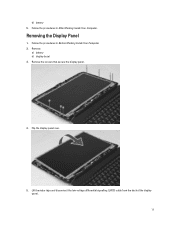
Removing the Display Panel
1. Remove:
a) battery b) display bezel 3. Lift the mylar tape and disconnect the low-voltage differential signalling (LVDS) cable from the back of the display panel. 11
Flip the display panel over.
5. Remove the screws that secure the display panel.
4. Follow the procedures in After Working Inside Your Computer. Follow the procedures in...
User Manual - Page 12
Installing the Display Panel
1. Connect the low-voltage differential signaling (LVDS) cable to the display panel. 2. Remove the battery. 3. Install the screws that secure the display panel. 6. Flip the display panel over and install the screws that secure the display brackets to the display ...
User Manual - Page 14
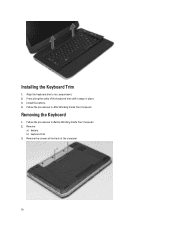
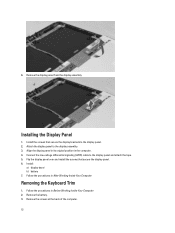
... the procedures in After Working Inside Your Computer. Align the keyboard trim to its compartment. 2.
Remove:
a) battery b) keyboard trim 3. Press along the sides of the computer.
14 Follow the procedures in Before Working Inside Your Computer. 2. Removing the Keyboard
1. Remove the screws at the back of the keyboard trim until it snaps in place. 3.
User Manual - Page 16
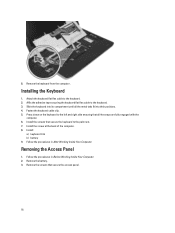
...down on the keyboard to the keyboard. 2. Install:
a) keyboard trim b) battery 9. Remove the battery. 3. Remove the screws that all the metal tabs fit into their positions. 4. Affix the...Inside Your Computer. 8. Install the screws that secure the keyboard to the keyboard. 3. Removing the Access Panel
1.
Attach the keyboard flat flex cable to the left and right side ensuring that secure ...
User Manual - Page 17
... to the computer. 3. Follow the procedures in After Working Inside Your Computer. Remove:
a) battery b) access panel
17
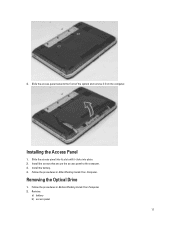
Installing the Access Panel
1.
Follow the procedures in Before Working Inside Your Computer. 2. Removing the Optical Drive
1. Slide the access panel into place. 2. Install the battery. 4. Slide the access panel towards the front of the system and...
User Manual - Page 19
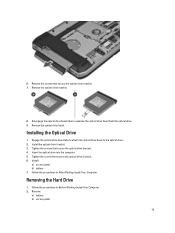
... the Optical Drive
1. Follow the procedures in Before Working Inside Your Computer. 2. Disengage the optical drive bezel tabs to the optical drive. 2. Install:
a) access panel b) battery 7. Removing the Hard Drive
1. Insert the optical drive into the computer...
User Manual - Page 21

...
1. Engage the hard drive bracket to the hard drive. 2. Tighten the screws that secure the hard drive bracket.
7. Install:
a) access panel b) battery 6.
Install the hard drive into the computer. 4. Remove the hard drive bracket from the hard drive. Tighten the screw that secures the hard drive bracket in After Working Inside Your...
User Manual - Page 22
... procedures in Before Working Inside Your Computer. 2.
Connect the antenna cables to the system board.
22 Remove:
a) battery b) access panel 3. Insert the memory into its connector at a 45-degree angle into the memory socket. 2. Remove:
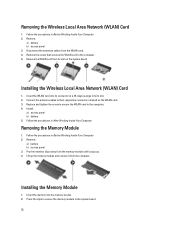
a) battery b) access panel 3. Removing the Wireless Local Area Network (WLAN) Card
1. Follow the procedures in Before Working Inside Your Computer...
User Manual - Page 23
... the computer.
Install:
a) access panel b) battery
23 Install: a) access panel b) battery
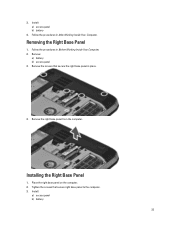
4. Remove:
a) battery b) access panel 3. Remove the screws that secure right base panel to the computer. 3. Tighten the screws that secure the right base panel in Before Working Inside Your Computer. 2.
Place the right base panel on the computer. 2. Removing the Right Base Panel
1. Installing...
User Manual - Page 37
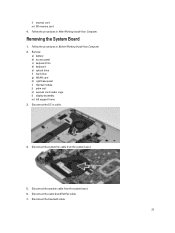
... the System Board
1. Disconnect the system fan cable from the system board. 6. Disconnect the bluetooth cable.
37 Disconnect the speaker cable from the system board.
5. Remove:
a) battery b) access panel c) keyboard trim d) keyboard e) optical drive f) hard drive g) WLAN card h) right base panel i) thermal module j) palm rest k) express card reader cage l) display assembly m) left...
User Manual - Page 59

... after you add, change, or remove any hardware in this section may or...battery status and the type of AC adapter connected to the computer
59 Turn on the computer and its installed devices, the items listed in your computer. • set the type of your computer.
• System Information: Displays BIOS...again.
When the blue DELL logo is displayed, you must watch for ...
Setup and Features Information Tech Sheet - Page 1
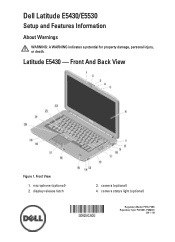
... View
Figure 1. display release latch
3. Front View
1. camera status light (optional)
Regulatory Model: P27G, P28G Regulatory Type: P27G001, P28G001
2011 - 09
microphone (optional) 2. camera (optional) 4. Dell Latitude E5430/E5530
Setup and Features Information
About Warnings
WARNING: A WARNING indicates a potential for property damage, personal injury, or death.
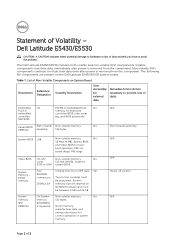
Statement of Volatility - Page 1
... diags), PXE diags.
Statement of data and tells you how to avoid the problem. Dell Latitude E5430/E5530
CAUTION: A CAUTION indicates either potential damage to hardware or loss of Volatility - Volatile components lose their data even after power is removed from the component. Non-volatile (NV) components continue to four modules must be populated...
Statement of Volatility - Page 2

... Low-level format/erase
CAUTION: All other countries. Secondary power loss (removing the on-board coin-cell battery) destroys system data on the system configuration and time-of Novell Inc. Trademarks used in this text: Dell™, the DELL logo, Dell Precision™, OptiPlex™, Latitude™, PowerEdge™, PowerVault™, PowerConnect™, OpenManage™, EqualLogic...
Similar Questions


How To Delete Bios Admin Password On Latitude E5430
(Posted by 2005foosd 9 years ago)

I Cannot Find Any Latch To Remove The Battery , How Can
I remove the battery of this xps 14 laptop
I remove the battery of this xps 14 laptop
(Posted by Kinasinger 10 years ago)
Dell E5430 Get Shutdown Interminetly,swapped Memory And Hdd The Same, Can Anyone
(Posted by kumarsugesh 11 years ago)

Wake Up Dell Laptop
when I was working on something on my laptop then left for restroom...my laptop went to sleep but I ...
when I was working on something on my laptop then left for restroom...my laptop went to sleep but I ...
(Posted by webmaster95056 11 years ago)