Dell Inspiron One 2330 Support Question
Dell Inspiron One 2330 Support Question
Find answers below for this question about Dell Inspiron One 2330.Need a Dell Inspiron One 2330 manual? We have 2 online manuals for this item!
Question posted by mdrobwood on January 31st, 2014
How To Set Up Webcam On Inspiron One 2330
The person who posted this question about this Dell product did not include a detailed explanation. Please use the "Request More Information" button to the right if more details would help you to answer this question.
Current Answers
Answer #1: Posted by prateekk007 on January 31st, 2014 7:20 AM
prateekk007

Member since:
December 5th, 2012 Points: 2,137,520

Member since:
December 5th, 2012 Points: 2,137,520
Hi mdrobwood,
If you are using Windows 7, please follow the below mentioned steps in order to open the webcam.
- Make sure to start the Dell Webcam Central in a well-lighted area (a blank, black or dark screen can be caused by low light conditions).
- Click Start
- Click All Programs
- Click Dell Webcam
- Click Webcam Central to start the program.
If you are using Windows 8 system, click on the Camera app to open it.
Please reply if you have further queries.
To know more about Dell Product Support, Drivers & Downloads, Order & Dispatch status -> choose your region US Customers; India Customers. For Here for Dell support videos.Thanks & Regards
Prateek K
Related Dell Inspiron One 2330 Manual Pages
Owner's Manual (PDF) - Page 1
Dell Inspiron One 2330 Owner's Manual
Computer model: Inspiron One 2330
Regulatory model: W05C
Regulatory type: W05C001
Owner's Manual (PDF) - Page 2

..., and Warnings
NOTE: A NOTE indicates important information that helps you make better use of Microsoft corporation in this text: Dell™, the DELL logo, and Inspiron™ are not followed.
disclaims any manner whatsoever without notice. © 2012 Dell Inc. All rights reserved.
Microsoft®, Windows®, and the Windows start...
Owner's Manual (PDF) - Page 9
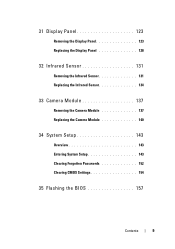
... the Camera Module 137 Replacing the Camera Module 140
34 System Setup 143
Overview 143 Entering System Setup 143 Clearing Forgotten Passwords 152 Clearing CMOS Settings 154
35 Flashing the BIOS 157
Contents
9
Owner's Manual (PDF) - Page 18
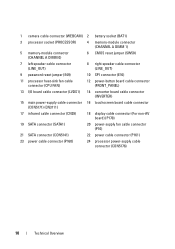
1 camera cable connector (WEBCAM) 2 battery socket (BAT1)
3 processor socket (PROCESSOR)
4 memory-module connector (CHANNEL A DIMM 1)
5 memory-module connector (CHANNEL A DIMM 0)
6 CMOS reset jumper (SW50)
7 left speaker cable connector (LINE_OUT)
8 ...
Owner's Manual (PDF) - Page 75
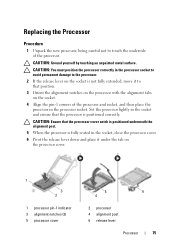
... and ensure that position.
3 Orient the alignment notches on the processor with the alignment tabs on the socket.
4 Align the pin-1 corners of the processor.
Set the processor lightly in the socket, close the processor cover. 6 Pivot the release lever down and place it to that the processor is not fully...
Owner's Manual (PDF) - Page 109
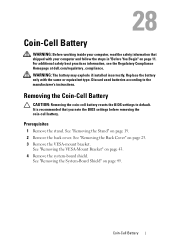
... the VESA-Mount Bracket" on page 19. 2 Remove the back cover.
Removing the Coin-Cell Battery
CAUTION: Removing the coin-cell battery resets the BIOS settings to the manufacturer's instructions. Coin-Cell Battery Discard used batteries according to default. See "Removing the Stand" on page 43. 4 Remove the system-board shield...
Owner's Manual (PDF) - Page 116
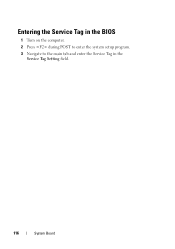
Entering the Service Tag in the BIOS
1 Turn on the computer. 2 Press during POST to enter the system setup program. 3 Navigate to the main tab and enter the Service Tag in the
Service Tag Setting field.
116
System Board
Owner's Manual (PDF) - Page 143
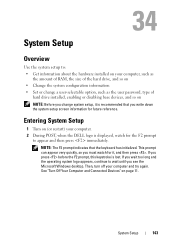
... DELL logo is displayed, watch for the F2 prompt
to wait until you see the Microsoft Windows desktop.
This prompt can appear very quickly, so you must watch for it is lost.
System Setup
...the size of the hard drive, and so on • Change the system configuration information • Set or change a user-selectable option, such as the user password, type of
hard drive installed, ...
Owner's Manual (PDF) - Page 144

... security features. As an option is not present;
Press the up and down -arrow keys to the Setup Item. Scroll up - Information on your current settings. Setup Item - Key Functions - The field is divided into three areas: the setup item, active help screen, and key functions.
Main -
Allows you can view...
Owner's Manual (PDF) - Page 148

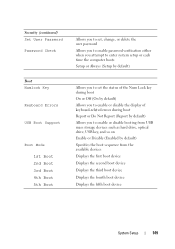
...the supervisor password
Displays the status of the user password
Allows you to set, change, or delete the supervisor password
Allows you to set access levels to the users
No Access, View Only, Limited, or ... option can be configured only if the Auto Power On mode is set to Enabled
Everyday or Selected Day (Selected Day by default)
Allows you to set to Enabled
1 to 31 (15 by default) • No...
Owner's Manual (PDF) - Page 149
... Errors
USB Boot Support
Boot Mode 1st Boot 2nd Boot 3rd Boot 4th Boot 5th Boot
Allows you to set, change, or delete the user password Allows you to enable password verification either when you attempt to enter... system setup or each time the computer boots Setup or Always (Setup by default)
Allows you to set the status of the Num Lock key during boot On or Off (On by default) Allows you to ...
Owner's Manual (PDF) - Page 150
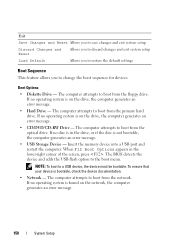
... and exit system setup
Discard Changes and Reset
Allows you to discard changes and exit system setup
Load Default
Allows you to restore the default settings
Boot Sequence
This feature allows you to boot from the primary hard drive. To ensure that your device is on the drive, the computer generates...
Owner's Manual (PDF) - Page 151
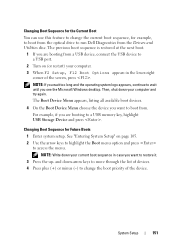
... Utilities disc. The Boot Device Menu appears, listing all available boot devices.
4 On the Boot Device Menu choose the device you see the Microsoft Windows desktop. System Setup
151 Changing Boot Sequence for the Current Boot
You can use this feature to change the boot priority of the screen, press . Changing...
Owner's Manual (PDF) - Page 152
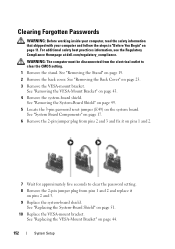
...
System Setup See "Removing the Stand" on pins 1 and 2.
7 Wait for approximately five seconds to clear the password setting.
8 Remove the 2-pin jumper plug from the electrical outlet to clear the CMOS setting.
1 Remove the stand. For additional safety best practices information, see the Regulatory Compliance Homepage at dell.com/regulatory_compliance. See...
Owner's Manual (PDF) - Page 154
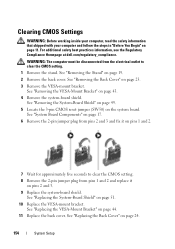
...See "Replacing the VESA-Mount Bracket" on page 11. Clearing CMOS Settings
WARNING: Before working inside your computer, read the safety information that ...it on pins 1 and 2.
7 Wait for approximately five seconds to clear the CMOS setting.
8 Remove the 2-pin jumper plug from the electrical outlet to clear the CMOS setting.
1 Remove the stand. See "Replacing the Back Cover" on page 23.
3 ...
Similar Questions

How To Restart My Inspiron 2330 Desktop To Factory Settings
(Posted by samarte 9 years ago)


How To Set Up Wireless Keyboard For Dell Inspiron 2330
(Posted by WBYDionne 10 years ago)

How To Get To Webcam Settings On Inspiron One Windows 7
(Posted by mabgrdh 10 years ago)